
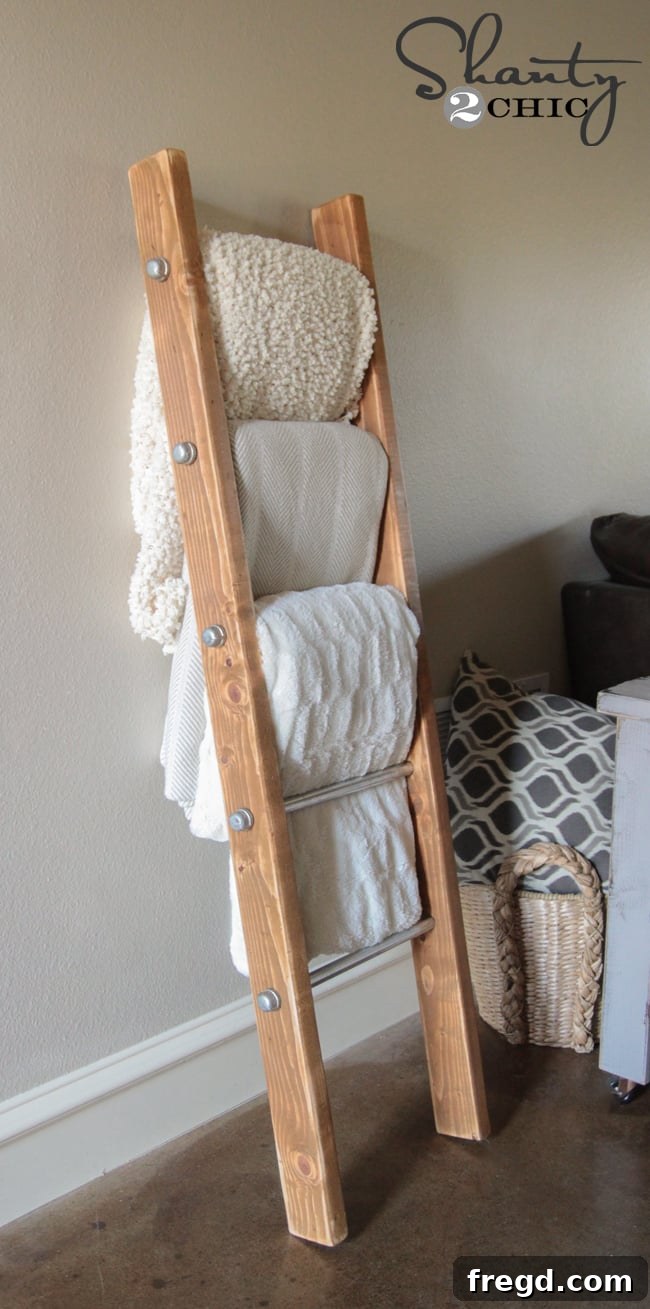
Welcome, fellow DIY enthusiasts! Get ready to transform your living space with a project that’s both stylish and practical. If you’re anything like us, you appreciate home decor that marries rustic charm with industrial flair. Today, we’re diving into building an absolutely stunning wood and metal pipe blanket ladder – a piece that promises to elevate your home organization and add a touch of modern farmhouse chic to any room. Before we begin, remember to connect with us and stay updated on all our latest creations by FOLLOWING us on Instagram and Pinterest!
Build Your Own Industrial Chic Wood and Metal Pipe Blanket Ladder
There’s something incredibly satisfying about creating functional art for your home with your own hands. This project was born out of a little bit of inspiration and a whole lot of creative itch. After witnessing the fantastic DIY metal pipe plate rack that Ash shared a few weeks ago, I immediately developed a serious case of “metal pipe envy.” The clean lines and industrial vibe were simply irresistible. Plus, I had been longing for a stylish blanket ladder ever since her beautiful wooden version made its debut. So, combining these two inspirations, I conceptualized and brought to life this unique wood and metal pipe blanket ladder. It’s not just a place to store blankets; it’s a statement piece!
Isn’t it just captivating? What makes this project even better is its surprising simplicity. Don’t let the custom look intimidate you; this DIY blanket ladder is genuinely one of the most straightforward and rewarding crafts you’ll undertake. It’s perfect for a weekend afternoon, or even a focused “nap time project” if you have little ones! The blend of warm wood tones and cool galvanized metal creates a versatile aesthetic that complements various interior styles, from modern farmhouse to industrial loft, and even bohemian chic.
Why a DIY Wood and Metal Pipe Blanket Ladder?
Beyond its undeniable visual appeal, a DIY blanket ladder offers numerous advantages. Firstly, it’s a fantastic solution for home organization. Those cozy throw blankets that often end up in a heap on the couch or floor now have a designated, elegant display spot. Secondly, crafting your own ladder allows for complete customization. You control the dimensions, the finish, and the overall look, ensuring it perfectly matches your existing decor and functional needs. Thirdly, and perhaps most importantly for many DIYers, it’s incredibly budget-friendly compared to purchasing a similar high-end piece from a retail store. Our version comes in at around $40, offering exceptional value for a piece that looks much more expensive.
Gather Your Materials and Tools
Preparation is key to any successful DIY project. Before you start, ensure you have all the necessary materials and tools laid out. This not only streamlines the building process but also helps maintain safety. We’ve sourced common materials from local hardware stores like Home Depot, making them easily accessible for everyone.
Material List:
- 2 – 2×4 Studs: These form the backbone of your ladder, providing sturdy vertical support.
- 5 – 1/2″ Galvanized Metal Pipes (18″ each): These will serve as the rungs of your ladder, offering that distinct industrial touch. Galvanized pipes are durable and resist rust, perfect for longevity. You can often find these pre-cut at hardware stores, saving you a step. If you opt for four pipes instead of five, you can shave approximately $9 off the total cost, making it an even more budget-conscious project.
- 10 – 1/2″ Galvanized Metal Caps: These caps screw onto the ends of your pipes, not only securing them in place but also giving a finished, polished look to your industrial design.
- Rust-Oleum Stain (color ‘Wheat’): This quick-drying, one-coat stain provides a beautiful, natural wood finish that enhances the grain.
Tool List:
- Ryobi 1″ Forstner Bit: Essential for drilling clean, precise holes for your metal pipes. Its unique design minimizes tear-out, ensuring smooth edges.
- Ryobi Drill: Any standard power drill will work to operate the Forstner bit.
- Measuring Tape and Pencil: For accurate measurements and markings.
- Clamps: Crucial for securing your wood pieces to a workbench, preventing movement during drilling for safety and precision.
- Scrap Wood: Placed beneath your main project piece during drilling to prevent tear-out on the backside.
- Old Rag or Wiping Cloth: For applying and wiping off excess stain.
- Corner Cat Sander (with 80-grit sandpaper): For distressing the wood to achieve a vintage, aged look. Any orbital or detail sander can work, or even sandpaper by hand for a smaller area.
- Pliers: Helpful for tightening stubborn metal caps.
- Safety Glasses: Always wear eye protection when cutting, drilling, and sanding.
- Gloves: Protect your hands from splinters and stain.
Step-by-Step Guide to Building Your Industrial Blanket Ladder
Step 1: Prepare Your Wood – Cutting the 2x4s
Begin by cutting your two 2×4 studs. For this particular ladder, I cut each stud to 60 inches (5 feet) in length. This creates a generously sized ladder that’s tall enough to lean against a wall without being cumbersome. Always measure twice and cut once to ensure accuracy. If you’re using a miter saw or circular saw, ensure your cuts are straight and clean. Safety is paramount here; wear appropriate eye protection and ensure your wood is securely clamped before making any cuts.
Step 2: Precision Drilling – Creating Holes for the Pipes
This step is where precision truly pays off. Using your Ryobi drill and the 1-inch Forstner bit (which often comes in this convenient set), you’ll create the holes for your metal pipes. Forstner bits are ideal for this task because they drill flat-bottomed, clean holes with minimal tear-out, which is crucial for a professional finish.
To ensure perfect alignment and prevent splintering, follow these steps:
- Clamp Securely: Clamp one of your 2×4 pieces firmly to your workbench. Place a scrap piece of wood directly underneath where you plan to drill. This scrap wood acts as a sacrificial surface, allowing the drill bit to pass completely through your 2×4 without causing tear-out on the backside of your main piece.
- Mark Your Holes: Measure and mark the exact locations for your holes on both 2x4s. Consistency is key here. Ensure the spacing between each hole is even and that the holes on both ladder sides will align perfectly when the pipes are inserted. I recommend spacing the holes approximately 10-12 inches apart, starting about 6-8 inches from the top and bottom of your 2x4s. Remember, you have five pipes, so you’ll need five sets of holes on each board.
- Drill with Care: Carefully drill each hole, allowing the Forstner bit to pass completely through the 2×4 and slightly into the scrap wood below. Keep your drill steady and straight to avoid angled holes.
- Repeat for the Second Board: Once you’ve drilled all the holes in the first 2×4, use it as a template to mark and drill the holes in the second 2×4. This guarantees that your holes will line up perfectly, making assembly much easier later on. Misaligned holes can make it incredibly difficult, if not impossible, to insert the pipes smoothly, as neither the wood nor the metal has any “give.”
Step 3: Stain for Style – Achieving the Perfect Finish
Once your drilling is complete, it’s time to add character with stain. I chose Rust-Oleum’s ‘Wheat’ colored stain for this project, and I absolutely adore it! This particular stain is fantastic because it dries in under an hour and typically requires only one coat, making the process quick and efficient. To apply, simply brush it generously onto the wood surface, allowing it to penetrate for a few minutes. Then, use an old rag or a clean wiping cloth to remove all the excess stain, ensuring an even, streak-free finish. This technique allows the natural wood grain to shine through while imparting a warm, inviting hue. If ‘Wheat’ isn’t your preference, feel free to experiment with darker stains for a more rustic look, or lighter washes for a coastal farmhouse vibe.
Step 4: Add Character – Distressing for a Vintage Look
After the stain has completely dried (always check the manufacturer’s recommendations for drying times), it’s time to add that authentic vintage charm through distressing. I used my Corner Cat sander, fitted with an 80-grit sandpaper, to strategically remove some of the applied stain. The trick here is to focus on the edges, corners, and any raised surfaces where natural wear and tear would typically occur. By gently sanding these areas, you expose the raw wood beneath, creating a beautiful contrast and an aged, time-worn appearance. You can control the level of distressing – a light touch for subtle character or more aggressive sanding for a truly antique feel. This step really personalizes the piece and enhances its industrial aesthetic.
Step 5: Assemble the Metal Pipes – Connecting the Rungs
Now for the exciting part – bringing the wood and metal components together! Take your 1/2-inch galvanized metal pipes, each measuring 18 inches long. These are readily available in the plumbing section of most hardware stores. Carefully insert one end of each pipe into the corresponding holes on one of your wooden 2x4s. Guide them through until the threaded end of the pipe sticks out slightly beyond the outer edge of the wood. This threaded portion is where your metal caps will attach. Ensure each pipe is snug but don’t force them too much, especially if your holes were drilled precisely.
Step 6: Secure with Caps – The Finishing Touch
With the pipes in place on one side, it’s time to secure them with the galvanized metal caps. Screw the caps onto the threaded ends of the pipes sticking out from the wood. This step can require a bit of “elbow grease.” Some caps will screw on smoothly and easily by hand, while others might be a bit stubborn and only go on halfway. For those defiant caps, grab your pliers to gently (but firmly) twist them further until they are securely fastened. Don’t worry if some pipes protrude slightly more than others, or if the caps aren’t all screwed on to the exact same depth. This slight variation actually enhances the authentic, hand-crafted industrial look, adding to its unique charm rather than detracting from it. Embrace the imperfections!
Design Considerations & Customization
The beauty of DIY lies in its adaptability. While we’ve provided a specific design, don’t hesitate to customize your blanket ladder to fit your unique style:
- Wood Type: Instead of 2x4s, consider using higher-grade wood like oak or maple for a more refined look, or reclaimed wood for a truly rustic feel.
- Finish Variations: Experiment with different stain colors – a darker espresso for a bold statement, a grey wash for a coastal vibe, or even paint the wood for a pop of color. You could also spray paint the galvanized pipes black or bronze for a different metal aesthetic.
- Dimensions: Adjust the height and width of your ladder, as well as the number of rungs, to suit the specific space where it will be displayed or the size of the blankets you intend to hang. For instance, a shorter, wider ladder might be perfect for towels in a bathroom.
- Alternative Uses: While perfect for blankets, this ladder can also beautifully display magazines, scarves, throws, or even serve as a stylish towel rack in a larger bathroom.
Safety First
As with any DIY project involving power tools and chemicals, always prioritize safety. Wear eye protection to shield against flying debris and gloves to protect your hands from splinters and stain. Ensure your workspace is well-ventilated when working with stains. Always read and follow the safety instructions for all tools and materials you use. If you’re unsure about a particular step, it’s always best to err on the side of caution or seek advice from an experienced DIYer.
Showcase Your Masterpiece!
And there you have it! Your very own handcrafted wood and metal pipe blanket ladder, ready to add a touch of industrial elegance to your home. The finished product is not only incredibly functional, keeping your throws neatly organized and easily accessible, but it also serves as a captivating decor piece. One of the aspects I love most about this ladder is its versatility. It can be effortlessly moved to any room in the house – from the cozy corner of a living room to a chic bedroom or even a spacious bathroom – and it looks absolutely adorable wherever it goes!
I sincerely hope you love creating and enjoying this industrial-style blanket ladder as much as I do! It’s a project that brings immense satisfaction and a beautiful addition to your home. I would absolutely LOVE for you to share and PIN this blanket ladder project with all your friends and fellow DIY enthusiasts. If you have any questions at all about the process, materials, or customization, please don’t hesitate to ask in the comments below. Thanks so much for stopping by and being a part of our creative journey!
~Whitney