
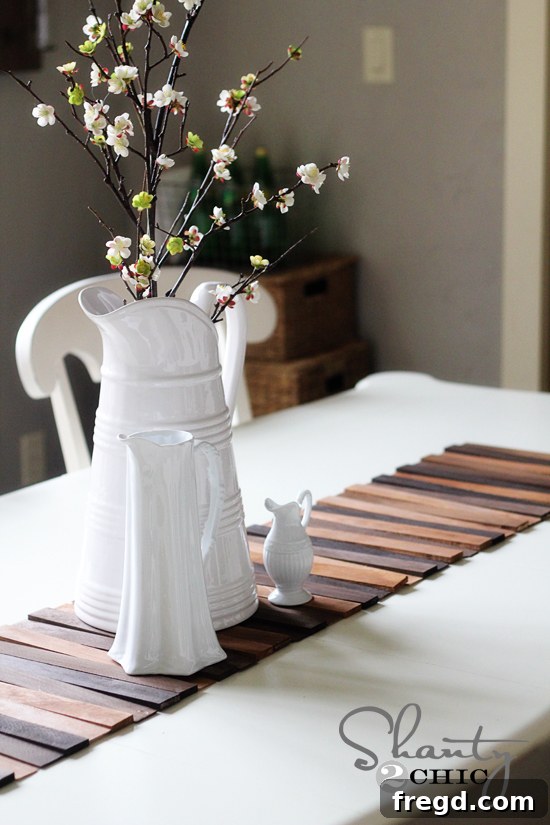
DIY Wood Shim Table Runner: Rustic Charm for Under $10!
Welcome, fellow DIY enthusiasts and home decor lovers! I am absolutely thrilled to share the details of my latest creative triumph. For far too long, my dining table sat bare, an empty canvas waiting for the perfect centerpiece to tie the room together. The search for a suitable table runner was a quest that spanned several months, but I can confidently say the wait was worth it. What makes this project even more exciting? You won’t need any power tools – just a trusty hot glue gun and a dash of creativity! Get ready to transform your space with this incredibly simple, chic, and budget-friendly wood shim table runner.
This unique piece adds a touch of rustic charm and farmhouse elegance to any dining area, all while keeping your wallet happy. It’s the perfect blend of natural textures and personalized style that’s sure to garner compliments.
The beauty of this DIY project lies in its simplicity and affordability. Crafted from humble wood shims, a material typically used for construction, this table runner is not only incredibly easy to assemble but also costs less than $10 to make! Who knew such an impactful decor piece could be achieved with so little effort and expense? Let’s dive into how you can create your own stunning wood shim table runner and infuse your home with personalized style.
Why Choose a DIY Wood Shim Table Runner?
In a world saturated with mass-produced decor, a DIY project stands out. A handmade wood shim table runner offers a plethora of benefits that store-bought alternatives simply can’t match. It’s an opportunity to create something truly special and tailored to your home:
- Unmatched Uniqueness: Your table runner will be a one-of-a-kind creation, reflecting your personal style and creativity. Because wood shims vary slightly and your staining technique will be unique, no two wood shim runners are exactly alike!
- Incredible Cost-Effectiveness: As mentioned, the total cost for this project is remarkably low. Wood shims are an inexpensive commodity, and with some fabric and wood stain, you can achieve a sophisticated, high-end look without the high-end price tag. This project proves that beautiful decor doesn’t have to break the bank.
- Full Customization: You have complete control over every aspect – the length and width to perfectly fit your table, the color palette to match your existing decor, and the finish (stained, painted, or natural). This level of customization is rarely available with off-the-shelf items.
- Beginner-Friendly: If you’re new to DIY or looking for a quick and rewarding craft, this project is an excellent starting point. It requires no complex tools, intricate measurements, or advanced crafting skills. The hot glue gun does all the heavy lifting, making it accessible for almost everyone.
- Versatile Style: Whether your home leans towards farmhouse, rustic, modern, industrial, or eclectic, a wood shim runner can complement various interior design aesthetics. The natural wood texture brings warmth, while your chosen finish dictates its overall feel.
Gather Your Materials: What You’ll Need
Before we begin this fun and rewarding project, let’s ensure you have all the necessary supplies. The beauty of this craft is that the material list is short and sweet, making it accessible for almost anyone to tackle.
Essential Materials:
- Wood Shims: You’ll need at least one large pack of wood shims, typically found in the lumber or hardware section of any home improvement store. These are usually made from pine or cedar and come in varying lengths and widths. For this project, a standard 12-inch length is ideal. When selecting your shims, inspect them to ensure they are relatively straight and free from major defects like large cracks or severe warping.
- Wood Stain or Paint: I opted for a mix of Rust-Oleum Wood Stains to create a beautiful multi-tonal, gradient effect, but you can choose any brand, color, or type of finish that suits your home decor. Consider classic wood tones, bold colors, whitewash, or even just a clear sealant to bring out the natural wood grain.
- Fabric for Backing: A sturdy utility fabric, canvas, duck cloth, or even thick felt will work perfectly as the base. This fabric serves as the foundation onto which your shims will be glued, providing essential stability, structure, and protecting your table surface from any potential scratches.
- Hot Glue Gun and Glue Sticks: This is your primary assembly tool! Ensure your hot glue gun is in good working order and that you have a generous supply of glue sticks on hand, as you’ll be doing a fair amount of gluing.
Optional but Recommended Tools:
- Protective Gloves: Essential for keeping your hands clean and safe while working with wood stain.
- Old Rags or Foam Brushes: Ideal for applying wood stain smoothly and evenly.
- Ruler or Tape Measure: For precise fabric cutting and ensuring your shim layout is consistent.
- Sharp Scissors: For cleanly cutting your chosen fabric.
- Drop Cloth or Cardboard: To protect your work surface from spills or drips during the staining process.
Here are the humble wood shims I used – readily available and perfect for transforming into a charming piece of decor!
My initial idea was to stain all the shims a single, uniform color. However, a flash of inspiration led me to experiment with multiple shades, and I’m so glad I did! The result is a much richer, more dynamic look that truly highlights the individual wood pieces and adds depth. I used a variety of Rust-Oleum Wood Stains, which are widely available at most hardware stores like Lowe’s.
The four distinct colors I chose (perhaps a light oak, a medium walnut, a darker espresso, and a greywash for contrast) added incredible depth and character, creating a beautiful gradient effect that makes the runner feel more artisanal and less uniform. Experimenting with different stain colors is highly recommended to achieve a truly unique piece that complements your personal aesthetic and existing decor.
Step-by-Step Guide: Crafting Your Rustic Table Runner
Now that you have all your materials gathered and ready, let’s get started on bringing this beautiful wood shim table runner to life! Follow these simple steps for a smooth and enjoyable crafting experience.
Step 1: Prepare and Stain Your Wood Shims
- Separate and Sort: Begin by dividing your wood shims into groups, one for each stain color you plan to use. If you’re opting for a single color, you can skip this sorting step and treat all shims uniformly.
- Apply Stain: Working in a well-ventilated area (or even outdoors), apply a thin, even coat of stain to each shim using an old rag or a foam brush. Remember to wear gloves to protect your hands. Rust-Oleum stains are fantastic for this project because they offer excellent coverage with just one coat and dry incredibly fast – typically in under an hour! This quick drying time means you can move on to the next step without significant delays.
- Achieve Variation: For a varied, multi-tonal look like mine, ensure you distribute the different stained shims evenly across your planned layout to avoid large, jarring blocks of one color. You can also experiment with your application technique: wipe off excess stain immediately after application for a lighter hue, or let it sit longer before wiping for a deeper, richer tone.
- Drying Time: Lay the stained shims flat on a protected surface (such as cardboard or a drop cloth) to dry completely. While the stain dries quickly to the touch, it’s always best to give them ample time to fully cure before extensive handling and assembly to prevent smudges or transfer.
Step 2: Prepare Your Fabric Base
- Choose Your Fabric: As mentioned in the materials list, any durable utility fabric will do! I had some versatile linen-look utility fabric on hand, which worked perfectly, but options like canvas, duck cloth, or even thick felt are excellent choices. The key is to select a fabric that can hold up to the hot glue and provide a stable, non-stretching foundation for your shims.
- Measure and Cut: Since my wood shims were 12 inches long, I cut my fabric strip to a width of 10 inches. This ensures the fabric is slightly narrower than the shims, preventing it from showing on the sides once the shims are glued down and giving it a clean, finished edge. The length of your fabric should correspond to the desired length of your finished table runner. Measure your dining table to determine the ideal length, allowing for some overhang on each end if preferred. Precision in this step helps achieve a neat, professional finish.
With your measurements in hand, cut your chosen fabric to the perfect dimensions for your unique table and desired runner length.
Step 3: Layout and Hot Glue Assembly
- Pre-Arrange Shims: This is arguably the most crucial step for achieving a visually appealing result. Lay out all your stained wood shims on your fabric base *before* applying any glue. This dry-fitting allows you to experiment with different arrangements, ensuring a balanced distribution of colors, textures, and patterns. There’s no rigid science here; trust your eye to create a pleasing, organic pattern that you love.
- Vary Shim Direction: A key detail often overlooked is that wood shims are naturally thicker on one end and taper down to a thinner edge. To prevent your runner from having an uneven, lopsided appearance and to help it lie flatter, make sure to alternate the direction of each shim. For instance, place one with the thick end facing left, the next with the thick end facing right, and so on. This simple technique helps to distribute the varying thickness evenly and creates a more stable, flatter surface for your finished runner.
- Hot Glue into Place: Once you’re completely satisfied with your layout, it’s time for the “easiest part” – hot gluing! Working one shim at a time to maintain your chosen pattern, apply a generous bead of hot glue to the back of the shim, focusing on the center and along the ends for maximum adhesion. Carefully press the shim firmly onto the fabric base in its predetermined spot. Hold each shim in place for a few seconds to allow the hot glue to set and bond securely. Continue this process, shim by shim, until your entire fabric base is covered.
- Safety First: Remember that hot glue guns get very hot! Exercise caution to avoid burns. If you don’t already have one, consider making or purchasing a hot glue gun holder to keep your workspace tidy and your hot glue gun safely upright, preventing messy drips and potential hazards.
My trusty hot glue gun is an indispensable tool for so many DIY projects like this!
If you’re as fond of your hot glue gun as I am and find yourself using it frequently, you might appreciate a dedicated holder. It keeps it stable and prevents messy drips on your workspace.
Here’s a tutorial for a DIY hot glue gun holder!
Simply pick up each pre-arranged shim, apply glue to its back, and press it firmly into its designated spot. It’s genuinely that straightforward to create a solid, beautiful surface!
Tips for Success & Customization
To ensure your wood shim table runner turns out exactly as you envision, and to inspire further creative ventures, here are some additional tips and customization ideas:
- Shim Selection: While wood shims are generally affordable, it pays to spend a moment selecting packs that have fewer warped or split pieces. Straighter shims will naturally create a more uniform and stable surface for your runner.
- Stain Alternatives: If traditional staining isn’t your preference, consider other finishing techniques. You could paint the shims solid colors for a bold, modern look, whitewash them for a distressed farmhouse aesthetic, or simply apply a clear varnish or polyurethane to enhance and protect the natural wood grain.
- Fabric Choices: The backing fabric plays a role in the overall feel. Burlap can add a distinctly more rustic or natural feel, while a solid color canvas provides a clean, neutral background that lets the wood shims truly shine. Consider how the fabric’s texture and color will complement your shim finish.
- Design Patterns: Don’t limit yourself to simple parallel rows! You could experiment with staggering the shims at varying lengths, creating subtle chevron patterns, or even leaving tiny, consistent gaps between shims for a slatted look (though this might require a different type of backing or more precise cutting).
- Embellishments: For extra flair, consider adding small decorative elements. You could wrap sections with twine, glue small beads or faux pearls, or even stencil simple designs onto some of the shims before assembly.
- Care and Maintenance: To clean your finished wood shim runner, simply wipe it gently with a slightly damp cloth to remove dust and minor spills. Avoid soaking it or using harsh chemical cleaners, as this could damage the wood finish or weaken the hot glue bonds. For added protection against moisture and wear, you could apply a clear sealant or wood wax to the finished runner.
Beyond the Dining Table: Versatile Decor Uses
While perfectly designed as a dining table runner, the versatility of this wood shim creation extends far beyond! Consider these alternative uses to bring rustic elegance and personalized charm to other areas of your home:
- Coffee Table Accent: Drape it across your coffee table to add texture, warmth, and a focal point to your living room or den. It’s an inviting base for books or decorative objects.
- Console Table Display: Perfect for entryway or hallway console tables, serving as a beautiful base for seasonal decor, lamps, or potted plants, making a welcoming first impression.
- Bedroom Dresser Runner: Add a touch of natural beauty and warmth to your bedroom dresser while simultaneously protecting the surface from scratches and spills.
- Wall Art Feature: With a sturdy frame and proper hanging hardware, this runner could even be adapted into a unique piece of textured wall art, bringing a captivating rustic element to any room.
- Buffet or Sideboard Decor: Enhance your serving areas during gatherings or everyday meals, adding a touch of handcrafted sophistication to your buffet or sideboard.
Frequently Asked Questions About Your DIY Wood Shim Table Runner
- Q: Can I use different types of wood for the shims?
A: Absolutely! While pine and cedar shims are most common and affordable, you could theoretically use other thin wood strips or even craft sticks for a similar effect. Just ensure they are consistent in thickness and length for a uniform look, or embrace the variations for a truly eclectic piece. - Q: Is hot glue strong enough to hold the shims?
A: Yes, for a table runner that won’t undergo extreme stress or heavy handling, hot glue provides surprisingly sufficient and durable adhesion. For projects that might see more wear and tear, or if you prefer a stronger bond, you could opt for wood glue or a strong craft adhesive, but be prepared for much longer drying and curing times. - Q: How do I clean my wood shim table runner?
A: Gently wipe it with a slightly damp cloth to remove dust and minor spills. Avoid soaking the runner or using harsh chemical cleaners, as this could damage the wood finish or weaken the hot glue bonds. For tougher spots, a mild wood cleaner designed for stained wood can be used sparingly. - Q: Can I make this runner weatherproof for outdoor use?
A: The current design, with standard wood shims and indoor fabric, is primarily intended for indoor use. To make it suitable for outdoors, you would need to use exterior-grade wood (like cedar shims), outdoor-rated fabric, and weather-resistant stain/sealant and adhesive to ensure it withstands the elements. - Q: What if my shims aren’t perfectly straight?
A: A slight variation in the natural curvature or thickness of shims can actually add to the rustic charm and handmade character of your runner! However, for severely warped shims, it might be challenging to achieve a flat, even surface. Try to select the straightest pieces from your pack, or strategically place slightly imperfect ones where they will be less noticeable.
And just like that, you’ve created a stunning, custom-made piece of home decor! Simple, incredibly affordable, and undeniably chic – this is precisely the kind of DIY project that brings immense satisfaction without breaking the bank or requiring specialized skills. It’s a testament to how creative thinking and simple materials can yield truly remarkable results.
Here are a few more glimpses of the finished wood shim table runner gracing the dining table, showcasing its beautiful texture, unique charm, and how it effortlessly elevates the entire space:
What are your thoughts on this project? Can you believe this impactful piece of decor, which brings so much character and style, cost less than $10 to create? It’s undeniable proof that amazing style and personalized touches don’t have to come with a hefty price tag.
Thank you so much for visiting and joining me on this creative journey! I truly hope this detailed tutorial inspires you to pick up some wood shims and a hot glue gun to craft your own unique table runner. If you enjoyed this project and found the instructions helpful, please consider sharing it with your friends, family, and fellow DIY enthusiasts. Don’t forget to pin it to your favorite DIY or home decor boards below so others can discover this fantastic idea. Your support and engagement mean the world!
Have a wonderfully creative and inspiring weekend, and happy crafting!
~Whitney