
Unlock Your Creativity: Crafting a Charming DIY Mini Magnet Board for Gifts or Home Decor
Are you constantly searching for unique, heartfelt, yet budget-friendly gift ideas that truly stand out? Whether it’s for a baby shower, a thoughtful teacher appreciation, or just a charming piece for your own home, handmade gifts carry a special touch that store-bought items often lack. This pursuit of personal, affordable presents led me to embark on a delightful crafting journey – a project that is not only incredibly versatile but also surprisingly simple to create. This particular endeavor is actually a refined adaptation of an earlier, larger project I tackled last July for Ellyot’s nursery, showcasing just how adaptable the core concept truly is.
For Ellyot’s room, I crafted a vibrant fabric magnet board. Its colorful charm and practicality made it an instant favorite, and I absolutely adored the final outcome. The success of that project sparked an idea: what if I could create a smaller, more intimate version? It immediately struck me as the perfect candidate for a thoughtful baby shower gift, allowing new parents to display precious milestones, or an exceptionally personalized teacher gift, offering a sweet spot for notes and cherished drawings. The possibilities truly seemed endless! So, without further ado, let me show you how this adorable mini magnet board came to life, step by step, and inspire you to create your own!
Gathering Your Creative Arsenal: Essential Supplies for Your Magnet Board
Before diving into the fun part of assembling your magnet board, let’s ensure you have all the necessary components. The beauty of this project lies in its flexibility; many items can be found affordably, and you can often repurpose things you already have at home. This makes it a truly budget-friendly craft. Here’s what you’ll need:
* **A Photo Frame:** Look for a sturdy frame that suits your desired aesthetic. I found an incredible deal on a beautiful frame at Hobby Lobby, snagging it for half price! Garage sales, thrift stores, and even dollar stores are fantastic places to discover hidden gems. The size of your frame will determine the final dimensions of your magnet board, so choose wisely based on your intended use.
* **Galvanized Metal Sheet:** This is the heart of your magnet board, providing the magnetic surface. You can typically find galvanized metal sheets in the plumbing or roofing sections of large home improvement stores like Lowe’s. I purchased a generous piece measuring 24″x36″ for approximately $7. This larger sheet is incredibly cost-effective as it will yield enough material for numerous magnet boards, ensuring you get great value for very little investment. Always remember to handle metal with care.
* **Spray Paint:** To transform your frame and customize its look. I opted for Rust-Oleum Heirloom White, a classic and versatile shade that offers a clean, elegant finish. However, feel free to choose any color that matches your decor or the recipient’s preference. Matte, satin, or gloss finishes all offer different visual appeals.
* **Decorative Paper or Fabric:** This will cover your metal sheet, adding personality and visual appeal to your board. For this specific project, I chose decorative paper, which provides a crisp, smooth surface. If you prefer a softer, more textured look, fabric is an excellent alternative, as I demonstrated with my first fabric memo board. Think about patterns, colors, and textures that resonate with the theme of your gift or your home.
* **Spray Adhesive (e.g., 3M Spray Adhesive):** Essential for securely bonding your decorative paper or fabric to the galvanized metal. A good quality spray adhesive ensures a smooth, bubble-free application and lasting adhesion.
* **Hot Glue Gun and Hot Glue Sticks:** For various small assembly tasks, such as securing the metal to the cardboard backing and attaching magnets to your embellishments.
* **Sharp Scissors (dedicated for crafts, preferably heavy-duty):** Crucial for cutting the galvanized metal. While it might sound daunting, I’ve found that galvanized metal cuts surprisingly well with a sharp pair of regular scissors. However, for best results and to preserve your good fabric scissors, use a pair specifically for crafting or a more robust utility scissor. Safety first!
* **Craft Knife or X-Acto Knife:** For precise trimming of paper or fabric around the cardboard backing.
* **Cardboard Backing (from your frame):** This piece will serve as the stable base for your magnetic surface.
* **Gloves:** Absolutely essential for protecting your hands when handling and cutting galvanized metal, as edges can be sharp.
* **Magnets:** Small, strong magnets are needed for your custom embellishments. You can buy these in bulk at craft stores or online.
* **Decorative Buttons or Embellishments:** To create your custom magnets. I used some charming gold buttons, but you can get creative with flat-backed cabochons, small wooden shapes, decorative thumbtacks (with the pin removed), or even bottle caps.
With your materials gathered, let’s transform them into a beautiful and functional magnet board!
Step-by-Step Guide: Crafting Your Personalized Magnet Board
**Step 1: Preparing Your Frame for a Fresh Look**
Every great project begins with a solid foundation. My frame, though a fantastic find, needed a touch of personalization. First, carefully disassemble the frame: remove the glass and the cardboard backing. You’ll only need the main frame structure and the cardboard piece for this project. With a well-ventilated area secured (preferably outdoors or in a garage with open windows), lay your frame down on a protective surface. Apply a light, even coat of Rust-Oleum Heirloom White spray paint. The key to a professional finish is to use multiple thin coats rather than one thick one, which can lead to drips and unevenness. Allow each coat to dry completely according to the manufacturer’s instructions before applying the next. This typically takes about 15-30 minutes per coat. I usually aim for 2-3 coats to achieve full, opaque coverage and a smooth, durable finish. While your frame is drying, you can move on to the next exciting part!
**Step 2: Crafting the Magnetic Core – The Galvanized Metal Board**
This step involves working with the galvanized metal sheet, which will form the magnetic surface of your board. Remember the cardboard backing you removed from your frame? That’s your template! Place the cardboard piece onto your galvanized metal sheet. Using a sharpie, meticulously trace the outline of the cardboard onto the metal. This ensures your magnetic insert will perfectly fit back into your frame. Now, for the cutting part: **always wear gloves** when handling galvanized metal. The edges can be surprisingly sharp and cause cuts. Using a sturdy pair of sharp scissors (dedicate a pair for metalwork if possible), carefully cut along the sharpie line. Take your time to make clean, straight cuts. You might find it easier to make several small snips rather than one long cut, especially around corners. Once cut, gently smooth any rough edges with a piece of fine-grit sandpaper or a metal file if necessary, still wearing your gloves.
After cutting your metal piece to size, it’s time to secure it to the cardboard backing. This provides stability and makes handling much easier. Apply a bead of hot glue along the perimeter of the cardboard backing, and then carefully press the galvanized metal sheet onto it. Ensure it’s centered and aligned before the glue sets. You can add a few dots of hot glue in the center for extra adhesion, but typically the perimeter is sufficient. Allow the hot glue to cool and set completely, creating a sturdy, combined unit.
**Step 3: Adding Style – Covering Your Magnetic Board**
This is where your magnet board truly begins to take on its unique character! For this particular mini magnet board, I opted to use a charming decorative paper. Its vibrant pattern adds a lovely touch without overwhelming the small scale of the frame. However, the beauty of this project lies in its adaptability; you can absolutely use fabric, just like I did on my first memo board. Fabric offers a softer texture and a different aesthetic, allowing for even more customization. Consider the overall theme and color palette you’re aiming for.
Once you’ve chosen your covering material (paper or fabric), lay it face down on a clean, protected surface. Take your metal-backed cardboard piece and apply a generous, even layer of 3M spray adhesive to the metal side. Work in a well-ventilated area and follow the adhesive’s instructions for application and tack time. Carefully center the metal-backed cardboard onto the backside of your chosen paper or fabric. Press down firmly, working from the center outwards to smooth out any air bubbles or wrinkles. Ensure complete contact across the entire surface. Allow the adhesive to cure for a few minutes to ensure a strong bond.
With the paper or fabric firmly adhered, carefully flip your piece over. Using a sharp craft knife or X-Acto knife, meticulously trim around the edges of the cardboard. This ensures a clean, professional finish, removing any excess paper or fabric. Take your time to make precise cuts, ensuring the edges are neat and flush with the cardboard backing. This attention to detail will significantly enhance the final appearance of your magnet board.
**Step 4: Assembling Your Masterpiece – Inserting into the Frame**
By now, your beautifully painted frame should be completely dry and ready for its new insert. With your paper-covered (or fabric-covered) metal board ready, carefully place it into the frame. Ensure it fits snugly and correctly. If your frame has small metal tabs, bend them down to secure the magnetic board in place. This step is usually straightforward, as you’ve used the original cardboard as your template, ensuring a perfect fit. Once secured, give your frame a gentle shake to ensure everything is firmly in position. You’re now just one step away from having a fully functional and gorgeous magnet board!
**Step 5: Crafting Custom Magnets – The Finishing Touch**
A magnet board isn’t complete without its magnets! This is another wonderful opportunity to add a personalized touch. I had a collection of charming gold buttons that I absolutely adored for their unique shape and detailing. To match the Heirloom White frame, I gave them a quick spray with the same paint, transforming them into cohesive, elegant embellishments. After the paint dried, I carefully cut off the shank (the loop on the back of the button) using wire cutters, creating a flat surface. Then, using my hot glue gun, I securely attached a small, strong magnet to the back of each button. The result was a set of custom, beautiful magnets that perfectly complemented the finished board.
You can get incredibly creative with your magnet designs! Consider using:
* **Bottle Caps:** Flatten them slightly, add decorative paper inside, and glue a magnet to the back.
* **Small Wooden Shapes:** Paint or decorate them to match your theme.
* **Cabochons or Glass Gems:** Glue photos or decorative paper behind them for a magnified effect.
* **Mini Clothespins:** Attach a magnet to the back for a functional clip-style magnet.
The possibilities are truly endless, allowing you to tailor the magnets to perfectly suit the recipient or the style of your home.
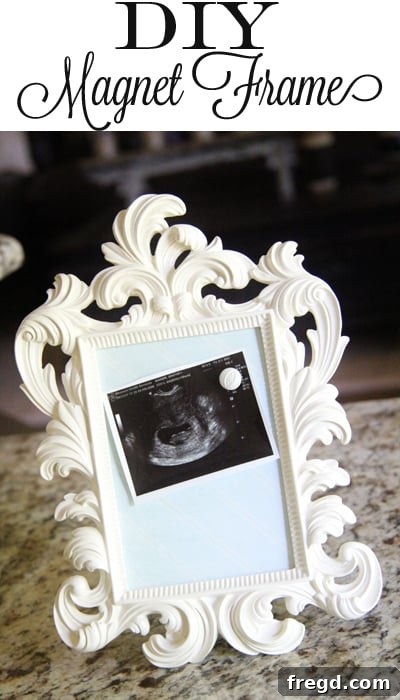
That’s it! Your stunning, handmade mini magnet board is now complete and ready to bring joy. Here’s a look at the finished piece from the front, showcasing its elegance and potential.
I immediately envisioned this elegant frame as the perfect spot to display precious photos of my new little “bean.” What do you think? It offers a beautiful, tangible way to celebrate milestones and keep cherished memories front and center.
Why This DIY Magnet Board is the Perfect Project
This project stands out for several compelling reasons, making it an ideal craft for beginners and experienced DIYers alike:
* **Effortlessly Customizable:** The design possibilities are truly limitless. You can choose any frame style, any paint color, and an endless array of papers or fabrics to match specific themes, room decor, or personal tastes. From minimalist chic to vibrant and whimsical, your magnet board can be tailored to perfection. This makes it an incredibly thoughtful and personal gift, as you can incorporate elements that resonate deeply with the recipient.
* **Incredibly Cost-Effective:** As demonstrated, the main components are surprisingly affordable. With a budget-friendly frame and a single sheet of galvanized metal yielding multiple boards, you can create high-quality, personalized gifts without breaking the bank. This makes it a fantastic option for creating multiple gifts, such as for a classroom of teachers or several expectant parents.
* **Practical and Decorative:** Beyond its aesthetic appeal, this magnet board is highly functional. It provides a dedicated space to display photos, notes, recipes, children’s artwork, important reminders, or even small keepsakes. It keeps surfaces clutter-free while adding a charming decorative element to any room – a nursery, kitchen, office, or classroom.
* **Simple and Rewarding:** The steps are straightforward and don’t require advanced crafting skills. This makes it a very rewarding project, allowing you to see a beautiful and functional item come to life with your own hands. The sense of accomplishment upon completing such a personalized piece is truly satisfying.
Beyond the Nursery: Creative Gift Ideas for Your Magnet Board
While perfect for a baby shower, the versatility of this DIY magnet board extends far beyond. Here are just a few ideas for who might love to receive one of these handmade treasures:
* **Teacher Appreciation:** Create a themed board with school-related paper, and gift it to a favorite teacher. They can use it to display student artwork, important notes, or photos of their class.
* **Housewarming Gift:** Customize it to match the recipient’s new home decor. It’s a thoughtful way to help them settle in and organize their new space.
* **Birthday Gift:** Personalize it with their favorite colors, hobbies, or even photos if you have access to them.
* **Office Decor:** A small, elegant magnet board can be a stylish addition to a home office or cubicle, perfect for keeping important notes visible and inspiring.
* **Kid’s Room:** Let your child pick their favorite characters or colors for a magnet board that encourages creativity and organization.
* **Kitchen Memo Board:** Use a food-themed paper or fabric, and it becomes a charming spot for recipes, grocery lists, or takeaway menus.
This easy gift idea is not only customizable but also incredibly affordable, proving that the most meaningful presents often come from the heart and a little bit of creativity. Thank you so much for stopping by and exploring this fun project!
We hope you’re inspired to start your own DIY magnet board project soon. Don’t forget to share your creations and connect with fellow crafters! We always love to see any and all projects, crafts, revamps, recipes, or whatever amazing things you’ve been working on lately.