
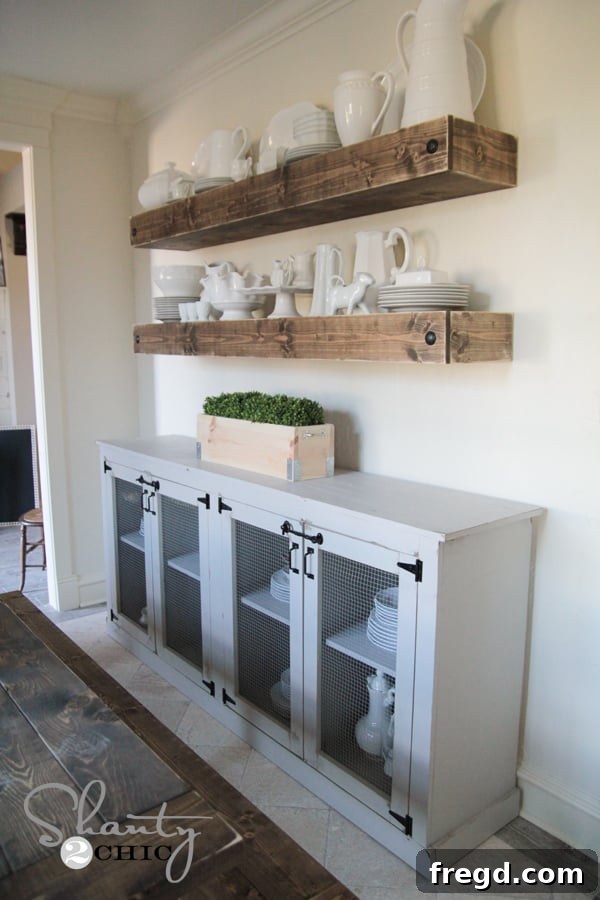
Unveiling Our Latest Masterpiece: The DIY Farmhouse Sideboard
We are absolutely thrilled to finally pull back the curtain on our most ambitious and rewarding project yet – our brand-new, handcrafted DIY Farmhouse Sideboard! For those who’ve been following along, you know that our dining room has been undergoing a complete transformation. This sideboard is the crowning jewel of that renovation, and we couldn’t be more excited with how it turned out. It perfectly blends rustic charm with practical elegance, offering ample storage and a stunning focal point for any dining space or living area. We invite you to explore every detail of this magnificent piece and discover how you can create one for your own home.
There’s a special kind of satisfaction that comes with creating a large, functional piece of furniture with your own hands. This DIY sideboard, or farmhouse buffet table as some prefer to call it, embodies everything we adore in design: substantial presence, undeniable beauty, and a clean, simple aesthetic that fits seamlessly into various decor styles. It’s robust enough to handle daily life yet boasts a refined finish that elevates the room. We believe in empowering fellow DIY enthusiasts, which is why we’re not just showing you the finished product; we’re guiding you through the entire build process step-by-step. Even better, you can download the detailed, FREE WOODWORKING PLANS by clicking HERE or using the convenient button below. These plans are meticulously crafted to ensure a smooth and successful build, regardless of your experience level.
Getting Started: Essential Materials and Smart Preparations
Let’s dive into the core of this project! The secret to this sideboard’s impressive look and durability lies in the primary material: hardwood plywood. If you’re wondering what makes hardwood plywood so special, let us explain. Unlike standard plywood, hardwood plywood features a beautiful hardwood veneer, such as oak or birch, on its outer layers. This gives you the sophisticated appearance of solid hardwood at a significantly more budget-friendly plywood price. Our absolute favorite brand for quality and consistency is Purebond Plywood, readily available at Home Depot. Beyond its aesthetic appeal and cost-effectiveness, Purebond plywood is known for its incredible straightness, which is a huge advantage for any woodworking project, making cuts and assembly much easier and more precise. It’s also an eco-friendly choice, made with soy-based adhesives that are formaldehyde-free.
Hardwood plywood sheets typically come in large 4′ x 8′ dimensions, which can be challenging to transport, especially with a busy family car. To simplify this, we highly recommend having Home Depot make the initial rip cuts for you. This service is invaluable, transforming unwieldy sheets into manageable pieces that fit perfectly into your vehicle, saving you time and effort at home.
Once the plywood was safely home, the next step involved making all the other necessary cuts. For this, we relied heavily on Kreg’s RipCut. This ingenious attachment for your circular saw allows you to make perfectly straight, precise cuts every single time. It attaches easily and can be adjusted to specific measurements, making it an indispensable tool for achieving professional-looking results without the need for a large table saw. Its accuracy and user-friendliness truly make woodworking accessible and enjoyable.
Constructing the Core: Building the Sideboard Box
Despite its grand appearance, the construction of this DIY farmhouse sideboard is remarkably straightforward. The build process can be broken down into simple, manageable steps: first, construct the main box, then add the decorative trim, and finally, install the doors. For the primary structure of the box, our go-to tool is always the Kreg Jig. This pocket hole system is a game-changer for creating strong, concealed joints effortlessly, making it ideal for both beginners and seasoned woodworkers.
For all our joints, we utilized 3/4″ pocket holes paired with 1.25″ pocket hole screws. This combination ensures an incredibly strong and durable connection that will stand the test of time. To further enhance the integrity of each joint, we always apply a generous line of Gorilla Wood Glue. Wood glue, when combined with mechanical fasteners like pocket hole screws, creates a bond that is often stronger than the wood itself. You can observe the precise placement of our pocket holes in the images below, demonstrating the meticulous care taken at every stage of this DIY sideboard build.
Given our intention to fill this beautiful sideboard with heavy dishes and other kitchenware, we made a crucial design decision to add a small brace in the middle of the shelves. This simple addition serves a vital structural purpose: preventing any potential sagging over time due to significant weight. This foresight ensures the longevity and functionality of your DIY sideboard. We created this brace by cutting a small piece of plywood and securely attaching it with both wood glue and pocket hole screws, integrating it seamlessly into the design.
To drive all these pocket hole screws, you’ll need a drill equipped with the Kreg bit, which conveniently comes included with your Kreg Jig. For our projects, we absolutely love our Ryobi 18V One+ drill. It’s the perfect combination of compact size and impressive power, making it comfortable to handle yet robust enough for any task. In fact, we’re so fond of it that we keep two on hand, saving us the hassle of constantly switching bits – a truly #lazygirlhack that maximizes efficiency!
Adding Character: Trim, Top, and Doors
Once the main box of your DIY sideboard is fully assembled and structurally sound, it’s time to add the trim pieces that define its aesthetic. This step transforms the utilitarian box into a piece of furniture with character and style. For attaching the trim, our Ryobi 16V Finish Nailer proved to be an invaluable tool. Yes, a cordless finish nailer! It’s truly amazing how efficient and powerful battery-operated tools have become, offering freedom from air compressors and hoses. If you don’t own one yet, we highly recommend adding this versatile tool to your workshop.
With the trim in place, the base of our farmhouse sideboard truly began to take shape. From a simple plywood box, it transformed into a framed structure ready for its elegant top.
Next, we meticulously built and attached the planked top, a feature that significantly contributes to the farmhouse aesthetic. We created this robust top by joining five individual boards. Four of these boards received 3/4″ pocket holes, and then we used 1.25″ pocket hole screws to firmly attach them all together, ensuring a solid, seamless surface.
Before permanently attaching the planked top to the sideboard base, we applied a generous amount of Gorilla Wood Glue to the top surface of the main box. We believe in a “no-holding-back” approach when it comes to glue for maximum adhesion and structural integrity – sometimes, that means having a little fun with the application process!
To secure the top firmly in place, we utilized our wonderful new Kreg bar clamps. These clamps are truly a dream to work with – self-adjusting and incredibly easy to use, they simplify the clamping process significantly. We used them to hold the planked top precisely where we wanted it while we secured it with 1.25″ finish nails using our finish nailer, creating a strong and lasting bond.
Crafting the Perfect Doors and Final Touches
The doors are a critical element that adds both functionality and charm to this farmhouse sideboard. Once again, our trusty Kreg Jig was instrumental in their construction. We created sturdy door frames by making pocket holes on the shorter pieces and then joining them to the longer pieces using 1.25″ pocket hole screws. While our free plans provide precise measurements for these doors, we always recommend a crucial step: measure your actual openings before making the final cuts. This ensures a perfect fit. We aim for doors that are 1/8″ smaller on all sides, translating to a total of 1/4″ less than the width and height of each opening, allowing for easy operation and preventing binding. For each door, you’ll have four longer pieces without pocket holes, forming the vertical sides.
You will also have four smaller pieces, each with pocket holes on both ends, which will form the horizontal rails of the door frame.
These pieces were then assembled into strong rectangular frames using both wood glue and 1.25″ pocket hole screws, guaranteeing durability for years of use.
Each completed door frame should look something like this, ready for its unique insert!
With all the structural elements built, it was time for the exciting step of painting. We opted for Sherwin Williams’ “Amazing Grey,” a beautiful shade that offers a sophisticated and versatile look. While we initially considered a slightly darker hue, we had an entire gallon of this particular paint on hand, which ultimately guided our decision. We are absolutely delighted with the final outcome; the “Amazing Grey” provides a perfect backdrop, allowing the natural wood top and the hardware to truly pop.
After the paint had thoroughly dried, we proceeded to attach the decorative and functional hardware mesh to the inside of the doors.
This sturdy hardware cloth, sourced from Home Depot, adds a touch of rustic charm and visual interest while allowing for discreet ventilation within the cabinet.
We used a small pair of pliers to carefully cut the hardware cloth to the exact size of the door openings, ensuring a snug fit. To attach it securely, we employed our Ryobi Airstrike Staple Gun, which made quick and effortless work of fastening the mesh to the inside of the door frames.
The Finishing Touch: Hardware Selection and Installation
Now, let’s talk about the hardware – the jewels that complete this farmhouse sideboard and bring its character to life! The right hardware can dramatically enhance the overall look and feel of your DIY furniture piece.
For the hinges, we selected a classic style that complements the rustic aesthetic of the sideboard. We found these perfect hinges at Home Depot, a reliable source for all our hardware needs.
To secure the doors, we also found these charming door latches at Home Depot. They add a touch of vintage appeal and functionality, ensuring the doors stay neatly closed. We absolutely love the look and feel they add to the piece!
The handles, often referred to as sash pulls or gate pulls, are also a fantastic find from Home Depot. Their rugged yet elegant design perfectly ties together the farmhouse theme, making the sideboard not just beautiful but also practical for everyday use.
Your Completed DIY Sideboard: A Vision Realized
And there she is – our stunning DIY Farmhouse Sideboard, finally complete and gracing our dining room! The entire process, from selecting the wood to the final hardware installation, has been a labor of love, and the result speaks for itself. This piece is more than just a storage solution; it’s a testament to the power of DIY, proving that with careful planning, the right tools, and a little dedication, you can create high-quality, custom furniture that perfectly suits your home and style.
We genuinely hope you love this DIY sideboard as much as we do, and that our detailed guide and free plans inspire you to embark on your own woodworking adventure. Imagine the satisfaction of telling guests, “I made that myself!”
We would absolutely LOVE for you to PIN this project to your DIY boards on Pinterest and share it with all your friends and fellow craft enthusiasts! Your shares help our passion for DIY reach even more people.
Thank you so much for stopping by and taking the time to explore our latest creation. Please don’t hesitate to leave a comment below or reach out if you have any questions at all about the build process, materials, or tools. Happy building!
~Whitney