
Hello DIY Enthusiasts!
Transform Your Space: The Ultimate DIY Framed Chalkboard Wall Project
Welcome back, creative minds! We’re kicking off the week with an exciting project that promises to revolutionize a forgotten corner of your home. To stay updated with all our latest inspirations and projects, make sure to follow us on Instagram!
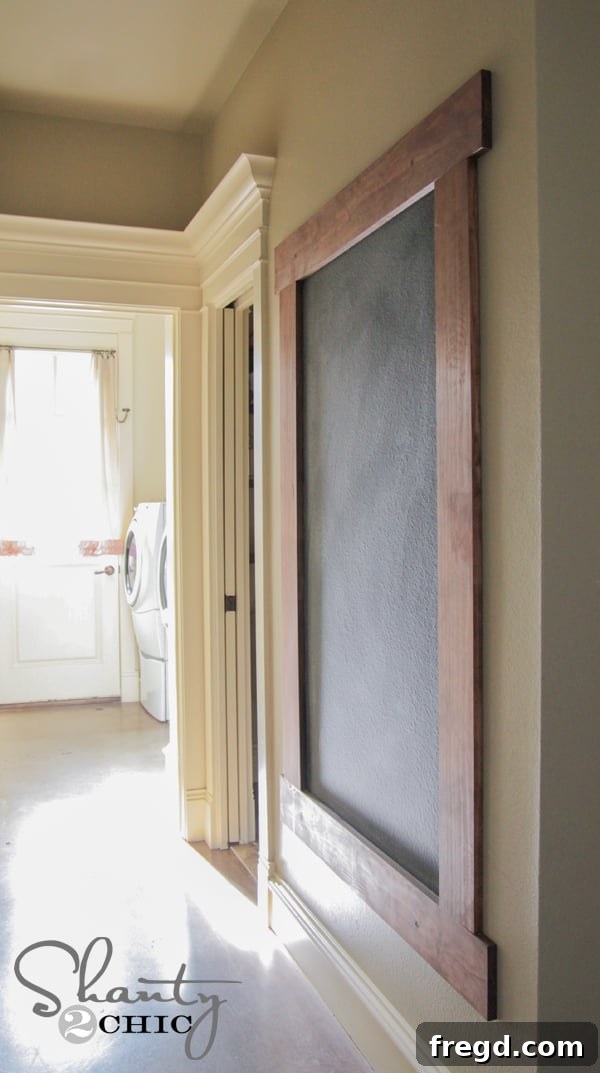
For years, a particular wall in my home has been a source of quiet frustration – simply… blank. Five long years I’ve stared at it, bored to tears, longing for it to be something more than just a wall. Well, the waiting game is officially over! I’m thrilled to unveil my brand new DIY framed chalkboard wall, a project that has not only breathed new life into my hallway but also added immense functionality and charm to our daily lives.
Why a DIY Framed Chalkboard Wall is Your Next Must-Do Project
Just look at how charming that turned out! Our home features a rather narrow hallway, and the opposing wall already boasts my DIY board and batten wall, meaning I needed a solution that was sleek, practical, and wouldn’t protrude too much. This framed chalkboard wall fits the bill perfectly, adding a touch of rustic elegance without sacrificing precious space. It’s truly incredible how well it complements the existing decor, and I absolutely adore the finished look!
Beyond its aesthetic appeal, a DIY framed chalkboard wall offers a multitude of benefits. Imagine having a central hub for family messages, daily to-do lists, grocery reminders, or even a creative space for your kids to express themselves. It’s a dynamic piece of wall art that changes as often as your needs or artistic whims do. The best part? I constructed this entire project for less than $30 and had it completed in no time at all. If you’re looking for a high-impact, low-cost DIY, you’ve found it! Here’s precisely how I brought this vision to life.
Gathering Your Essential Supplies for a Budget-Friendly Build
Before diving into the construction, it’s crucial to gather all your materials. Opting for readily available and affordable supplies helps keep this project firmly within budget, proving that stunning home upgrades don’t have to break the bank. Here’s a detailed list of what you’ll need:
- 1 – 1x6x8′ Pine or Whitewood board: This will form your main horizontal frame pieces. Pine and Whitewood are excellent choices for their affordability, ease of working, and consistent grain, making them perfect for staining.
- 2 – 1x6x6′ Pine or Whitewood boards: These will be used for the vertical sides of your frame. Again, the choice of pine or whitewood offers a great balance of cost and workability for a smooth finish.
- Rust-Oleum Chalkboard Paint: This specialty paint transforms any surface into a functional chalkboard. Its ease of application and durability make it ideal for this project, allowing for countless messages and drawings.
- Varathane Stain in American Walnut: For achieving that rich, classic wood finish on your frame. Varathane stains are renowned for their quick drying times and deep color penetration, simplifying the staining process.
- Kreg Jig (optional and totally recommended): While not strictly essential if you have alternative joinery methods, a Kreg Jig simplifies creating strong, clean joints, especially for beginners. It’s a game-changer for speed and precision.
- General woodworking tools: A miter saw (or hand saw), a drill, measuring tape, pencil, safety glasses, and wood screws.
- Painter’s tape: For masking off your wall to ensure crisp paint lines.
- Contractor’s paper or drop cloths: To protect your work area during staining and painting.
- Stud finder: Crucial for securely mounting the frame to your wall.
- Stainable wood filler: For concealing screw holes for a flawless finish.
Step-by-Step Construction: Building Your Chalkboard Frame
The journey to a beautiful framed chalkboard wall begins with precise cuts and a sturdy frame. Don’t be intimidated; this process is straightforward and rewarding!
1. Making Your Initial Wood Cuts
Accuracy in your cuts is paramount for a professional-looking frame. Start by carefully measuring and marking your boards. I cut the 8-foot board into two 48-inch pieces. These will serve as the top and bottom horizontal elements of your frame. Next, I cut each of my two 6-foot boards to 55 inches. These will form the vertical sides. For these cuts, I relied on my Ridgid miter saw, which provides incredibly clean and precise cuts. However, if you’re working with a smaller budget or prefer manual tools, a reliable hand saw can achieve similar results with a bit more effort. Always double-check your measurements before making any cuts!
2. Creating Strong Joints with a Kreg Jig
For robust and hidden joinery, I highly recommend using a Kreg Jig. This tool makes woodworking accessible even for beginners, allowing you to create strong pocket holes quickly and efficiently. I used my Kreg Jig to make two 3/4-inch pocket holes on each end of both of my 55-inch vertical boards. These strategically placed holes will allow you to discreetly attach the vertical pieces to the horizontal ones, creating a clean, seamless frame without visible screws from the front.
For those new to woodworking, this truly is a great beginner Kreg Jig project! Many of our readers often inquire about which Kreg Jig model we prefer. For two years, we extensively used and loved the K4 model. However, the new K5 is absolutely phenomenal! It boasts numerous fantastic new features that make it even more user-friendly (if that’s even possible!) and significantly cuts down on assembly time. If you’re serious about DIY, investing in a good Kreg Jig is highly recommended.
3. Assembling the Frame
With your pocket holes drilled, it’s time to bring your frame together. Carefully line up your boards on a flat, stable surface, arranging them as shown in the picture below. The 55-inch vertical boards will sit 2 inches in from the edge of your 48-inch horizontal boards. This offset creates a visually appealing inner edge for your chalkboard area and ensures structural integrity.
Next, using your Ryobi 18V drill, drive 1 1/4-inch pocket hole screws through the pre-drilled pocket holes in the 55-inch boards and into the ends of the 48-inch boards. Ensure these connections are snug and secure to create a strong, stable frame. This method keeps all screw heads hidden, contributing to the clean, finished look of your project.
Repeat this process for the other side to complete the rectangular frame. When all four sides are securely fastened, you’ll have a sturdy, beautifully constructed wooden frame ready for the next steps. It will look something like this, a testament to your budding woodworking skills!
4. Staining Your Custom Frame
With the frame assembled, it’s time to add character with stain. I carefully laid my frame on contractor’s paper to protect my workspace from any drips or spills. Ensuring good ventilation is important when working with stains.
For this project, I discovered a new favorite stain line, easily found at Home Depot. It’s called Varathane, and I chose the American Walnut shade for its rich, warm tones that perfectly complement a rustic or farmhouse aesthetic. This stain is very similar in quality and performance to the Rust-Oleum stains we’ve long admired. Its standout features include an impressive 1-hour dry time, and remarkably, it only requires a single coat to achieve full, vibrant color. This makes the staining process incredibly fast and efficient – woohoo for saving time!
After applying the stain evenly with a cloth or brush, allow it ample time to dry thoroughly according to the manufacturer’s instructions. Here’s my frame drying, patiently awaiting its transformation into a functional piece of art.
Preparing and Painting Your Wall with Chalkboard Paint
While the frame was drying, I shifted my focus to the wall itself. For the chalkboard portion, I opted for Rust-Oleum Chalkboard paint. This paint is a fantastic choice for its quality and affordability, also readily available at Home Depot.
Addressing Wall Texture Considerations
Now, a quick note on wall texture: my walls have what’s often described as an ‘orange peel’ texture. It’s certainly textured, but not overly heavy or rough. I made the conscious decision not to sand the wall to smooth it out. My reasoning was twofold: first, the existing texture doesn’t bother me in the slightest for this application, and second, I love the flexibility it offers. Should I ever wish to remove the chalkboard wall in the future, I can simply paint over the area with a different color, and no one would ever know a chalkboard was there. This reversibility is a significant advantage of painting directly onto a lightly textured wall.
However, if your walls have a very heavy, prominent texture, you might want to consider an alternative approach. Instead of painting directly onto the wall, you could apply the chalkboard paint to a 1/4-inch piece of MDF or plywood, and then frame that panel. This provides a perfectly smooth writing surface without altering your permanent wall structure. My two cents? I would always opt for painting a separate panel before attempting to sand down a heavily textured wall. Sanding a large area of wall texture is a permanent change, and there’s no easy way to revert it to its original state if you change your mind down the line. It’s a commitment, so choose wisely!
Taping and Painting for a Perfect Finish
Once you’ve decided on your approach, begin by meticulously taping off the area of your wall where the chalkboard will be. Precise taping is key to achieving sharp, clean edges. Refer to the measurements diagram below to guide your taping process, ensuring your chalkboard area is perfectly sized to fit within your frame.
For applying the chalkboard paint, I experimented with a new roller system I discovered at Home Depot, and I absolutely adore it! It’s a microfiber roller manufactured by Wooster, and it has quickly become my go-to choice for painting. This roller makes the application incredibly fast and, most importantly, leaves absolutely no paint lines on the wall. The smooth, even coverage it provides is exceptional – woohoo for flawless results!
I applied two coats of Rust-Oleum Chalkboard paint to my wall, allowing adequate drying time between coats as per the product instructions. This paint dries remarkably quickly, which is a huge bonus. In less than an hour, the painted area was dry to the touch and ready to be framed, minimizing project downtime.
Final Assembly: Attaching Your Beautiful Frame to the Wall
Once both the frame and the chalkboard paint were completely dry, it was time for the satisfying step of attaching the frame to the wall. This is where precision and proper mounting techniques ensure your chalkboard wall is not only beautiful but also incredibly secure.
To properly mount the frame, I first held it up against the freshly painted chalkboard area on the wall. Using a reliable stud finder, I marked the locations of the wooden studs within the wall. This particular stud finder is the model I consistently use and trust. A stud finder is an incredibly handy tool that I would wholeheartedly recommend to anyone planning to hang anything substantial on their walls. It saves countless hours of frustration and potential headaches by accurately locating studs, which are essential for secure anchoring. You simply glide it along the wall, and it emits an audible beep when it detects a stud.
After marking the stud locations, I transferred these marks to two spots on each of my 48-inch horizontal frame boards where they would align with the studs. Next, I used my drill to pre-drill a pilot hole at each marked spot on the frame. Pre-drilling is a crucial step that prevents wood splitting and ensures your screws drive in smoothly. Finally, I used 3-inch torx screws to securely attach the frame directly to the wall, driving them through the pre-drilled holes in the frame and into the studs. Wood screws can also be used effectively for this purpose. These screws create a small, visible hole in the frame, but don’t worry – that’s easily remedied! To conceal these holes, I used stainable wood filler, allowing it to dry before lightly sanding and touching up the spots with a bit of the American Walnut stain. This method provides a very clean, professional finish, making the screw holes virtually invisible upon close inspection. Easy peasy, indeed!
Seriously, you really can’t see the filled and stained spots at all unless you’re looking extremely closely. The result is a seamless, built-in look that truly elevates the entire space. Woohoo for hidden hardware and perfect finishes!
The Grand Reveal: Your New Functional and Stylish Chalkboard Wall
And there you have it – the completed DIY framed chalkboard wall! It’s incredibly satisfying to see a once-boring wall transformed into such a functional and aesthetically pleasing feature. Here are a few more shots of the finished project, showcasing its charm and utility in our home.
What do you think of this transformation? My kids are absolutely thrilled with it, and honestly, so am I! It’s become a central point for notes, drawings, and even impromptu games of tic-tac-toe.
This project undeniably turned a dull, neglected wall into a super functional and undeniably cute focal point. And, did I mention the best part again? The entire endeavor cost under $30! That’s right, a high-impact home improvement for a minimal investment. Bam! It just goes to show that with a little creativity and elbow grease, you can achieve amazing results without breaking the bank.
We would absolutely love for you to share and PIN my new framed chalkboard wall with all your friends, family, and fellow DIY enthusiasts! Spreading the inspiration helps others discover the joy of creating. If you have any questions at all about the process, the materials, or anything else related to this project, please don’t hesitate to ask in the comments below. Happy building!
~Whitney