
Craft Your Own Rustic Charm: An Easy DIY Succulent Wood Centerpiece
Good morning, DIY enthusiasts! Get ready for a truly delightful, budget-friendly, and incredibly simple project that will infuse natural beauty into your home. We’ve always been captivated by the minimalist elegance of succulents and the timeless warmth of natural wood. Today, we’re bringing these two loves together to create a stunning, versatile centerpiece that you’ll adore. Join us as we walk through the steps to build your very own DIY Succulent Centerpiece!
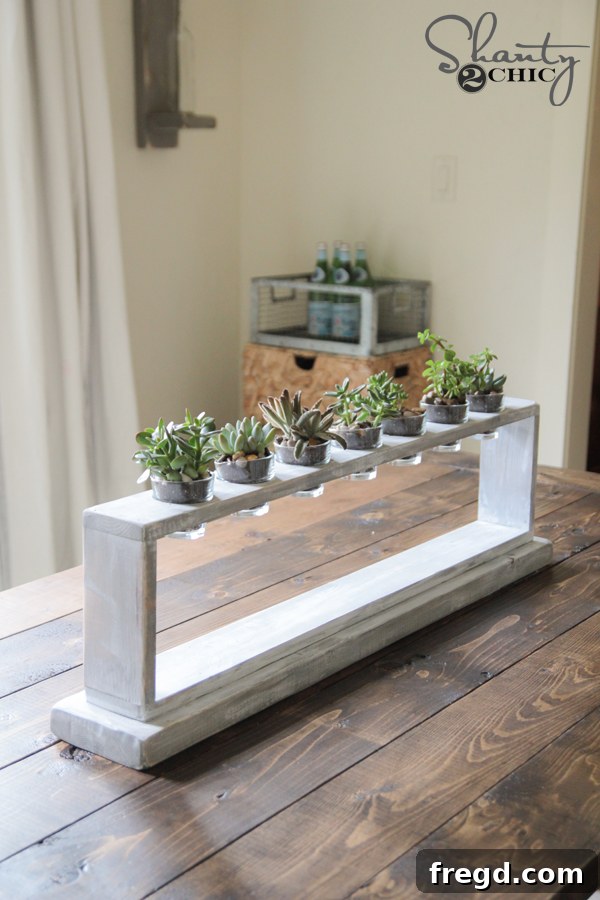
Isn’t it absolutely charming? We’re completely smitten! The best part about this handcrafted wooden planter box is its remarkable versatility. While it shines brightly as a captivating dining room centerpiece, its rustic appeal makes it a perfect addition to a console table, a mantelpiece, a kitchen island, or even an outdoor patio setting. This project is surprisingly straightforward to make, and if your workshop or garage boasts a lumber collection anything like ours, you might even have most of the necessary wood scraps lying around!
Gather Your Essentials: Materials and Tools for Your Succulent Planter
Every successful DIY project begins with a well-organized collection of materials and the right tools. For this elegant succulent planter box, you’ll primarily need some basic woodworking supplies and a sprinkle of creative enthusiasm. The beauty of this project lies in its simplicity and affordability, making it an excellent choice for both seasoned crafters and those new to the world of DIY.
Wood Components:
- One (1) 1x4x8 Pine or White Wood Board: This board will form the main structure of your planter box. White wood is often a budget-friendly and easily accessible choice, typically retailing for around $5 for an 8-foot length, which helps keep the overall project cost down. Pine is another excellent alternative, offering a lovely grain that takes stain beautifully.
- One (1) 2x6x36″ Wood Piece: This will serve as the robust and visually appealing base for your planter. The wider and thicker profile of the 2×6 will give your finished centerpiece a more substantial, custom-built, and high-end appearance.
Essential Tools and Hardware:
- Miter Saw or Circular Saw: For making precise and clean cuts on your wood boards.
- Measuring Tape and Pencil: Absolutely crucial for accurate marking before any cutting or drilling.
- Electric Drill: A standard drill will be needed to power your hole saw bit.
- 2.5-inch Carbon Hole Saw Bit: Specifically, a bit like this Ryobi hole saw bit from Home Depot is perfectly sized for creating the openings for your succulent pots or votives. The small pilot point on the end of such bits helps guide your drill for accurate hole placement.
- Sander (Orbital or Corner Cat): An orbital sander is great for general smoothing, while a Corner Cat sander is ideal for detailed distressing, especially on edges and corners.
- Wood Glue: A strong wood adhesive, such as Gorilla Wood Glue, is vital for creating durable and long-lasting joints.
- Bar Clamps: These are indispensable for securely holding wood pieces together while the glue sets and before you apply fasteners, ensuring tight and even joins.
- Brad Nailer and 1.25″ Brad Nails: A tool like the Ryobi AirStrike brad nailer makes quick work of assembly, providing immediate hold to complement the wood glue.
- Safety Gear: Always prioritize safety! Wear appropriate safety glasses and hearing protection when operating power tools.
Finishing and Planting Supplies:
- Wood Stain: Varathane Weathered Gray stain provides a beautiful, aged base coat for our distressed look.
- Chalk Paint: Rust-Oleum Chalked paint in Linen White creates a soft, matte top layer that’s perfect for distressing.
- Mini Pots or Glass Votives: Small clay pots are a classic choice, but we found charming glass votives (like the affordable $.77 ones from Hobby Lobby) that fit perfectly and add a unique touch.
- River Rocks: These will be placed at the bottom of your planting containers for essential drainage.
- Succulent Potting Mix: A specialized soil blend designed to provide optimal drainage and aeration for succulents.
- Succulents: Select a variety of beautiful, low-maintenance succulent plants to fill your new planter.
Step-by-Step Construction: Building Your Rustic Succulent Planter Box
Follow these detailed instructions carefully to construct your elegant succulent centerpiece. Each step is designed to be straightforward, ensuring a rewarding and successful DIY woodworking experience. Take your time, measure twice, and cut once!
Step 1: Precisely Cut Your Wood Pieces
The foundation of any good woodworking project is accurate cuts. Begin by carefully measuring and cutting your 1x4x8 board. For this planter, you will need to cut the following pieces:
- Two (2) pieces at 34 inches long: These will form the elongated top and bottom panels of your planter box.
- Two (2) pieces at 7 inches long: These shorter pieces will serve as the sturdy end panels, connecting the top and bottom.
Next, take your 2×6 board and cut it to a length of 36 inches. This will be the robust and decorative base for your entire centerpiece. Always use a reliable measuring tape and pencil to mark your lines clearly, and ensure you’re wearing your safety glasses before operating any saw. A miter saw will provide the cleanest and most accurate crosscuts for this project.
Step 2: Drill the Succulent Holes in the Top Panel
This is where the unique character of your planter truly begins to emerge. Grab one of your 34-inch 1×4 pieces – this will be your top panel, the surface through which your beautiful succulents will emerge. An essential tip for achieving clean, professional-looking holes is to place a scrap piece of wood directly underneath your workpiece. This “backer board” prevents tear-out as the drill bit exits the wood, resulting in much smoother and cleaner edges for your holes.
Attach your 2.5-inch hole saw bit to your electric drill. Many quality hole saws, including the Ryobi bit we recommend, feature a small pilot point at the center. This point is incredibly helpful for accurately positioning your drill, ensuring that each hole is precisely where you want it and preventing the drill from “walking” across the wood surface. We spaced our holes approximately 4 inches apart, center-to-center, which comfortably accommodates seven succulents, allowing each plant adequate space to be admired. Before drilling, meticulously mark the center point for each hole along your 34-inch board to ensure perfectly even spacing.
When drilling, apply steady, consistent pressure and allow the hole saw to do the work. Avoid forcing it, as this can lead to splintering or an uneven cut. Once you have successfully drilled all seven holes, you’ll have a beautifully perforated top panel, ready for the next exciting stage of assembly.
Step 3: Smooth and Refine All Edges
After all your cuts and drills are complete, it’s highly recommended to take a moment to soften and smooth the edges of all your wood pieces. Use your sander (an orbital sander is ideal for flat surfaces, and even a sanding block works well for edges) to gently smooth any rough spots, splinters, or sharp edges. Pay particular attention to the edges around your newly drilled holes. This step not only makes the finished piece much safer and more pleasant to handle but also gives it a more refined and professional feel, elevating the overall quality of your handmade rustic decor. You’re aiming for a subtle softening of the edges, not a complete reshaping, to preserve the inherent rustic charm of the wood.
Step 4: Assemble the Main Planter Box Structure
Now, it’s time to bring the individual pieces of your planter box together! Begin by attaching the two 7-inch end pieces to each end of your drilled 34-inch top panel. Apply a continuous, even line of strong wood glue, such as Gorilla Wood Glue, along the edges where the pieces will meet. Wood glue provides incredible shear strength and creates a remarkably durable bond that will ensure the longevity of your centerpiece.
Once the glue is applied, position the end pieces precisely and use bar clamps to firmly hold them in place. Clamps are absolutely indispensable for ensuring a tight, secure bond while the glue begins to set and before you add mechanical fasteners. This clamping step is critical for the structural integrity and squareness of your planter. With the pieces securely clamped, use your Ryobi AirStrike brad nailer (or any comparable brad nailer) to attach them permanently with 1.25-inch brad nails. The nails offer immediate holding power, allowing you to quickly move on to the next step without waiting for the glue to fully cure, though you should still allow adequate drying time for maximum joint strength.
After both end pieces are securely attached, carefully flip the partially assembled box over. Now, take your remaining 34-inch 1×4 piece – this will form the bottom panel of your planter box. Attach it using the exact same method: apply a generous bead of wood glue along the connecting edges, position it accurately, and then secure it firmly with your brad nailer. Congratulations! You now have a complete, sturdy, and well-constructed planter box ready for its base and finishing touches.
Step 5: Attach the Substantial Base for Added Presence
To truly elevate the aesthetic and provide your centerpiece with a more robust, custom-built feel, we will now attach the wider 2×6 base. Take your 36-inch 2×6 piece of wood. This thicker and wider base will offer exceptional stability and a visually striking foundation for your planter box, enhancing its overall presence on any surface.
Carefully center the assembled 1×4 box on top of the 2×6 base. Ensure it is perfectly aligned, allowing for an even overhang on the ends (the 34-inch box on a 36-inch base gives a nice 1-inch overhang on each end). Apply a generous and even amount of wood glue to the entire underside of the 1×4 box where it will make contact with the 2×6 base. Press the box firmly onto the base, ensuring good contact for the glue. Then, using your brad nailer once more, secure the box to the base. You can nail from the top of the 1×4 box down into the 2×6 base, or carefully from the underside of the 2×6 base up into the 1×4 box if you prefer to conceal the nail holes later. This combination of strong wood glue and brad nails creates an incredibly robust and lasting bond, completing the structural assembly of your magnificent succulent planter.
The Art of the Finish: Achieving a Beautifully Weathered and Rustic Look
The finish is arguably the most transformative step, taking your raw wood planter and turning it into a captivating piece of home decor. We opted for a popular distressed, weathered style that beautifully complements the natural appeal of succulents and adds a touch of farmhouse charm.
Step 6: Apply a Weathered Gray Base Stain
Once your assembled planter is structurally sound and any glue has fully dried, it’s time to begin the finishing process. Start by applying an even coat of Varathane Weathered Gray stain over the entire piece. This particular stain is fantastic for creating a rustic, aged wood appearance that serves as a perfect base layer for our distressed effect. Apply it thoroughly with a foam brush or a clean rag, always working with the grain of the wood. Ensure you achieve full coverage, carefully getting into all the crevices and corners. Allow the stain to penetrate for a few minutes before wiping off any excess with a clean cloth. Refer to the manufacturer’s instructions for specific drying times, but typically, several hours are needed for it to dry completely.
Step 7: Layer with Linen White Chalk Paint
After the weathered gray stain is completely dry and cured, proceed to apply a single, even coat of Rust-Oleum Chalked paint in Linen White over the entire stained piece. Chalk paint is an excellent medium for this technique due to its ultra-matte finish and its inherent ease of distressing. You don’t need to strive for a perfectly opaque or factory-smooth coat; in fact, a slightly less-than-perfect application actually enhances the authentic distressed effect we are aiming for. Make sure to cover all visible surfaces evenly. Allow this chalk paint layer to dry thoroughly according to the product instructions – patience here will prevent issues in the next step.
Step 8: Distress for a Timeless, Aged Appearance
This is where the true character of your succulent centerpiece comes to life! Once the chalk paint is completely dry, take your Corner Cat sander (or a fine-grit sanding block, typically 180-220 grit). Strategically distress the entire piece by gently sanding away portions of the white chalk paint. Focus your efforts on edges, corners, raised areas, and other spots that would naturally show wear and tear over time. As you sand, the beautiful underlying weathered gray stain will begin to peek through, creating a stunning contrast and an authentically aged, farmhouse-inspired appearance. Experiment with the pressure and duration of your sanding to achieve your desired level of distress – from subtly aged to heavily worn. We absolutely love the rich, textured results this multi-layered finishing process yields!
For added protection and durability, especially if your centerpiece will be placed in a high-traffic area or might be exposed to moisture (such as from occasional plant watering), consider applying a clear protective topcoat. A clear wax or a matte polyurethane finish will seal the paint and stain, safeguarding your beautiful distressed finish for many years to come.
Bringing It to Life: The Joy of Planting Your Succulents
With your beautifully crafted and finished planter box complete, it’s time for the most exciting final step: adding the vibrant and resilient succulents that will truly bring your centerpiece to life! This is where your personal style can really shine through in your plant selection.
Step 9: Select Your Planter Inserts
This custom wood planter box is designed to perfectly accommodate mini clay pots, which offer a classic and earthy look. However, during our search, we stumbled upon an even more charming and incredibly budget-friendly alternative: small glass votives! We found these delightful little gems at Hobby Lobby for an unbeatable price of just $0.77 each – a deal too good to pass up. Glass votives offer a sleek, modern touch, allowing the soil, river rocks, and even the root systems of your succulents to be subtly visible, which adds another fascinating layer of visual interest to your arrangement. Whichever option you choose, ensure they fit snugly and securely into the 2.5-inch holes you drilled in the top panel.
Step 10: Layer for Optimal Drainage
Before adding any soil, place a small, generous layer of river rocks at the very bottom of each votive or mini pot. This step is absolutely crucial for the health and longevity of your succulents. Succulents are highly susceptible to root rot if they sit in standing water, and these river rocks provide essential drainage, allowing excess water to escape from the soil. The rocks also add a lovely decorative touch, especially if you’re using clear glass votives, creating an appealing visual contrast within your planter.
Step 11: Pot Your Beautiful Succulents
Now, fill each prepared cup with a specialized potting mix designed specifically for succulents and cacti. This type of soil is formulated to provide superior drainage and aeration, which is absolutely vital for these drought-tolerant plants. Carefully place one succulent plant into each cup, gently arranging its roots, and then fill around its base with more potting mix. Lightly press the soil down to secure the plant in place. The minimalist aesthetic of the glass votives, combined with the incredibly low-maintenance nature of succulents, makes this entire arrangement wonderfully appealing. You’ll truly appreciate how little attention these plants require, freeing you up to simply enjoy their unique beauty and the rustic charm they add to your space!
Essential Succulent Care Tip: Succulents truly thrive on neglect! Water them thoroughly but infrequently, always allowing the soil to dry out completely between waterings. Place your stunning new centerpiece in a location that receives plenty of bright, indirect light for optimal growth, vibrant color, and overall plant health. Avoid direct, harsh sunlight unless your specific succulent variety is known to tolerate it.