
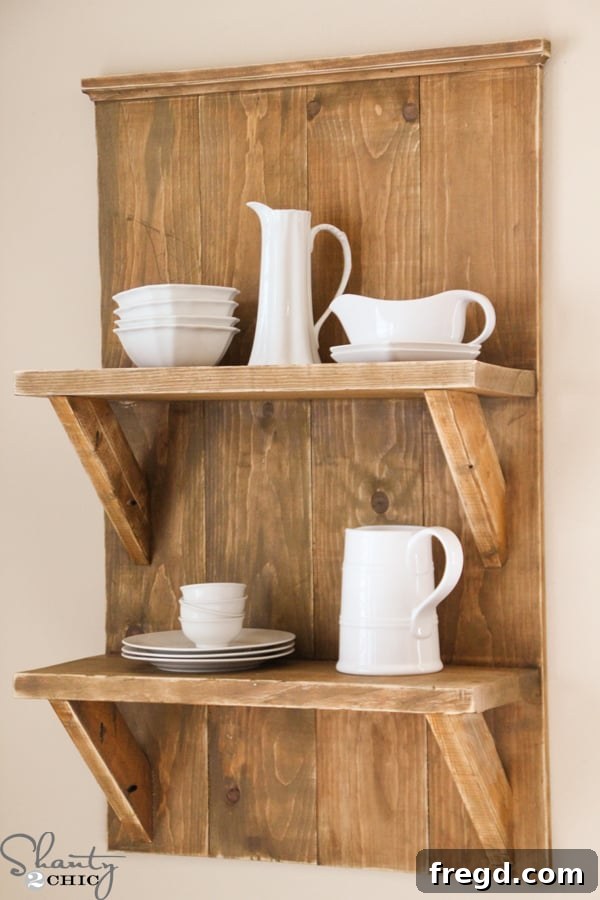
Welcome, fellow DIY enthusiasts! Get ready to be inspired because I’m thrilled to unveil a project that consumed my weekend in the best possible way, and the result is absolutely stunning. I poured my heart into crafting this magnificent, oversized shelf, specifically designed to beautifully display my cherished collection of dishes right in the heart of my kitchen. And let me tell you, it’s not just the aesthetics I’m head over heels for; the sheer simplicity of this build makes it an absolute winner!
This project is a fantastic excuse to dive into your lumber scrap pile. Seriously, dig deep! I was fortunate enough to salvage most of the wood from our scrap collection at our new house construction site. But fear not if your scrap bin is looking a little lean; I’ve got a comprehensive shopping list prepared so you can gather everything you need with ease. Let’s transform some lumber into a statement piece for your home!
Tools and Materials You’ll Need
Before we embark on this exciting journey, it’s crucial to have all your tools and materials ready. A well-prepared workspace makes any DIY project smoother and more enjoyable. Here’s what you’ll need:
Essential Tools:
- Kreg Jig: A pocket-hole jig is indispensable for strong, hidden joinery.
- Drill/Driver: For drilling pilot holes and driving screws.
- Miter Saw (or Hand Saw & Miter Box): Essential for precise angle cuts, especially for the braces and trim.
- Tape Measure & Pencil: For accurate measurements.
- Clamps: To hold pieces securely while drilling and assembling.
- Wood Glue: For added strength at joints.
- Brad Nailer (Optional, for Trim): Speeds up trim attachment, but a hammer and finishing nails work too.
- Sander (e.g., Ryobi Corner Cat Sander): For smoothing and distressing.
- Safety Glasses & Hearing Protection: Always prioritize safety!
Materials Shopping List:
- For the Main Frame: 2 pieces of 1×8 lumber, 8 feet long (or equivalent from scrap).
- For the Shelves: 1 piece of 2×12 lumber, 8 feet long (or equivalent from scrap).
- For the Braces: Approximately 5 feet of 2×4 lumber (or scrap pieces).
- For Optional Trim:
- 1 piece of 1×2 lumber, 4 feet long.
- 1 piece of cove moulding, 3 feet long.
- Pocket Hole Screws:
- 1 1/4 inch (for 1×8 frame).
- 2 inch (for 2×12 shelves and 2×4 braces).
- Wood Screws: 1 1/4 inch (for reinforcement).
- Wood Filler: For patching imperfections and nail holes.
- Wood Stain: Your chosen color (e.g., similar to “Wheat” from Rustoleum).
- Clean Cloths & Foam Brush: For applying and wiping stain.
- Heavy-Duty French Cleat: For secure wall mounting (consider a 200 lb capacity for peace of mind).
Having everything organized before you begin will make the build process seamless and enjoyable. Now, let’s get our hands dirty and construct this beautiful piece!
Step 1: Building the Main Shelf Frame
The foundation of our stunning new shelf begins with constructing the main frame. This will provide the sturdy side supports for our shelves.
I started with two 1×8 boards, each 8 feet in length. From these, I precisely cut four pieces, each measuring 47 3/4 inches. These will form the vertical sides and the horizontal top and bottom supports of our shelf.
Next, it’s time to create the pocket holes, which are a fantastic way to achieve strong, hidden joints. Using my Kreg Jig, I drilled three pocket holes along one side of three of these boards. These holes will allow us to securely connect the pieces without visible fasteners on the exterior. Ensure your jig is set for the correct wood thickness (3/4 inch for 1x material).
As you can see, I marked the locations where I drilled the pocket holes. This helps with alignment and ensures even spacing for maximum strength. With the pocket holes drilled, I then joined these boards using 1 1/4-inch pocket hole screws. It’s always a good practice to apply a small amount of wood glue to the joint before driving the screws; this significantly enhances the strength and durability of your piece. Clamp the pieces together firmly before screwing to prevent any shifting.
Step 2: Installing the Robust Shelves
Now that our main frame is taking shape, it’s time to add the robust shelves that will hold all your beautiful dishes and decor.
For the shelves themselves, I was able to grab a couple of 2×12 pieces from the scrap pile at our new home – a true testament to the beauty of upcycling! If you’re buying new, a single 8-foot 2×12 from your local hardware store will suffice. You can even ask them to make the cuts for you right there, saving you time and effort. I cut two boards to a precise length of 29 inches. These wider boards provide ample space and a substantial look for your displayed items. Just like the frame, I drilled three pocket holes along one side of each of these shelf boards. This method ensures that the fasteners remain hidden, contributing to a clean and professional finish.
With the pocket holes ready, it’s time to attach the shelves to the frame. For superior strength, I recommend applying a thin, even line of wood glue along the edge of the shelf where your pocket holes are located. This creates a bond that is often stronger than the wood itself, ensuring your shelves can handle a substantial load.
Carefully position your shelf. The key here is to have the pocket holes facing downwards towards the bottom of the piece, ensuring they are completely out of sight once the shelf is hung. This attention to detail elevates the overall appearance. I placed the bottom shelf at 11 inches from the very bottom of the frame and the top shelf at 28 inches from the bottom. Remember to measure from the bottom edge of each shelf. Secure each shelf with 2-inch pocket hole screws, ensuring they are driven flush for a smooth finish. Proper clamping during this step is crucial to hold the shelf in place and prevent any movement while you drive the screws.
Step 3: Adding Structural Braces for Stability
To enhance both the structural integrity and the rustic aesthetic of the shelf, we’ll now add diagonal braces.
For these braces, I utilized some scrap 2×4 lumber. If you’re purchasing new, you’ll only need about 5 feet of 2×4. I cut four pieces, each measuring 14 inches from long point to long point, with 45-degree angles on both ends. This creates a perfect diagonal support. If you don’t own a compound miter saw, don’t despair! A simple hand saw used with an inexpensive miter box can achieve the exact same precise angles. It just takes a little more manual effort but delivers equally great results.
After cutting the angles, I drilled one pocket hole at the end of each 2×4 brace piece. Pay close attention to how I positioned the 2×4 in the Kreg Jig: the 45-degree angle was flush with the jig, allowing for the pocket hole to be drilled at the correct angle for attachment. This ensures a seamless and strong connection to the main frame.
Now, let’s attach these braces to our shelf structure.
I positioned each brace 2 inches in from the sides of the frame. This spacing provides excellent support and a visually balanced look. Secure them using 2-inch pocket hole screws. The image clearly illustrates where all my pocket holes were placed for both the frame and the braces, giving you a visual guide to follow. Don’t forget to add a touch of wood glue before screwing for maximum hold.
For an extra layer of security and peace of mind, especially considering the weight this shelf will hold, I reinforced the shelves and the braces. From the back of the piece, I drove 1 1/4-inch screws directly into the shelves and braces. This hidden reinforcement ensures that your shelf remains rock-solid and stable for years to come.
Step 4: Adding Optional Decorative Trim
At this point, your shelf is fully functional and structurally sound. You could choose to leave it as is and move straight to finishing. However, adding decorative trim can elevate the piece, giving it a more refined and customized look.
I opted to add a simple yet elegant trim, which truly completes the farmhouse-inspired aesthetic. Here’s how to do it:
I purchased a 4-foot piece of 1×2 lumber and a 3-foot piece of cove moulding. For the cove moulding, I cut one piece at 29 1/4 inches, measured from long point to long point. I also cut two smaller pieces at 1 1/4 inches, cut from long point to square, to create the return edges. The 1×2 piece was cut to 30 1/4 inches. Precision in these cuts is key for a seamless trim installation.
When cutting the cove moulding, I used a technique similar to cutting the 2×4 braces. The trick is to slide the moulding down the saw fence and then swing the arm around for the next 45-degree cut, rather than flipping the piece over. If you flip it, your angles won’t match up correctly. Again, if you don’t have a miter saw, a hand saw with a miter box works perfectly for these delicate cuts.
First, apply a thin line of wood glue to the back of the 1×2 trim piece, then carefully nail it into place, leaving about a 1/2-inch overhang on the sides. This overhang provides a nice visual detail. Follow up by attaching the cove moulding directly underneath the 1×2. It should wrap neatly around the top edge of the shelf frame. Don’t worry if your angles aren’t absolutely perfect – a common occurrence in woodworking! Simply use wood filler to mend any small gaps, sand them smooth once dry, and no one will ever notice. I used my brad nailer for quick and easy attachment of these trim pieces, but a hammer and finishing nails will also do the trick, just remember to countersink the nail heads.
Step 5: The Art of Finishing – Stain and Distress
Now for the fun part that truly brings out the character of your handmade shelf: the finish! This is where you can really make the piece your own.
I experimented with a new color of stain for this project, and I absolutely adore the result! It was called “Wheat” and, sadly, is no longer available. However, this stain looks very similar and would achieve a comparable warm, inviting tone. The key to a beautiful stain finish is careful application. I wiped on a single coat using a foam brush, allowed it to sit for approximately five minutes, and then gently wiped it down with a clean, lint-free cloth. The goal isn’t to completely remove the stain, but rather to blend it evenly and remove any excess, ensuring a consistent color without blotches. Work in sections, applying and wiping before the stain dries too much.
Of course, I couldn’t simply leave it at that! To achieve that coveted reclaimed and worn look, I had to break out my Corner Cat Sander and distress the entire shelf. Don’t be shy with this step if you’re aiming for a truly antique or farmhouse feel. I went all in, focusing on edges, corners, and areas that would naturally show wear and tear over time. This technique adds depth, character, and an authentic aged appeal that perfectly complements the sturdy build of this shelf. You can also add further distressing by lightly tapping with a hammer, dragging a chain across the surface, or creating small divots to mimic years of use.
Step 6: Safely Hanging Your Heavy-Duty Shelf
Once your shelf is complete and its finish cured, the final, crucial step is hanging it securely. Given its size and robust construction, and especially once loaded with dishes, this shelf is quite heavy – likely around 60-70 lbs empty! Proper installation is paramount for safety and longevity.
I spent some time researching the best method for hanging substantial wall decor and was incredibly excited by my discovery: the French cleat system.
I opted for a heavy-duty French cleat, specifically one with a 200 lb capacity, to provide ample support and peace of mind. If you’ve never used one before, don’t be intimidated – I hadn’t either! But let me assure you, it was surprisingly easy. Many French cleat systems come with excellent instructions, often including helpful installation videos online (a quick YouTube search can guide you through the process). A huge bonus is that many even include a small built-in level, making it nearly impossible to hang incorrectly.
The actual hanging process took me only about 5 minutes, but I highly recommend enlisting the help of a friend or family member for the final lift. Positioning a heavy, large shelf precisely on the wall cleat is much easier and safer with an extra pair of hands. Ensure you locate wall studs for anchoring the cleat to the wall, as drywall anchors alone will not suffice for this amount of weight.
Mission accomplished! With the French cleat securely installed and the shelf mounted, it was time for the grand reveal. I dressed up my new creation with some beautiful white dishes, and I’m utterly in love with how it transformed my kitchen. The scale of this shelf truly makes a statement, and its functional design provides much-needed display and storage space.
What I particularly love about this piece is its incredible versatility and functionality. It’s not just a shelf; it’s a focal point, a conversation starter, and a practical storage solution all rolled into one. Its generous size commands attention and truly makes a statement in any room. The subtle trim on the top adds that perfect final touch, creating a polished yet rustic look that ties everything together beautifully. This piece would look equally fantastic in a living room displaying books or in a bathroom for towel storage.
I genuinely hope you’re as smitten with my large DIY shelf project as I am! Creating something with your own hands brings an unparalleled sense of satisfaction and pride. Don’t hesitate to personalize your build with different stains, paints, or distressing techniques to match your unique home decor style. We always appreciate your shares and pins, so if this project inspires you, please spread the love! Have a wonderful and creative week!
~Ashley