
Hey there, fellow DIY enthusiasts!
I am absolutely thrilled to finally unveil my latest home renovation triumph: a stunning DIY thin brick accent wall! Many of you who follow us on Instagram and Facebook have caught glimpses of my progress over the past few days, and I know you’ve been eagerly awaiting the full reveal. While I initially considered titling this post “How to Install a Thin Brick Wall,” I quickly realized that there are countless approaches to tackle such a project. Instead, I’m excited to share the exact method I employed to create this incredibly successful DIY thin brick wall – a process that proved to be both rewarding and surprisingly achievable for any determined homeowner.
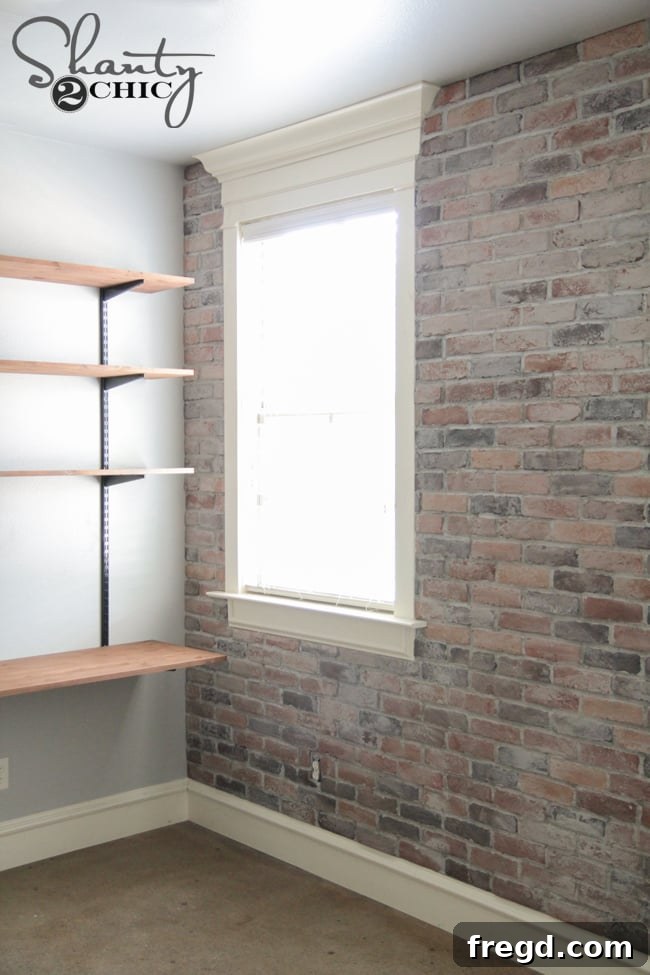
The transformation is truly remarkable, and I couldn’t wait another moment to share the final look with you. Just a small note: I still need to adjust the electrical sockets to accommodate the cover plates, but the allure of sharing this finished project was simply too strong to resist! Get ready to be inspired to bring that timeless, rustic charm into your own living space.
Transform Your Space with a DIY Thin Brick Wall: A Step-by-Step Guide
Isn’t it just captivating? Every time I step into this room, a wave of joy washes over me. The primary goal for this entire project was to create a wall that looked as if it had been an original feature of the house, standing proudly for decades. I believe we achieved that authentic, aged aesthetic perfectly, adding immense character and warmth to my son’s room. This comprehensive guide aims to demystify the process, proving that anyone with a little determination and the right tools can achieve professional-looking results. Don’t hesitate to reach out with any questions you might have along the way!
Choosing the Right Thin Brick Products
Let’s kick things off by discussing the foundation of any great brick wall project: the products themselves. The market is brimming with various thin brick options, and selecting the right one can feel overwhelming. After extensive research and comparison, I ultimately chose to go with Coronado Stone Products. Their range stood out to me because their products offered the most authentic look and feel, truly replicating the appearance of traditional bricks, which was crucial for achieving that desired vintage charm.
Coronado Stone Products boasts an impressive array of thin brick options, offering a multitude of colors, textures, and styles to suit any design vision. For my specific project, I selected their Special Used Brick in the Tribecca style. This particular choice delivers a rich blend of tones and a wonderfully distressed texture, contributing significantly to the wall’s antique appearance. While many Coronado products are conveniently available through major retailers like Lowe’s, you can also utilize their handy Distributor Locator on their website to find a local supplier for their full product line.
Below, you can see what these thin bricks look like up close. Notice the subtle variations in color and texture – these are key to creating a natural, weathered aesthetic that truly makes the wall come alive.
Each thin brick is unique, contributing to the overall cool, vintage feel that sets this product apart. The blend of hues and slight imperfections are what give the wall its undeniable character.
For this specific wall, which measures 12 feet by 9 feet, I used approximately 4 to 5 boxes of the thin brick. This can give you a good estimate for budgeting and purchasing for your own project, keeping in mind that coverage can vary slightly based on desired spacing and cuts.
Wall Preparation: Setting the Stage for Success
Before diving into the exciting part of laying bricks, proper wall preparation is non-negotiable. Here’s a look at my son’s wall before the transformation began. I had already painted the other walls in the room the previous week, intentionally leaving this one untouched since it was destined for a brick facade. The first crucial step was to remove all existing plate covers from electrical outlets and switches. Next, I ensured the wall surface was as clean as possible, free from dust, grease, or any debris that could compromise the mortar’s adhesion. This foundational cleanliness is vital for a long-lasting installation.
Given that this project can get quite messy, I took preventative measures by laying down scrap boards on the floor to protect against drips and spills. Heavy-duty construction paper, available in rolls, is another excellent option for floor protection. To ensure my brick rows would be straight and level, I utilized a reliable level to mark several horizontal lines across the wall. While I aimed for a slightly organic, “eyeballed” installation to enhance the vintage appeal, these guide lines were instrumental in keeping the overall pattern in check and preventing significant deviations.
Selecting and Mixing Your Mortar (Adhesive)
For attaching the thin bricks to the wall, I opted for a heavy-duty thinset mortar. Specifically, I chose ProBond from The Tile Shop. This isn’t my first rodeo with ProBond; I previously used it with great success to install my faux wood ceramic tile floor. It’s incredibly user-friendly when it comes to mixing and, in my experience, performs flawlessly.
Tips for Achieving Perfect Mortar Consistency
The secret to working effectively with thinset mortar lies entirely in achieving the correct consistency. This is a lesson I learned the hard way! My first attempt involved filling a bucket halfway with water and then adding the thinset. Big mistake! Thinset requires surprisingly little water relative to the amount of dry product. I ended up with a massive bucket of mortar that was too heavy to manage and, frustratingly, cured before I could even begin using it. This resulted in significant waste and a valuable, albeit costly, lesson learned. You’re welcome for the shortcut!
For Trial 2 (the successful one!), I adopted a much smarter approach: I poured a very small amount of water into the bottom of my bucket first. Then, I gradually added the dry thinset powder, mixing continuously until I reached the ideal consistency – similar to thick peanut butter or frosting. This method allows for far better control over the mix. To make the mixing process effortless, I highly recommend investing in a good mixing paddle, like the one I found at Home Depot.
This paddle easily attaches to my Ryobi drill, turning what could be a laborious task into something akin to baking in the kitchen – just a lot messier!
Applying the Thin Bricks: Step-by-Step Installation
Another crucial lesson from this project involved the application method. Initially, I tried spreading the thinset directly onto the wall before attaching the bricks. After completing a small section, I quickly realized that it was far more efficient and effective to apply the thinset directly to the back of each brick using a notched margin trowel. Trust me, this tool will become your absolute best friend for this project!
Simply apply a consistent layer of thinset to the entire back surface of each brick, ensuring full coverage to maximize adhesion. The notched edge of the trowel creates ridges that help the mortar grip the wall more effectively.
Once the thinset is applied, firmly press the brick onto the wall and gently wiggle it into its perfect position. A critical indicator of correct thinset consistency is how well the bricks hold their place. If your bricks tend to slide or sag, it means your mixture is too wet, and you’ll need to add more dry thinset to thicken it. The goal is for the bricks to stay put immediately upon application. I recommend starting your installation in the bottom left corner of your wall with a full brick, then building upwards. Subsequent rows should be staggered, centered between the bricks directly below them, mimicking traditional bricklaying patterns. I’ll cover cutting bricks in more detail shortly.
I worked my way across the wall, completing about 3-4 bricks vertically at a time. For this project, I deliberately chose not to use spacers. My intention was to achieve the charmingly imperfect look of an old, vintage brick wall, and I felt that slight variations in spacing would significantly contribute to this desired aesthetic. If you’re aiming for a more uniform, modern look, then spacers would be an essential tool for your project.
Managing Mortar Batches and Cleaning
An important operational tip: only mix as much mortar as you anticipate using within approximately 30 minutes. Thinset begins to cure relatively quickly, and once it starts to harden, you cannot simply add more water to soften it again. This was particularly pertinent for me, as I had two little “helpers” throughout the process, necessitating frequent breaks to manage whatever delightful disasters they were conjuring! I would lay a few rows, tend to the kids, and then mix a fresh bucket of mortar. Additionally, always make sure to thoroughly clean out your mixing bucket between each batch. Old, partially cured mortar can contaminate your new mix and affect its consistency. Thankfully, it rinses out easily with water, but prompt cleaning is key. While using a new bucket for each mix is an option, it can quickly become quite expensive.
Here’s a glimpse of the steady progress on the wall:
As you can observe, I strategically left gaps where bricks would require cutting, focusing on laying all the full bricks first. More progress, and yes, that’s my adorable “helper” making a cameo! 😉
Cutting Thin Bricks for a Seamless Finish
Once all the full bricks were securely in place, it was time to address the cut pieces. My initial tool of choice was a brick chisel, a handy little gadget I picked up at Home Depot. To use it, you simply position the chisel where you want your cut on the brick and strike the top with a hammer. This method proved effective about 70% of the time, working best for larger cuts, particularly when I needed to split bricks roughly in half. However, for smaller, more precise cuts, I found the bricks tended to break unpredictably. This led me to retrieve my trusty Ryobi portable tile saw – and let me tell you, this saw is an absolute game-changer! It’s incredibly affordable and remarkably easy to operate.
Pardon its somewhat messy appearance – it’s been well-loved! Using the saw is straightforward: simply remove the lid and fill the reservoir with water up to the designated fill line. The water is crucial for keeping the blade cool and minimizing dust during cutting.
Replace the lid, power on the saw, and gently guide the bricks through the blade using your hands. Always exercise extreme caution and, obviously, avoid touching the spinning blade. For anyone intimidated by power tools, rest assured, this tile saw is even simpler and safer to operate than a miter saw for these specific cuts.
You might notice my nail polish is a casualty of this project – it’s definitely not manicure-friendly work! With all my cuts made, I carefully filled in all the remaining open spaces on the wall. Here’s how it looked just before the grouting stage!
Grouting Your Thin Brick Wall: Adding Character and Finish
Now, for the step that truly brings the brick wall to life: grouting! For this phase, I used Quikrete Mortar Mix, which is incredibly budget-friendly at under $5 a bag. I found that just over one bag was sufficient for this entire wall.
Mixing Grout to the Right Consistency
Once again, consistency is paramount when mixing grout. Unlike the thick thinset mortar, your grout mixture needs to be much thinner – think of a milkshake or a thick pancake batter consistency. This will allow it to flow easily through the grout bag. Here are the tools and products I used for the grouting process. I started by mixing the dry grout with water in a bucket, similar to the thinset process, but aiming for a significantly more fluid mixture.
Using a Grout Bag for Precision and Smoothing the Joints
To apply the grout, I utilized a grout bag. Imagine a much larger version of a pastry icing bag – that’s essentially what it is! I would load the bag with about 4 cups of grout at a time to keep it manageable and prevent it from becoming too heavy. Then, I would squeeze the grout out through the tip of the bag, carefully filling each joint between the bricks. I tackled the wall in roughly 4×4-foot sections. Remember, the grout absolutely needs to be thin enough to easily flow through the bag. If you find it’s struggling to come out, simply add a bit more water to your mix and try again. This image shows the grout immediately after being squeezed from the bag, before any smoothing.
After applying the grout to a section, I allowed it to set for about 10-15 minutes. This brief waiting period is crucial as it allows the grout to firm up slightly before you work with it. Then, I went back with a specialized smoothing tool, running it along the grout lines to compress and smooth the mortar, creating a tidy finish. If you’re aiming for that authentic, aged brick wall look, remember that perfection isn’t the goal; slight imperfections only add to its charm! However, if you’re striving for immaculate precision, a different tutorial might be more suitable for your aesthetic preferences.
This is me, post-grouting, feeling incredibly happy and accomplished! #happy
The Optional Mortar Wash: Enhancing Vintage Appeal
Fair warning: this project can be quite messy. As a self-proclaimed messy DIYer, the combination resulted in a bit of a chaotic workspace, as seen here:
But don’t fret – it cleans up remarkably easily! After completing the grouting, I decided I wanted an even rougher, more weathered finish. To achieve this, I applied a mortar wash over the entire wall. This technique involves mixing some of the remaining dry mortar with water to create a very thin, slurry-like consistency. I used a sponge for this process.
I then simply wiped this diluted mortar mixture over the entire brick surface. The messy, slightly irregular application is precisely what I love about this finishing touch; it enhances the distressed, aged character of the wall, making it look even more authentic. It truly brings the whole aesthetic together!
In this image, you can clearly see the bottom section of the wall has begun to cure and lighten, revealing its final hue, while the top portion still appears darker where the mortar wash is in the process of drying and setting.
And once again, here she is, completely finished and absolutely breathtaking!
Frequently Asked Questions About DIY Thin Brick Walls
To preempt some common queries, here are answers to a few questions you might have:
~Have you installed brick before? No, this was my very first time installing any type of brick or thin brick. It truly didn’t require anything more than carefully selecting the right products, dedicating some good old-fashioned elbow grease, and exercising a fair bit of patience!
~How long did the entire project take? The entire installation, from start to finish, spanned approximately 24 hours of active work, which I spread out over 4 to 5 days. This allowed for drying times and managing other daily tasks.
~What about the exposed electrical sockets? Yes, I am absolutely addressing the electrical plate covers. I simply need to get around to extending the sockets forward slightly so the plates sit flush against the new brick surface. That’s a minor detail I’ll tackle soon.
~What about the existing trim around windows and baseboards? The beauty of thin brick is its slim profile. These bricks are thin enough that they sit just beneath my existing window and floor trim. Rather than undertaking the arduous task of removing and reinstalling all that beautiful trim, I opted to butt the thin bricks up directly against it. I am extremely pleased with this seamless result. Depending on your specific trim and the thickness of your chosen thin brick, you might decide on a different approach for your project.
~What was the approximate cost of this DIY project? As best as I can calculate, this entire wall, measuring 12 feet by 9 feet, cost between $600 and $700, including all supplies, from the bricks themselves to the mortar, grout, and necessary tools. This should help you gauge the potential cost for your own thin brick endeavor.
~What’s that intriguing shelving unit in some of the pictures? Ah, that’s a secret for now! You don’t get to see the full reveal of that just yet. Rest assured, a tutorial for that project is coming soon!
Conclusion: Unleash Your Inner DIYer!
Thank you all so much for joining me on this journey! I genuinely hope that this detailed tutorial has not only inspired you but also empowered you to consider tackling your very own thin brick accent wall. The profound satisfaction of conceiving, starting, and completing an entire project like this entirely by myself was, without a doubt, the most rewarding part. It truly is a project that anyone, regardless of their prior experience, can successfully accomplish. I promise you, the results are worth every ounce of effort!