
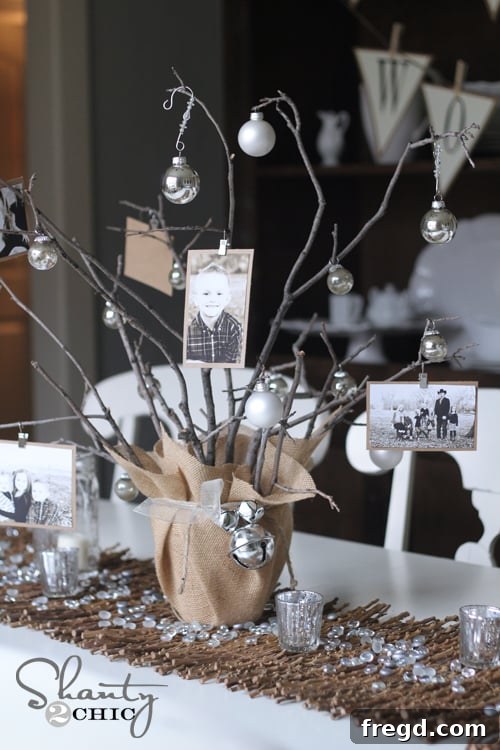
Craft a Memorable Christmas: Easy DIY Photo Tree Centerpiece
Welcome to Day 4 of our cherished 12 Days of Christmas Event! We are thrilled to share another delightful and budget-friendly holiday project with you. Be sure to stay updated with all our festive creations and behind-the-scenes glimpses by FOLLOWING us on Instagram!
The holiday season is a magical time for creating lasting memories, and what better way to celebrate those precious moments than by weaving them into your festive decor? Today, we’re diving into a quick, easy, and incredibly charming DIY Photo Tree Centerpiece. This project is not just a decoration; it’s a heartfelt display of your cherished memories, bringing warmth and a personal touch to any room. We love finding creative ways to showcase photos, and this centerpiece allows you to do just that without breaking the bank or requiring advanced crafting skills. It’s a project that truly embodies the spirit of giving and togetherness.
As passionate DIY enthusiasts, you know our love for incorporating personal touches into home decor, especially when it comes to photographs. This photo tree is the perfect embodiment of that philosophy. While we styled ours as a stunning centerpiece, its versatility knows no bounds! Imagine it gracing your mantelpiece, brightening a cozy corner, adding a unique touch to your entryway table, or even serving as a thoughtful, personalized gift for loved ones. It’s a beautiful way to keep your favorite faces and moments front and center throughout the festive season. The best part? It’s incredibly simple to assemble, and we’re excited to walk you through each step.
Gather Your Materials: What You’ll Need
Before we embark on this creative journey, let’s ensure you have all the necessary supplies. Most of these items can be found readily around your home or at your local craft store, making this a truly accessible DIY project.
- **Sturdy Branches:** Look for interesting branches from your yard or a park. Aim for a variety of sizes and shapes to create a natural, tree-like silhouette.
- **Floral Foam or Plaster of Paris:** To secure your branches firmly in place.
- **Container/Vase:** A sturdy pot, vase, or decorative container that complements your desired aesthetic.
- **Spray Paint (Optional):** For customizing the branches to match your decor. White, silver, or gold work wonderfully for a festive look.
- **Green Moss (or other decorative filler):** To cover the foam base and add a natural, finished touch.
- **Small Photos:** Your favorite memories! Print them in a variety of sizes for visual interest.
- **Brown Kraft Paper:** For backing your photos, adding a rustic and cohesive look.
- **Small Metal Hanging Clips:** Essential for easily attaching and rearranging your photos on the branches.
- **Mini Ornaments (Optional):** To add extra sparkle and charm to your photo tree.
Step-by-Step Guide to Crafting Your Photo Tree
Let’s dive into the fun part – bringing your photo tree to life!
Step 1: Preparing Your Branches and Base
Start by gathering your chosen branches. If desired, give them a fresh coat of spray paint. White or silver paint can create a beautiful frosty effect, perfect for winter, while gold adds a touch of classic elegance. Once dry, arrange your branches artfully into your chosen container. Use floral foam or plaster of Paris to securely anchor them. Ensure the branches are stable and stand upright, creating a pleasing, natural shape that resembles a small tree.
Step 2: Securing the Base
Once your branches are perfectly positioned, it’s time to stabilize them. If using floral foam, press the branch ends firmly into the foam. For a more permanent fixture, consider using plaster of Paris or quick-drying cement in the bottom of your container. This ensures your beautiful creation remains stable throughout the bustling holiday season.
Step 3: Adding Natural Charm with Moss
To conceal the floral foam or plaster and add a touch of rustic elegance, cover the base with green moss. This simple step instantly elevates the look of your centerpiece, making it appear more polished and organic. You can find bags of decorative moss at any craft store.
Step 4: Preparing Your Cherished Photos
Now for the heartwarming part! Select your favorite photos – perhaps snapshots from past Christmases, memorable family vacations, or everyday moments that make you smile. To give them a consistent, finished look, back each photo with cheap brown kraft paper. Simply cut the kraft paper slightly larger than your photo and adhere the photo to it. This adds a lovely rustic frame and helps the photos stand out against the branches. You can find kraft paper rolls or sheets in the scrapbook section of any craft store.
Step 5: Hanging Your Memories
With your photos prepared, it’s time to adorn your tree! Use small metal hanging clips to attach each photo to the branches. These clips make it incredibly easy to arrange and rearrange your pictures until you achieve the perfect display. The beauty of these clips is their flexibility, allowing you to easily swap out photos for different seasons or occasions. Distribute your photos evenly, mixing sizes and orientations for a dynamic and visually appealing presentation.
We found our handy clips at Michael’s, but you can also find similar options on Amazon for convenience.
Step 6: The Finishing Touches
To complete your festive photo tree, consider adding a few mini ornaments. Small baubles, glittery stars, or tiny pinecones can add extra sparkle and holiday cheer, filling any remaining gaps and enhancing the overall festive atmosphere. This step is entirely optional but can truly make your centerpiece shine!
Your Personalized Holiday Masterpiece is Complete!
And just like that, you are DONE! How incredibly easy and rewarding is that? We absolutely love how this Photo Tree Centerpiece turned out, and we know you will too. The best part? This entire project cost us under $15, proving that beautiful, meaningful holiday decor doesn’t have to be expensive. It’s truly a “shanty” chic solution!
This DIY Photo Tree is more than just a decoration; it’s a conversation starter, a focal point, and a constant reminder of the love and joy shared with family and friends. It allows you to showcase a collection of memories in a unique, artistic, and deeply personal way. Imagine the smiles and stories it will evoke as guests gather around during your holiday celebrations. It’s a project that brings not only visual appeal but also emotional warmth to your home.
More Views of Our Finished Photo Tree Centerpiece
Here are a few more glimpses of our completed Photo Tree Centerpiece from different angles, showcasing its charming simplicity and elegance. We hope these images inspire you to create your own unique version!
Join the Festive Fun: The 12 Days of Christmas Event Continues!
We are incredibly excited to be part of the “12 Days of Christmas” event, a fantastic collaboration with some truly talented and fabulous bloggers. This event is packed with daily inspiration, unique DIY projects, festive recipes, and exciting giveaways to make your holiday season even brighter. Each day brings a new surprise, and we encourage you to explore all the wonderful contributions from our partners. Don’t miss out on today’s special giveaway!
Make sure to visit our amazing collaborators to discover more incredible holiday ideas:
Discover More with The Shanty Sisters: DIY on a Budget!
For those new to our community, allow us to introduce ourselves! We are the Shanty Sisters, two passionate DIYers dedicated to transforming our homes with style and savvy — all while sticking to a strict budget. Between the two of us, we’re juggling eight lively kiddos, which means every naptime is a precious opportunity to create something beautiful and functional! Our blog, Shanty2Chic, is where we share our love for woodworking, home renovations, and creative decor ideas that prove you don’t need a huge budget to achieve a chic and personalized living space. Our philosophy is simple: empower you to build, create, and decorate the home of your dreams without breaking the bank.
Our projects range from substantial builds that add significant character and value to your home to small, impactful decor pieces. We believe in making beautiful design accessible to everyone. Take a peek at some of our most popular projects:
Like this stunning Triple Pedestal Farmhouse Dining Table, which we built for an incredible $125! It’s a testament to what you can achieve with a little wood and a lot of heart.
Or this equally impressive $65 Farmhouse Table – proof that high-end style doesn’t require a high-end price tag. We love teaching you how to build sturdy, beautiful furniture that will last for years.
We also specialize in transforming everyday items into extraordinary pieces, like this ingenious $15 DIY Mirror made from a basic Walmart mirror. It’s amazing what a little creativity and a few simple supplies can achieve!
And for those who love to add charming details, we offer free printables, including our popular Free Alphabet Banner, perfect for personalizing any celebration or space!
Stay Connected with Shanty2Chic!
Don’t miss out on any of our exciting projects, tips, and inspiration! We love connecting with our community across various platforms:
You can also follow us on Facebook for daily updates, engaging discussions, and sneak peeks!
And keep up with all of our posts and discover endless DIY inspiration by following us on Pinterest!
Thank you for joining us on this creative journey. We hope this DIY Photo Tree Centerpiece brings joy, warmth, and a touch of personalized charm to your holiday celebrations. Happy crafting, and we look forward to sharing more inspiring projects with you!