
Every home has that one room that constantly gets neglected, the one that whispers for attention but often gets drowned out by daily demands. For me, that space has always been my laundry room. It’s a functional zone, yes, but far from inspiring. I’ve harbored a secret loathing for its chaotic state, its lack of organization, and its utterly un-chic appearance. The vision of a truly efficient and aesthetically pleasing laundry space felt like a distant dream, until one day, I stumbled upon a brilliant DIY project that sparked an undeniable surge of motivation: a custom washer/dryer pedestal on Ana White’s site. This wasn’t just another DIY idea; it was the catalyst I needed to finally tackle my laundry room’s transformation from a forgotten corner into a functional, beautiful, and envy-worthy area. While the full reveal of my transformed laundry room, complete with its previous state of neglect, will come later, today is entirely dedicated to the star of the show: the meticulously crafted DIY pedestal.
Transform Your Laundry Room: The Ultimate DIY Washer/Dryer Pedestal Guide
A DIY washer/dryer pedestal isn’t merely a stand; it’s a strategic upgrade that elevates your laundry experience, quite literally. This project promises to revolutionize how you interact with your appliances, turning mundane chores into a more comfortable and organized process. The benefits extend far beyond just lifting your machines; they encompass improved ergonomics, smart storage solutions, and a significant aesthetic boost to one of the most hardworking rooms in your home. Before diving into the construction details, let’s explore why this particular DIY endeavor is an absolute game-changer for any homeowner.
Why a DIY Washer/Dryer Pedestal is a Game-Changer for Your Laundry Room
For years, many of us have endured stooping and bending over our washing machines and dryers, a posture that can lead to back strain and discomfort, especially for those with taller statures or existing back issues. A custom-built pedestal addresses this common problem head-on, raising your appliances to a more comfortable, waist-level height. This simple elevation makes loading and unloading laundry remarkably easier, reducing physical strain and making the entire process less arduous.
Beyond ergonomics, a well-designed pedestal unlocks invaluable storage potential. The space created beneath your machines, previously unused dead space, can be transformed into convenient, hidden storage for laundry detergents, fabric softeners, stain removers, or even a discreet hamper. This declutters your countertops and shelves, contributing to a cleaner, more organized aesthetic. Imagine having all your laundry essentials neatly tucked away, yet easily accessible, freeing up valuable visual space and making your laundry room feel more spacious and less chaotic.
Aesthetically, a custom pedestal provides a seamless, built-in look that instantly upgrades your laundry room’s appearance. You can finish it to match your existing cabinetry or introduce a contrasting color for a modern touch. This cohesive design element ties the room together, giving it a polished and intentional feel that store-bought plastic pedestals simply cannot replicate. It’s an opportunity to inject personality and style into a utilitarian space, turning it from an eyesore into a highlight of your home.
Finding Your Inspiration: Kicking Off the Laundry Room Makeover
My journey to a more functional laundry room began with a simple scroll through DIY blogs, a common starting point for many home improvement enthusiasts. It was on Ana White’s incredibly inspiring site that I discovered the DIY Washer/Dryer Pedestal plans that immediately resonated with my vision. The beauty of starting with well-researched and detailed plans, like those offered by Ana White, cannot be overstated. They provide a clear roadmap, outlining materials, measurements, and step-by-step instructions, which are invaluable for both seasoned DIYers and beginners alike. I meticulously reviewed the plans, picturing how each cut and joint would come together, and decided to follow them without any major modifications, trusting the expertise behind the design. This decision allowed me to focus purely on the execution, minimizing guesswork and potential errors.
With the plans in hand and a surge of enthusiasm, I embarked on the first crucial step: framing out the two main “floors” of the pedestal. These frames would serve as the robust top and bottom platforms, designed to support the significant weight of the washer and dryer. Using high-quality wood screws and an ample amount of Gorilla Glue Wood Glue, I carefully joined each piece, ensuring every connection was not only strong but also meticulously aligned. A critical tip I learned early in my DIY adventures, and one I cannot stress enough, is the importance of pre-drilling. This simple step prevents wood splitting, especially near the ends of boards, and ensures a cleaner, more secure screw insertion. Patience and precision at this initial stage lay the groundwork for the entire project’s success and durability.
Essential Tools and Materials for Your Pedestal Project
Before any cutting or assembling can begin, having the right tools and materials on hand is paramount for a smooth and efficient DIY experience. For this sturdy washer/dryer pedestal, you’ll need a selection of common woodworking tools and materials:
- Lumber: Primarily 2x4s for the frames and 4x4s for the sturdy legs. Ensure your wood is straight and free of major defects.
- MDF (Medium-Density Fiberboard): 3/4″ MDF is an excellent choice for the actual “floor” surfaces of the pedestal, providing a smooth, stable, and strong platform for your appliances.
- Wood Screws: Various lengths suitable for joining 2x4s and securing 4x4s. Counter-sinking screws are particularly useful for a flush finish.
- Wood Glue: A strong, waterproof wood glue like Gorilla Glue Wood Glue is essential for creating incredibly strong, lasting bonds that reinforce screw connections.
- Miter Saw: Crucial for accurate cuts, especially for the framing and any decorative trim you might add.
- Electric Drill/Driver: For pre-drilling holes and driving screws quickly and efficiently.
- Tape Measure and Pencil: For precise measurements and markings.
- Safety Gear: Always wear safety glasses and hearing protection when operating power tools.
- Sanding Blocks or Electric Sander: For smoothing rough edges and preparing the surface for finishing.
- Clamps: Useful for holding pieces together while glue dries.
Investing in good quality materials and taking the time to gather all necessary tools beforehand will save you time and frustration during the building process, ensuring a more professional and satisfying result for your DIY washer dryer pedestal.
Step-by-Step Construction: Building a Sturdy Foundation
1. Framing the Base and Top Sections
The foundation of this DIY washer/dryer pedestal relies on two identical, robust rectangular frames, which I refer to as the “floors.” These frames are constructed using 2×4 lumber, cut to the precise dimensions outlined in the original plans. Each corner of these frames is joined with wood screws, after carefully pre-drilling pilot holes, and liberally coated with Gorilla Glue Wood Glue. The combination of screws and glue creates an incredibly strong bond, capable of withstanding the vibrations and weight of modern washing machines and dryers. Taking the time to ensure each corner is square and flush is vital for the overall structural integrity and aesthetic appeal of the finished pedestal.
Once both floor frames were meticulously assembled, I double-checked their dimensions and ensured they were perfectly identical. This critical step ensures that the pedestal will be level and stable once the appliances are placed upon it. The inherent strength of the 2×4 framing, combined with the structural support of the wood glue, creates a foundation that is not only durable but also ready to support the next phase of construction – the attachment of the legs.
2. Attaching the Robust 4×4 Legs
With the two main frames completed, the next significant step was attaching the 4×4 posts that would serve as the sturdy legs of the pedestal. These posts provide the necessary elevation and load-bearing capacity. Each 4×4 post was carefully aligned with the corners of the top frame. Due to the significant weight the pedestal would eventually bear, and mindful of maximizing stability, I used a substantial amount of Gorilla Glue Wood Glue in conjunction with long wood screws to secure the legs. The principle here is to create a bond that is both mechanically strong (from the screws) and incredibly adhesive (from the glue), essentially making the components act as one solid unit.
Attaching the legs requires careful alignment to ensure they are plumb and square. Even slight deviations can affect the overall stability of the pedestal, so taking extra time here is a wise investment. I opted for a strong, angled screw insertion after pre-drilling, further enhanced by the copious use of wood glue, to ensure maximum rigidity. This method, while labor-intensive, guarantees a structure that can comfortably support heavy appliances.
3. Securing the Structure: Tips for Maximum Stability
The original plans suggested optional metal brackets for reinforcing the leg attachments, but finding the exact right size proved challenging. Instead of compromising, I chose an alternative method that, when executed correctly, is just as strong, if not stronger: counter-sinking screws at an angle and using an abundance of wood glue. Counter-sinking involves drilling a wider, shallow hole on the surface so that the screw head sits flush with or slightly below the wood surface. This not only provides a cleaner finish but also allows for deeper screw penetration, enhancing the structural integrity.
This upside-down view of the top section illustrates how the legs are securely joined to the upper frame. Each leg is meticulously attached to the 2×4 framing, forming a robust corner. The generous application of Gorilla Glue Wood Glue fills any tiny gaps, creating an impenetrable bond between the wood surfaces. This method, while requiring careful execution, provides exceptional structural rigidity, making the pedestal incredibly sturdy and reliable for years of heavy use in a busy laundry room.
4. Completing the Bottom Section and Reinforcement
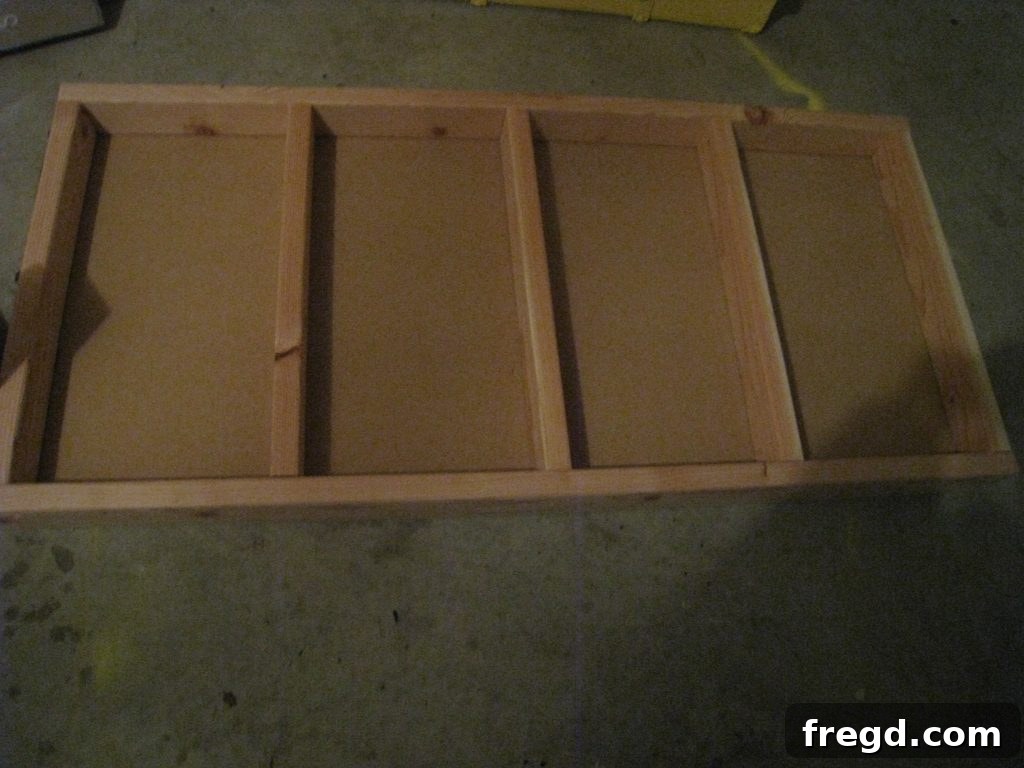
After the top frame and legs were securely in place, the process for attaching the “bottom” floor followed the same meticulous steps. This lower frame, also constructed from 2x4s and affixed with screws and wood glue, provides additional stability and forms the base for the pedestal. What you see coming together is a well-engineered structure composed of two framed platforms (built with 2x4s) supported by 4×4 legs, with 3/4″ MDF serving as the actual, smooth “floor” surfaces for where the machines will rest and where any storage items will sit.
The image above showcases the completed structural framework, with the bottom platform firmly attached to the 4×4 legs, mirroring the top assembly. This creates a double-layered support system, enhancing the pedestal’s capacity to handle the weight and operational vibrations of laundry appliances. The design ensures even weight distribution and prevents sagging over time, crucial for the longevity of both the pedestal and the appliances themselves. This comprehensive framing approach is what truly distinguishes a custom DIY pedestal from simpler, less robust alternatives.
Here it is, finally flipped upright! The moment of truth when all the pieces come together to reveal the full scale of the project. And yes, I can confirm, it is incredibly HEAVY! This substantial weight is a testament to the robust construction, the solid wood used, and the generous application of glue and screws, all contributing to its rock-solid stability. While the weight ensures durability and minimal vibration for your machines, it also highlights the need for careful planning during installation. Moving this behemoth into the laundry room will definitely require an extra set of hands, preferably a strong one, perhaps even a trusty partner!
Mastering the Miter Saw: A DIYer’s Learning Journey
Every DIY project presents its unique set of challenges and learning opportunities. For me, with this washer/dryer pedestal, that challenge came in the form of the miter saw, specifically when attempting to cut the decorative trim that would give the pedestal its finished, polished look. Miter cuts, essential for creating seamless corners, require precision and a keen understanding of angles. I’ll admit, I tried my hand at a little mitering, feeling confident after the structural assembly.
The image captures the initial, somewhat optimistic, phase of my mitering attempts. What started with confidence soon turned into a humbling lesson in woodworking patience and calibration. Achieving perfectly matched 45-degree angles on four pieces to form a flawless 90-degree corner is an art. It’s not just about setting the angle on the saw; it’s about accounting for the thickness of the blade, the direction of the cut, and the smallest imperfections in the wood itself. This step taught me that woodworking, at times, is as much about finesse as it is about brute strength.
Let’s just say that after several attempts, a significant amount of scrap wood, and another trip to Home Depot for an additional 8-foot piece of trim, I FINALLY figured it out. It was a classic example of learning through doing, and making peace with the inevitable trial-and-error that defines many DIY projects. This “small price to pay” for a greater knowledge of the miter saw and improved woodworking skills is what I continue to tell myself. It’s a valuable reminder that perfection isn’t always achieved on the first try, but perseverance pays off in the long run, leaving you with not just a finished project, but a deeper understanding of your craft.
Finishing Strong: The Final Touches and Installation
With the structural elements complete and the mitered trim successfully applied, the washer/dryer pedestal was nearing its grand completion. The next phase involved transforming the raw wood into a piece that would seamlessly integrate into my vision for a stylish laundry room. This includes essential finishing touches such as thorough sanding to smooth out any rough edges or imperfections, followed by priming to ensure uniform paint adhesion and durability. Once primed, the pedestal is ready for its final coat of paint or stain, chosen to complement the overall aesthetic of the laundry room makeover. This finishing stage is where the personality of the project truly shines through, allowing for customization and a professional, polished appearance.
Tada! Behold the completed DIY washer/dryer pedestal, still in its temporary home in the garage. Please excuse the surrounding clutter – I’m a messy builder, a testament to the creative chaos that often accompanies hands-on projects! My only thought after constructing this beast was, “How the heck am I going to get this under the washer and dryer?” Given its impressive weight and robust construction, I’m pretty sure that task won’t be accomplished without the crucial assistance of my husband. Planning for installation, especially for heavy items, is just as important as the building process itself. Ensuring you have the right tools (like furniture dollies) and enough helping hands will make the final transition from garage to laundry room a breeze, preventing strain and potential damage to your newly built masterpiece.
Beyond the Pedestal: Envisioning Your Dream Laundry Room Makeover
The DIY washer/dryer pedestal is undoubtedly a cornerstone of an improved laundry room, but it’s often just one piece of a larger puzzle. A true laundry room transformation goes beyond elevating appliances; it encompasses creating a space that is both highly functional and aesthetically pleasing. To complete your dream laundry room makeover, consider integrating other elements that enhance organization and visual appeal:
- Smart Storage Solutions: Beyond the pedestal’s hidden compartments, think about custom shelving above the washer and dryer for detergent, folded towels, or decorative baskets. Wall-mounted cabinets can conceal less attractive items and provide ample storage for linens or cleaning supplies. A tall, narrow pantry-style cabinet can be perfect for an ironing board, broom, or mop.
- Countertops and Folding Space: Adding a durable countertop above or adjacent to your appliances provides a much-needed surface for folding clothes, sorting items, or even crafting. Materials like laminate, butcher block, or even reclaimed wood can dramatically elevate the room’s utility and style.
- Efficient Lighting: Good lighting is crucial in a laundry room, often a space without natural light. Consider bright overhead fixtures, under-cabinet lighting, or even task lighting above a utility sink to make sorting and stain treatment easier.
- Stylish Decor and Personal Touches: Don’t forget the power of decor. A fresh coat of paint in a calming or vibrant color, patterned wallpaper, a colorful rug, or some well-placed artwork can transform a sterile space into an inviting one. Small plants, functional hooks for drying delicate items, or personalized labels for storage bins add both charm and utility.
- Durable Flooring: Upgrading your flooring to something water-resistant and easy to clean, like tile or luxury vinyl plank, can withstand spills and heavy foot traffic, ensuring your beautiful laundry room remains practical.
By thoughtfully combining the ergonomic benefits of your new DIY washer/dryer pedestal with these additional design and organization strategies, you can create a laundry room that’s not just a place for chores, but a well-designed extension of your home, making laundry day a far more pleasant experience.
Ready for the Grand Reveal!
The journey to building this DIY washer/dryer pedestal has been incredibly rewarding, filled with learning curves, minor triumphs, and a renewed sense of accomplishment. It marks a significant milestone in my ongoing mission to conquer my neglected laundry room and transform it into a space that I no longer loathe, but genuinely love. I’ll be back soon with a comprehensive reveal of my entire laundry room makeover, sharing pictures of its humble beginnings and its fabulous transformation. But while you’re eagerly awaiting that grand unveiling, why not draw some immediate inspiration? Take a moment to check out Whitney’s super cute laundry room for more fantastic ideas and discover what’s possible with a little creativity and effort. Also, for those who love crafting and personalized home decor, it’s not too late to enter the exciting Silhouette Giveaway! You can get all the details and enter right HERE! Thanks so much for stopping by and sharing in my DIY journey; your support and enthusiasm mean the world!