
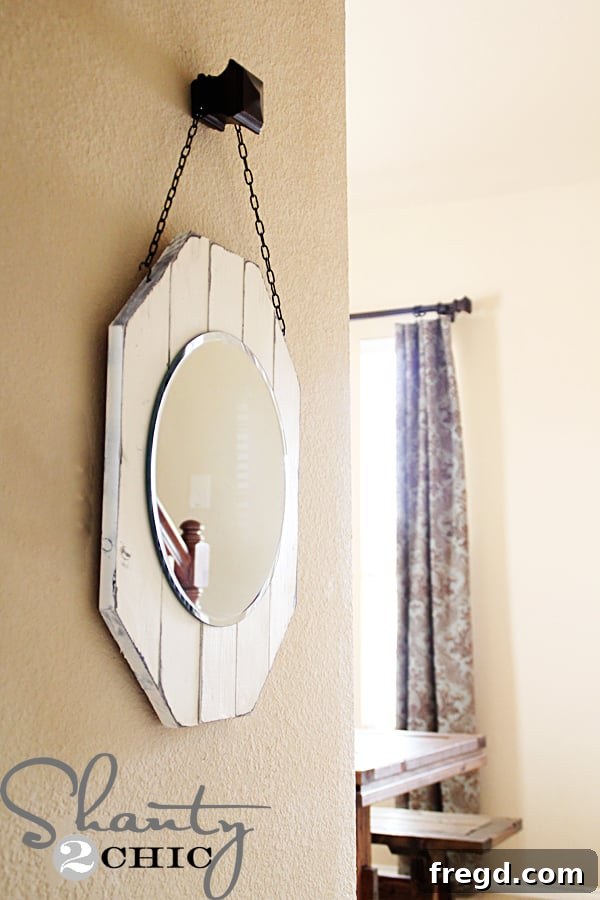
DIY Distressed Wood Frame Wall Mirror: A Budget-Friendly Weekend Project
Are you searching for a stylish yet affordable way to elevate your home decor? Look no further! This comprehensive guide will walk you through creating a beautiful, distressed wood frame wall mirror that looks far more expensive than its modest price tag. Perfect for a weekend project, this DIY mirror adds a touch of rustic charm and personalized flair to any room, all while keeping your budget in check. We’re talking about a stunning piece of wall art for approximately $20 and just a couple of hours of active work!
Mirrors are incredible decor elements, known for their ability to brighten spaces, create the illusion of more room, and serve as captivating focal points. While designer mirrors can come with a hefty price, crafting your own allows for complete customization and significant savings. Get ready to embark on a fun and rewarding project that will leave you with a gorgeous, handcrafted mirror that perfectly complements your unique style.
Why Choose This DIY Mirror Project?
Beyond the undeniable satisfaction of creating something with your own hands, this DIY mirror project offers a multitude of benefits:
- Unbeatable Value: For roughly $20, you’ll produce a custom piece that rivals high-end decor. The impact-to-cost ratio is simply fantastic, making it an ideal choice for budget-conscious decorators.
- Quick & Rewarding: With active construction and painting taking only about two hours, this project is perfect for a lazy Saturday or Sunday afternoon. The drying time allows for breaks, making it a low-stress endeavor with a highly satisfying outcome.
- Customizable Style: While we’re focusing on a distressed finish for a rustic or farmhouse aesthetic, the techniques are versatile. You can easily adapt the paint colors, finish, and hanging style to match any decor theme, from modern farmhouse to coastal chic.
- Beginner-Friendly: Even if you’re new to woodworking or distressing techniques, this project uses straightforward steps and common tools. We’ll guide you through each stage, ensuring a successful and beautiful result.
- Unique Home Accent: Store-bought mirrors often lack personality. A handmade mirror brings character, warmth, and a personal touch to your living room, entryway, bedroom, or even a bathroom. It’s a true conversation starter!
Let’s gather our supplies and turn some simple materials into a stunning decorative piece!
Materials You’ll Need:
Here’s a detailed list of everything required to bring your distressed mirror to life. Most items are readily available at hardware stores, craft shops, or online.
- Beveled Mirror Plate (14-inch diameter): Surprisingly, a candle plate works perfectly for this! Look for one with a nice bevel for an elegant touch.
- Wood for Frame (1×4, 10 ft length): One standard 1×4 pine board, 10 feet long, will provide ample material for your frame.
- Pocket Hole Screws (1 1/4 inch): These are essential for strong, hidden joinery in your wood frame.
- Espresso Spray Paint (Satin Finish): This will be your base coat, providing a rich, dark underlayer for the distressed effect.
- Vaseline (Petroleum Jelly): The secret ingredient for an effortless distressed look!
- Heirloom White Spray Paint (Satin Finish): Your top coat will give the mirror its primary color, allowing the espresso to peek through.
- Sandpaper (120-grit): For gently revealing the distressed effect after painting.
- Liquid Nails (or strong construction adhesive): To securely attach the mirror to its wooden frame.
- Decorative Cup Hangers (2): These will be used to attach the hanging chain. Consider a finish that complements your paint colors, or plan to spray paint them.
- Black Chain (Small box/length): Choose a lightweight but sturdy chain that suits the aesthetic.
- Wall Anchor/Decorative Finial: For securely hanging your mirror. A finial adds an extra touch of elegance.
Essential Tools:
Having the right tools makes any DIY project smoother and more enjoyable. Here’s what you’ll need:
- Miter Saw (10-inch compound miter saw recommended): Ideal for precise, angled cuts. If you don’t own one, a hand saw with a miter box is a fantastic, budget-friendly alternative for smaller projects like this.
- Kreg Jig (or similar pocket hole jig): Simplifies creating strong, concealed joints. If you don’t have one, you can use traditional wood glue and clamps with butt joints, though pocket holes offer superior strength and ease for this design.
- Drill: For pre-drilling holes and driving screws.
- Wire Cutters: Necessary for cutting the decorative chain to size.
- Measuring Tape and Pencil: For accurate measurements and markings.
- Safety Glasses and Gloves: Always prioritize safety when working with tools and paint.
Our journey begins with this 14-inch beveled mirror. It’s essentially a candle plate, a clever hack that keeps costs low while delivering a beautiful reflective surface. You might find similar plates at craft stores, but always opt for the largest size available to maximize your mirror’s presence.
A miter saw is a fantastic tool for precise cuts. If you’re not ready to invest in a compound miter saw, a simple hand saw and miter box kit is an excellent, affordable choice for projects of this scale.
Step-by-Step Guide to Crafting Your Distressed Mirror:
Step 1: Preparing Your Wood Frame Pieces
Begin by taking your 1×4 x 10 ft. board. Using your miter saw (or hand saw and miter box), cut the board into five equal pieces, each measuring 22 inches in length. Accuracy here is key for a well-fitting frame, so double-check your measurements before making each cut. These five pieces will form the robust backing for your mirror.
Step 2: Assembling the Wood Backing with Pocket Holes
Now, let’s create a strong, seamless backing. Select four of your 22-inch boards. Using your Kreg Jig, drill pocket holes along one long edge of each of these four boards. The pocket holes should be strategically placed to connect these boards to their neighbors. A Kreg Jig makes this process incredibly easy, creating angled holes that allow screws to pull the pieces tightly together for a very strong joint. If you don’t have a Kreg Jig, consider using wood glue and clamps with butt joints, or metal mending plates on the back for reinforcement.
Once the pocket holes are drilled, arrange your five boards side-by-side. Use 1 1/4-inch pocket hole screws to attach them together, forming a solid, wider panel. Ensure the edges are flush as you screw them in. This panel will serve as the sturdy foundation for your mirror, providing a solid surface for attachment and hanging.
Step 3: Shaping the Corners with 45-Degree Cuts
To add a decorative element and soften the edges, you’ll now make 45-degree cuts off each corner of your assembled wood panel. Measure 5 inches in from each corner along both adjacent edges. Connect these two 5-inch marks with a pencil line, forming a triangle at each corner. This line indicates where you will make your cut. Carefully use your miter saw to cut along these lines, creating distinct angled corners that give the frame a more refined and unique shape. This small detail significantly enhances the mirror’s overall design.
Step 4: Applying the Base Coat (Espresso)
Now, let’s move on to the signature distressed finish! Start by applying a base coat of your chosen Espresso satin spray paint. Ensure you’re in a well-ventilated area and lay down a drop cloth. Apply one good, even coat across the entire wood frame. The goal here is complete coverage, as this rich, dark color will peek through the top coat, providing depth and contrast for the distressed look. Allow this coat to dry completely according to the manufacturer’s instructions, typically an hour or two.
Step 5: The Vaseline Distressing Technique
This is where the magic happens! Once your espresso base coat is thoroughly dry, take a small amount of Vaseline on your finger or a cloth. Lightly and sparingly wipe the Vaseline onto the areas of the frame where you want the base coat to show through. Focus on edges, corners, and areas that would naturally experience wear and tear over time. The Vaseline acts as a resist, preventing the top coat from adhering firmly, making it incredibly easy to sand away later. Remember, a very thin layer is all you need – too much can create a clumpy effect.
Step 6: Applying the Top Coat (Heirloom White)
With the Vaseline applied, it’s time for the top coat. Using your Heirloom White satin spray paint, apply two even coats over the entire frame, including the areas treated with Vaseline. Allow adequate drying time between coats (usually 15-30 minutes, check your can). This beautiful creamy white provides a classic farmhouse or shabby chic look, contrasting beautifully with the dark espresso base. Ensure full coverage for the top coat before proceeding.
Step 7: Revealing the Distressed Effect with Sanding
Once the Heirloom White top coats are completely dry (give it a few hours or overnight for best results), grab your 120-grit sandpaper. Gently sand over the areas where you applied Vaseline. You’ll be amazed at how easily the top coat comes off in those spots, revealing the rich espresso base underneath. This technique creates an authentic “chippy” or aged look with minimal effort. Continue sanding until you achieve your desired level of distress, allowing as much or as little of the base coat to show through as you prefer. Wipe away any dust with a clean cloth.
Step 8: Attaching the Beveled Mirror to the Frame
Now it’s time to incorporate the star of the show: your beveled mirror! Carefully peel off any felt pads or protective stickers from the back of the mirror. These could interfere with proper adhesion.
Apply a generous amount of Liquid Nails or other strong construction adhesive to the back of the mirror. It’s crucial to keep the adhesive closer to the center of the mirror, forming a good ring or pattern, to prevent it from squeezing out the sides when pressed onto the wood frame. Avoid applying it too close to the edges to ensure a clean finish.
Carefully center the mirror onto your distressed wood frame. Press down gently but firmly to ensure good contact with the adhesive. Allow the mirror to dry completely, ideally overnight, before attempting to move or hang it. Patience here is key to prevent the mirror from shifting or detaching. You can continue with the hanging preparation steps while the adhesive cures.
Step 9: Preparing for Hanging with Decorative Hangers
To hang your beautiful new mirror, we’ll use decorative cup hangers. If desired, you can spray paint these hangers with a little of your Espresso paint to match the distressed aesthetic, or choose a metallic finish for contrast. Decide which orientation you want your mirror to hang (long ways or wide ways). Using a drill, pre-drill small pilot holes into the top edge of your mirror frame where the cup hangers will be placed. Then, screw the cup hangers securely into these pre-drilled holes. Pre-drilling prevents the wood from splitting.
Step 10: Attaching the Decorative Chain
Take your black decorative chain and, using wire cutters, cut it to your desired length. The length will determine how far the mirror hangs from its wall mount. Attach each end of the chain to the cup hangers on your mirror frame, creating a graceful loop for hanging. Test the balance of the mirror by holding it up with the chain before proceeding to hang it on the wall.
Step 11: Final Installation and Display
The final step is to hang your newly crafted distressed mirror! You have a couple of options for wall mounting. A simple black screw securely anchored into a wall stud works perfectly. However, for an added touch of elegance and design, consider using a decorative finial. These can often be found in curtain rod accessory sections at home improvement stores. If you don’t have a stud available, always use a wall anchor suitable for the weight of your mirror to ensure it’s securely fastened. Position your mirror in a place where it can truly shine and enhance your room’s ambiance.
Your New Wall Mirror: A Masterpiece of DIY Decor!
And there you have it – a stunning, custom-made distressed wood frame wall mirror, created with your own two hands for a fraction of the cost of retail options! This project proves that beautiful home decor doesn’t have to break the bank or require advanced skills. The blend of rich espresso and soft heirloom white, paired with the rustic texture of the distressed wood, creates a timeless piece that will enhance any living space.
We absolutely love the outcome and are thrilled with how much character this simple mirror adds to our home. It’s truly amazing what a few dollars and a couple of hours can achieve when you embrace the world of DIY. We hope this guide inspires you to take on your own mirror project and discover the joy of creating personalized accents for your home.
Frequently Asked Questions (FAQs)
- Can I use a different size or shape of mirror?
- Absolutely! This tutorial uses a 14-inch round mirror, but you can adjust the dimensions of your wood frame to accommodate any size or shape of mirror you desire. Just ensure your wood backing is slightly larger than the mirror for a nice border.
- What if I don’t have a Kreg Jig?
- While a Kreg Jig makes joining wood super easy and strong, it’s not strictly necessary. You can use wood glue combined with clamps, and reinforce the joints with metal mending plates on the back. Ensure proper drying time for the glue.
- Can I choose different paint colors for the distressed look?
- Yes, the beauty of DIY is customization! You can choose any color combination you like. For a distressed effect, pick a darker color for the base coat and a lighter, contrasting color for the top coat. Experiment with pastels, grays, or even bright hues for a more contemporary distressed finish.
- How long does the project actually take?
- The active work time for cutting, assembling, and painting is approximately 2-3 hours. However, you’ll need to account for drying times for the paint coats (each coat, plus overnight for the adhesive), which can extend the overall project duration to a full day or a weekend.
- How do I clean my distressed mirror?
- For the mirror itself, use a standard glass cleaner and a microfiber cloth. For the distressed wood frame, simply wipe it gently with a dry or slightly damp cloth to remove dust. Avoid harsh chemicals or excessive scrubbing, as this could damage the paint finish.
Share Your Creation!
We hope you feel empowered to create your own DIY distressed wood frame wall mirror. It’s a fantastic way to add character and charm to your living space without overspending. If you loved this tutorial, please consider sharing it with your friends and fellow DIY enthusiasts. We’d love to see your finished projects – don’t hesitate to share them on social media and tag us!
Happy crafting and enjoy your beautiful new mirror!
Warmly,
Ashley