Happy Friday, fellow DIY enthusiasts! It’s been an incredibly busy and, for many, an unexpectedly quiet few weeks. We sincerely hope that everyone is staying safe and making the most of this precious downtime with loved ones. That’s precisely what we’ve been up to – channeling our energy into some rewarding home improvement projects. As someone who thrives on hands-on creation, I’ve found immense satisfaction in tackling new challenges and revamping older, beloved pieces. Instead of my usual quick runs to the lumber store, I’ve embraced the opportunity to breathe new life into furniture I still adore, and in doing so, make a significant dent in my ever-growing scrap wood pile. It’s truly a win-win situation, transforming forgotten materials into cherished items once more!
The very first project on my list for this revitalizing spree was my beloved coffee cabinet. This isn’t just any piece of furniture; it’s a functional work of art that I painstakingly designed and built years ago, and it has served me exceptionally well, becoming the heart of my morning ritual. Its remarkable versatility and timeless design have resonated with so many of you over the years, making it one of our most popular and frequently requested projects. This week, I decided it was time to give it a fresh new look, a stylish makeover to keep it current, inspiring, and perfectly aligned with evolving home decor trends!
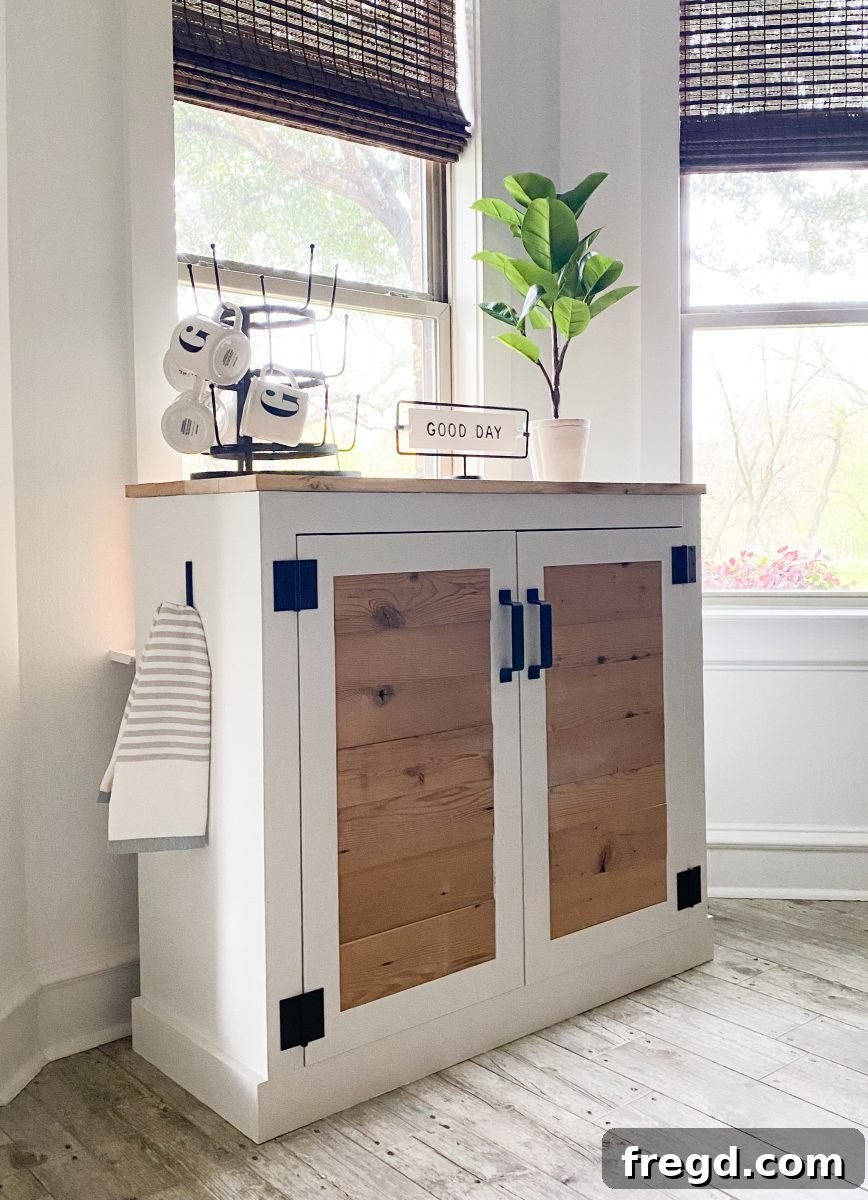
For those of you who diligently follow our journey on Instagram, you might have already caught a glimpse of the transformation process unfold in our stories, witnessing the journey from concept to completion. But for everyone else eager for inspiration, get ready to be amazed! Here she is, proudly standing, all set up, and looking absolutely stunning in her refreshed glory:
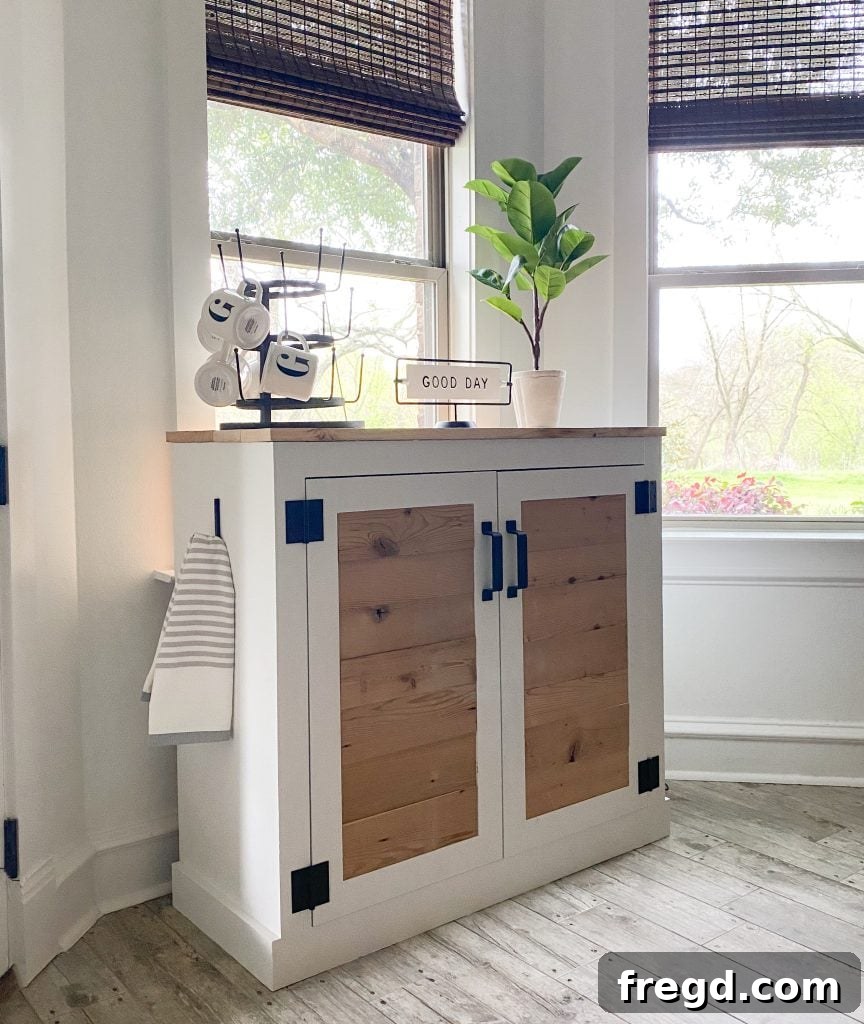
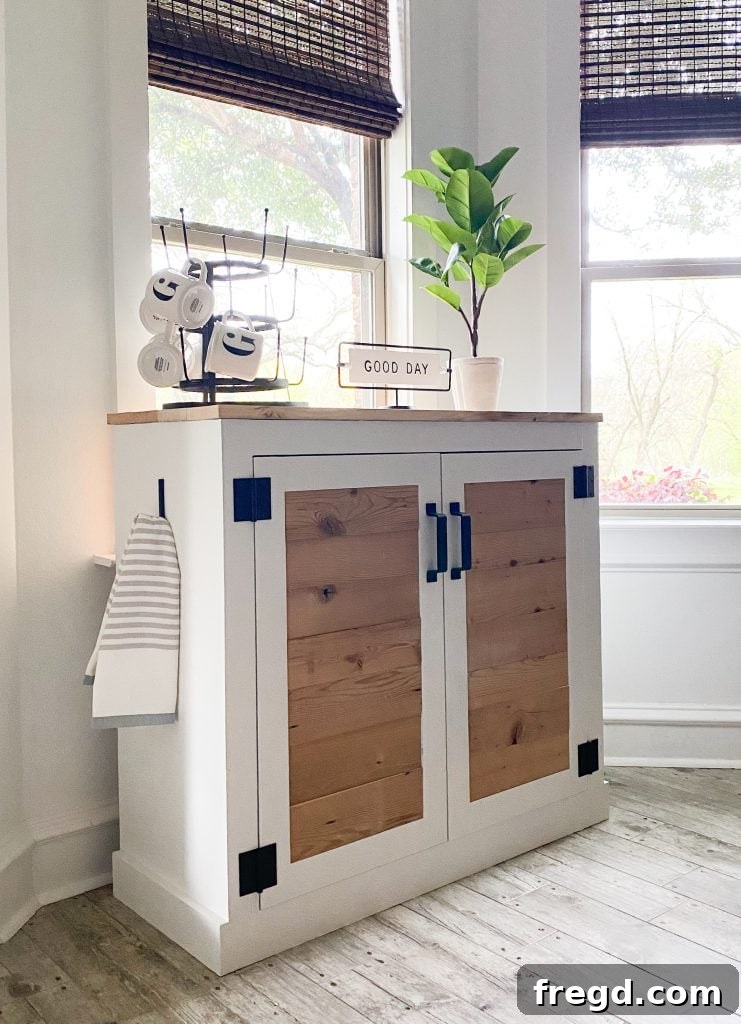
Build Your Own Dream Coffee Station: DIY Modern Farmhouse Coffee Cabinet with Free Plans
Are you ready to create a dedicated coffee station that not only organizes your daily brews but also significantly elevates the style and atmosphere of your home? This DIY modern farmhouse coffee cabinet project is the perfect undertaking for any woodworking enthusiast looking for a rewarding and functional build! Before we delve into the intricate details of the building process, make sure you take a moment to download the FREE, comprehensive plans for this popular coffee cabinet. You’ll find the download link conveniently located at the bottom of this post. Please note, the only significant modification you might consider will be related to how you construct your doors, which I’ve thoughtfully outlined in the plans to give you maximum creative flexibility and allow for personalization. With your plans in hand, let’s gather our tools and materials, and get ready to build something truly special!
Why a Dedicated Coffee Cabinet is an Absolute Must-Have for Your Home
In our increasingly fast-paced world, carving out a dedicated, serene space for your daily rituals can bring an astonishing amount of calm, efficiency, and joy to your everyday life. A custom-built coffee cabinet is far more than just a simple piece of furniture designed to store mugs and coffee beans; it quickly becomes the vibrant heart of your morning routine, a mini oasis for your much-needed caffeine fix, and a stylish focal point that enhances the aesthetic appeal of your kitchen, dining room, or even a cozy corner in your living area. This specific modern farmhouse design offers a harmonious blend of rustic charm and contemporary functionality, making it an incredibly versatile addition that seamlessly integrates with a wide range of home decor styles, from traditional to transitional and beyond.
Imagine a world where all your coffee essentials – your beloved coffee machine, an assortment of favorite pods or gourmet grounds, various sugars, elegant stirrers, and a collection of cherished mugs – are not only neatly organized but also beautifully displayed and effortlessly accessible. No more cluttered countertops, no more frantic rummaging through overflowing cabinets, and no more searching for misplaced items. A dedicated coffee cabinet brings order, beauty, and a sense of luxury to your daily coffee ritual, transforming it from a chore into a delightful experience. It’s an investment in both organization and ambiance, creating a designated “coffee corner” that invites you to slow down and savor every sip.
Essential Tools, Quality Materials, and Preparation for Your DIY Coffee Cabinet Project
Before embarking on any woodworking project, particularly one as detailed and rewarding as building your own modern farmhouse coffee cabinet, it is absolutely crucial to meticulously gather all your necessary tools and high-quality materials. This proactive approach not only significantly streamlines the entire building process but also enhances safety, minimizes frustrations, and ensures a smoother, more enjoyable workflow from start to finish. For this particular coffee cabinet, you’ll primarily be working with durable plywood and common yet versatile pine or whitewood boards, along with essential fasteners, strong adhesives, and a few key hardware components. Proper preparation is the cornerstone of a successful DIY project, so take your time with this stage.
Comprehensive Supply List:
- Wood Boards (Pine or Whitewood Recommended for Ease of Use and Finishing):
- 3 x 1x4x8’ boards (Ideal for creating the robust face frame, decorative trim, and other structural elements that give the cabinet its character.)
- 1 x 1x4x6’ board (For additional trim work or specific support pieces where longer lengths aren’t required, minimizing waste.)
- 2 x 1x3x8’ boards (Crucial for the main cabinet structure, providing stability and forming the framework for shelves and dividers.)
- 2 x 1x3x6’ boards (Perfect for smaller structural elements, cross-braces, or areas requiring less length, ensuring efficient material usage.)
- 1 x 1x2x6’ board (Primarily used for the elegant trim around the shallow drawer, adding a refined detail.)
- Plywood (For Structural Integrity and Panels):
- 1 x 41-1/2” x 38” x 1/4” plywood sheet (Designated for the back panel, providing structural stability and a finished enclosure.)
- 1 x 48” x 96” x 3/4” plywood sheet (This full sheet is the backbone of your cabinet, used for the sturdy cabinet sides, bottom, internal shelves, and the base of your shallow drawer.)
- Hardware & Fasteners (For Strong and Concealed Joints):
- 1-1/4” pocket hole screws (These are essential for creating strong, concealed joints, crucial for the cabinet’s clean aesthetic and durability.)
- Brad nails (Used primarily for attaching lighter trim pieces and the back panel, where strong but less visible fastening is desired.)
- High-quality wood glue (Absolutely critical for reinforcing every single joint in this project. When cured, wood glue creates a bond stronger than the wood itself, ensuring longevity.)
- 2 x 1/2” wide drawer pulls (Choose a style that complements your farmhouse aesthetic, serving as the ‘jewelry’ for your drawer.)
- Decorative hinges (Select hinges that match your desired aesthetic for the doors, adding to the overall charm and functionality.)
- 1/2” hardware mesh (This is a key component for the distinctive farmhouse look of your doors, providing both visual appeal and a unique texture.)
- Drawer runners/slides (Essential for ensuring the shallow drawer operates smoothly and effortlessly.)
- Finishing Supplies (To Bring Your Vision to Life):
- Sandpaper (A variety of grits, from coarse to fine, is necessary for achieving a perfectly smooth and paint/stain-ready surface.)
- Wood filler (Indispensable for concealing any nail holes, minor imperfections, or small gaps, creating a flawless finish.)
- Primer (Optional, but highly recommended, especially when painting, to ensure consistent color adhesion and a more durable finish.)
- Paint or stain of your choice (This is where your personal style shines through! Choose a finish that complements your home decor.)
- Recommended Tools (For Efficiency and Precision):
- Miter saw or circular saw (For making precise, square, and angled cuts, ensuring all your pieces fit together perfectly.)
- Pocket hole jig (e.g., Kreg Jig) (An invaluable tool for creating strong, hidden joints with ease.)
- Drill/driver (For drilling pilot holes and driving screws efficiently.)
- Brad nailer (Speeds up the process of attaching trim and panels, creating a clean finish.)
- Tape measure and pencil (For accurate measurements and markings – “measure twice, cut once” is the golden rule!)
- Wood clamps (Essential for holding pieces firmly together while glue dries or during fastening, preventing movement and ensuring tight joints.)
- Safety glasses and hearing protection (Always prioritize your safety when working with power tools.)
Having every item on this list readily available before you even make your first cut will make the entire building process significantly more enjoyable, efficient, and ultimately, more successful. Remember, safety first! Always wear appropriate protective gear when operating power tools and handling materials.
Step-by-Step Instructions: Building Your Beautiful Modern Farmhouse Coffee Cabinet
This project has been thoughtfully designed to be manageable and highly rewarding for DIYers with intermediate woodworking skills, offering clear, concise steps and consistently satisfying results. We’ll combine robust joinery techniques with careful attention to detail to construct a beautiful and durable coffee cabinet. Let’s begin the exciting process of bringing your functional and stylish coffee station to life!
1. Assemble the Main Cabinet Structure and Base
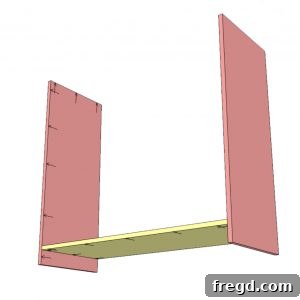
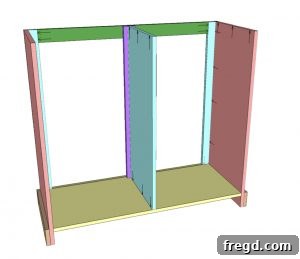
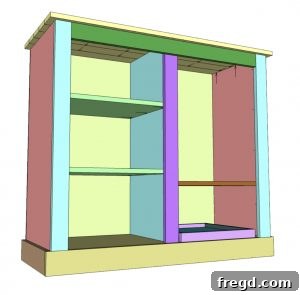
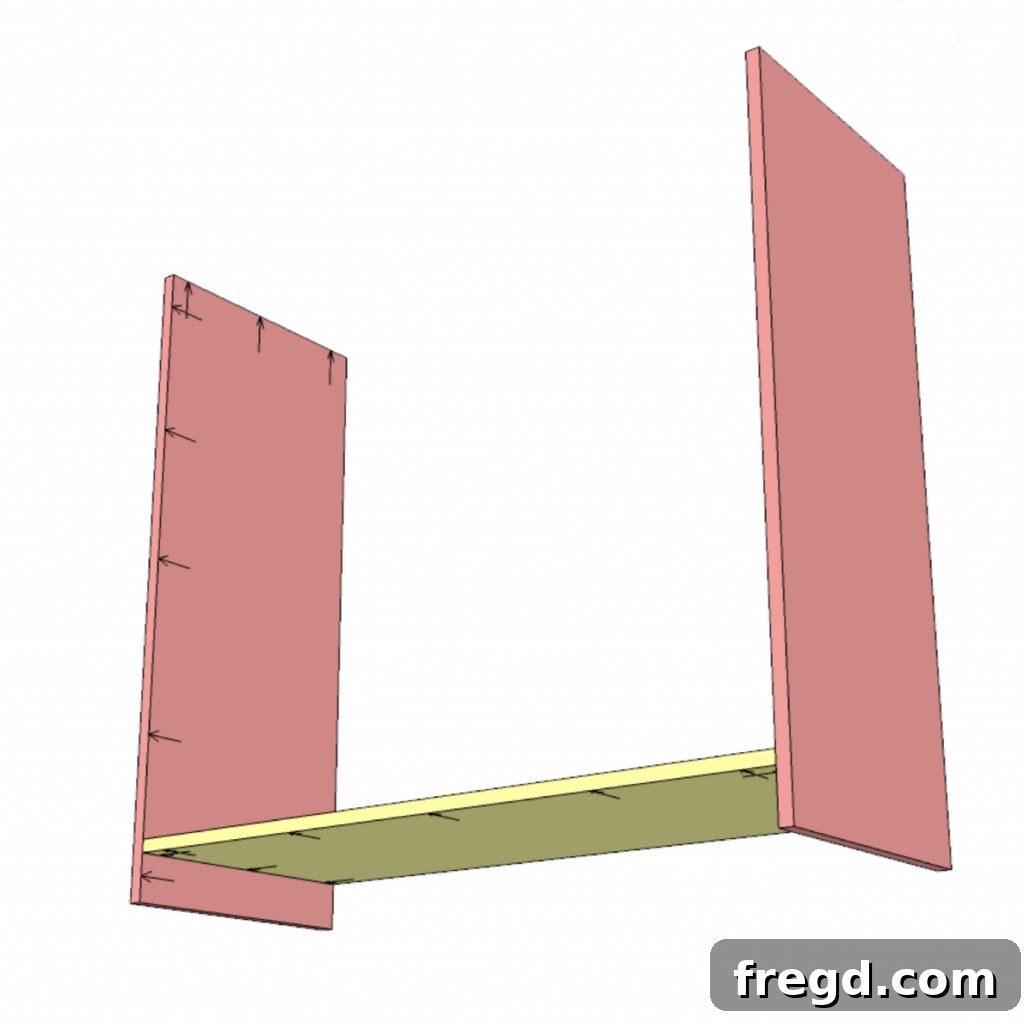
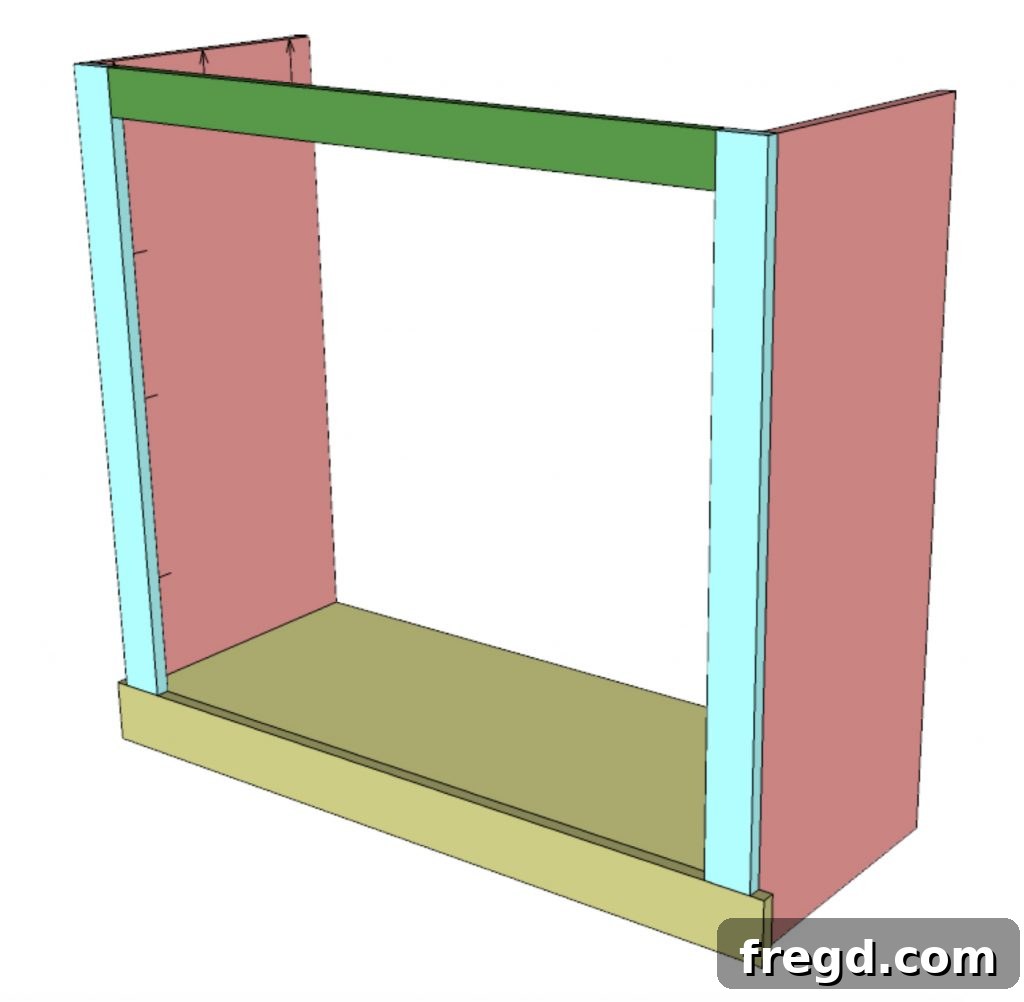
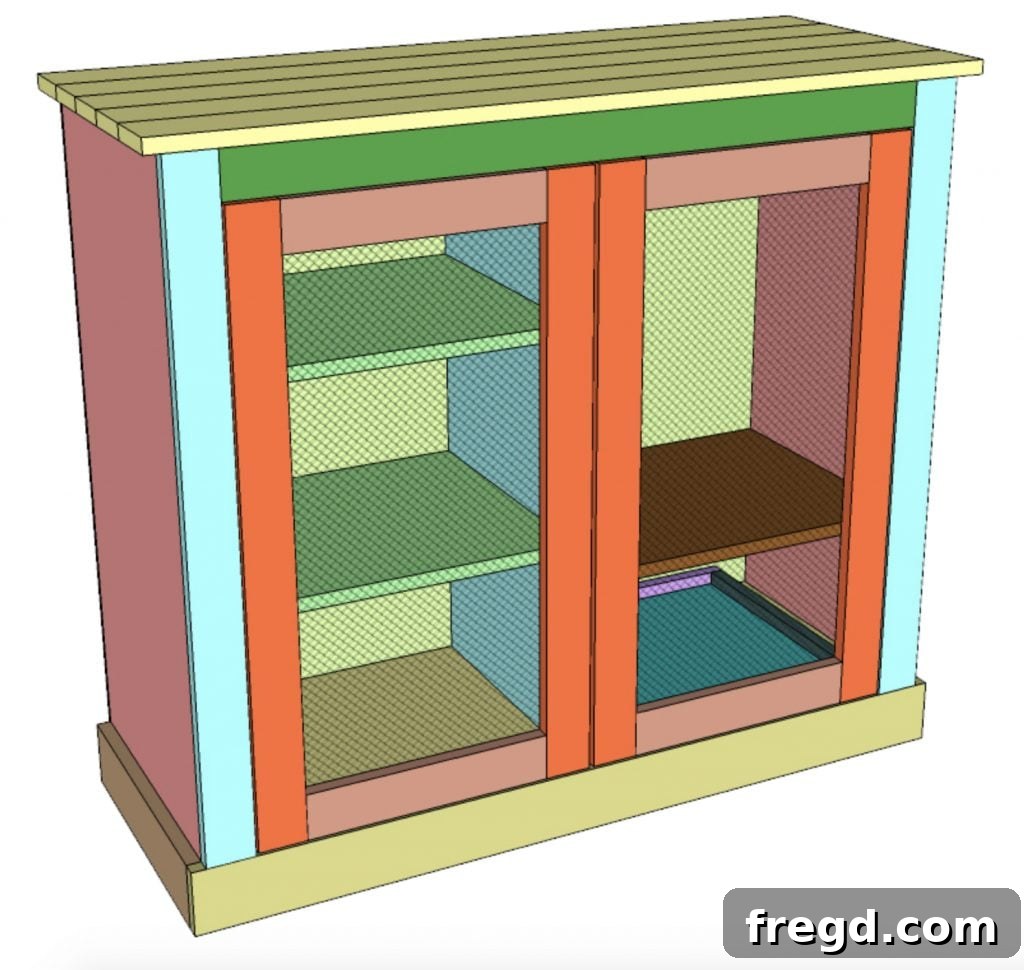
Begin by securing the bottom panel to the two side panels. For maximum durability and strength, it is absolutely paramount to use a generous amount of wood glue at every single joint throughout this entire project. Wood glue, when properly applied and allowed to cure, creates a bond that is often stronger than the wood itself. As you position these panels, ensure that all pocket holes are strategically drilled and oriented on these pieces, ready for the subsequent and seamless attachment of the front face frame. A critical measurement to remember at this stage is that the top surface of the bottom shelf should be precisely 3-1/2 inches from the ground. This specific measurement establishes the cabinet’s foundational height and ensures overall stability. This initial step forms the core framework of your coffee cabinet, so meticulous precision here is the key to a successful build.
2. Construct the Sturdy Face Frame
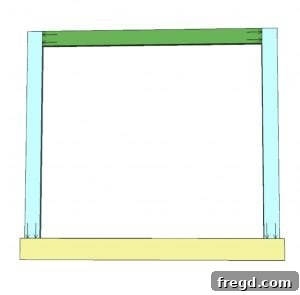
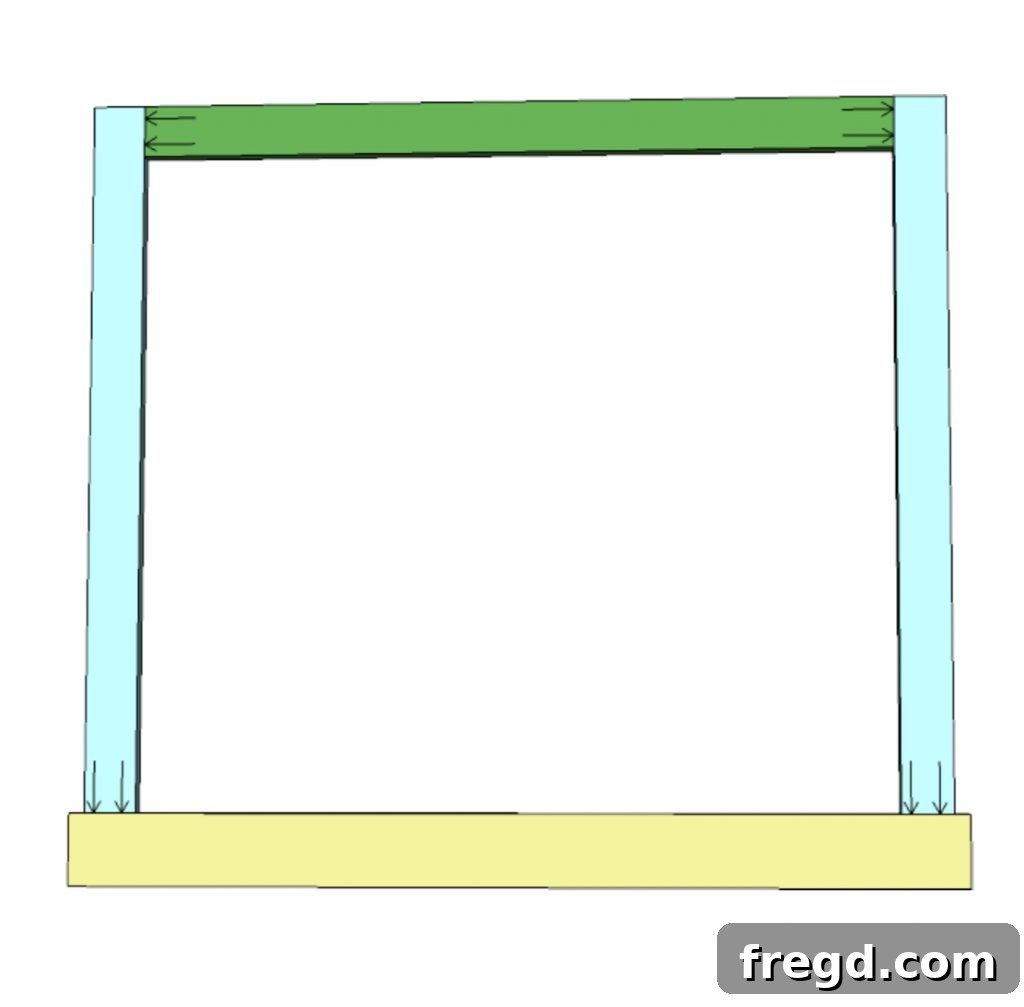
Next, carefully assemble the face frame using reliable pocket hole screws. The face frame is an incredibly crucial component, contributing significantly to both the structural integrity and the overall aesthetic appeal of your cabinet, providing a clean, finished, and professional look. Pay particularly close attention to the bottom board of the face frame; it needs to be perfectly centered, ensuring an equal 3/4-inch overhang on both ends. This precise overhang will create a subtle yet elegant design detail, and also provides a slight protective lip for the cabinet base. Double-check all your measurements and dry-fit the pieces before permanently fastening them to ensure a perfectly symmetrical and professional appearance.
3. Securely Attach the Face Frame to the Cabinet Carcass
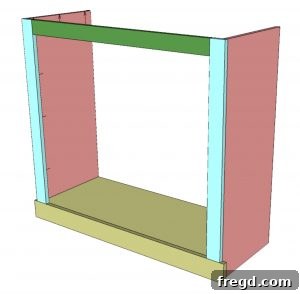
With your face frame meticulously assembled and ready, it’s now time to robustly join it to the main plywood panels that form the cabinet’s carcass. Apply a generous and even amount of high-quality wood glue along all mating surfaces of the face frame and the plywood edges. Then, secure the face frame firmly in its place using pocket hole screws. The powerful combination of wood glue and strategically placed screws will create an incredibly strong and exceptionally durable joint, which is absolutely essential for a coffee cabinet that is designed to withstand daily use and last for years. If possible, utilize clamps to hold the pieces tightly together and ensure a perfect, tight bond while the fasteners are being driven in and the glue begins to set.
4. Gracefully Add the Lower Side Trim Boards
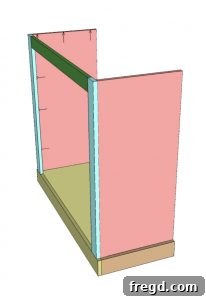
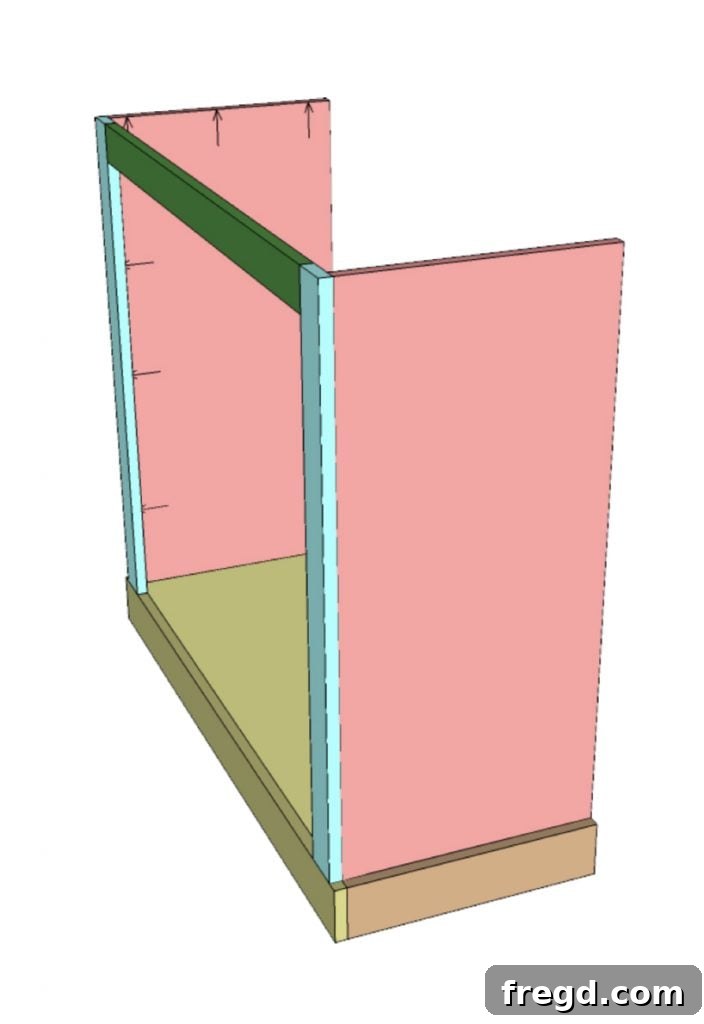
Now, let’s begin to incorporate some of the elegant decorative elements that are instrumental in achieving that distinctive modern farmhouse aesthetic. Using both a strong wood glue and fine brad nails, carefully attach the lower side trim boards. These trim boards serve a dual purpose: they not only significantly enhance the visual appeal of the cabinet’s base but also provide an additional layer of protection against everyday bumps and scuffs. Ensure that these trim pieces are installed perfectly flush with both the bottom and sides of the cabinet for a clean, integrated, and seamless look. The brad nails will effectively hold them securely in position while the wood glue dries and fully cures, providing a strong and lasting bond that won’t separate over time.
5. Precisely Install the Center Trim Board
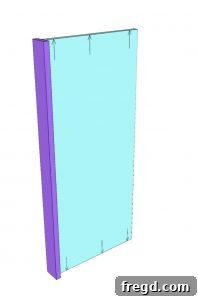
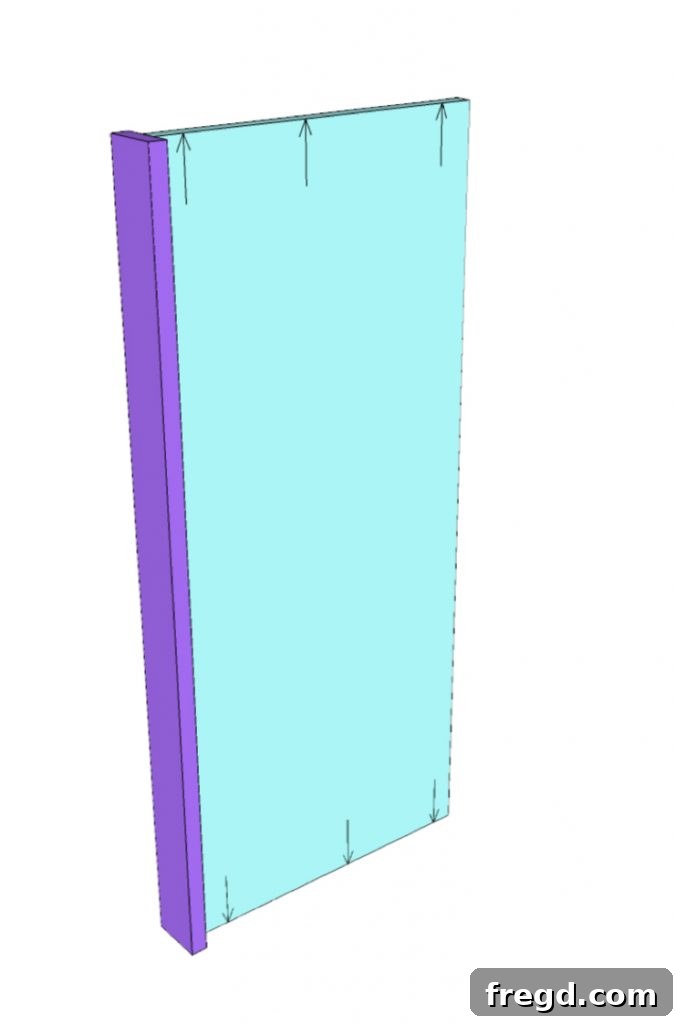
Next, shift your focus to the interior of the cabinet. Using a combination of wood glue and brad nails, meticulously attach the center trim board to the middle divider. This specific trim board is not just decorative; it plays a crucial role in visually defining the internal sections of the cabinet and adds another layer of refined, finished detail to the interior. It is absolutely crucial that this trim board is positioned perfectly centered on the plywood divider to maintain impeccable symmetry and achieve a professional, high-quality finish. Take your time to accurately measure and mark its exact position before permanently fastening it in place to ensure perfect alignment.
6. Robustly Secure the Center Divider
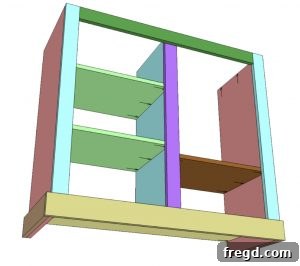
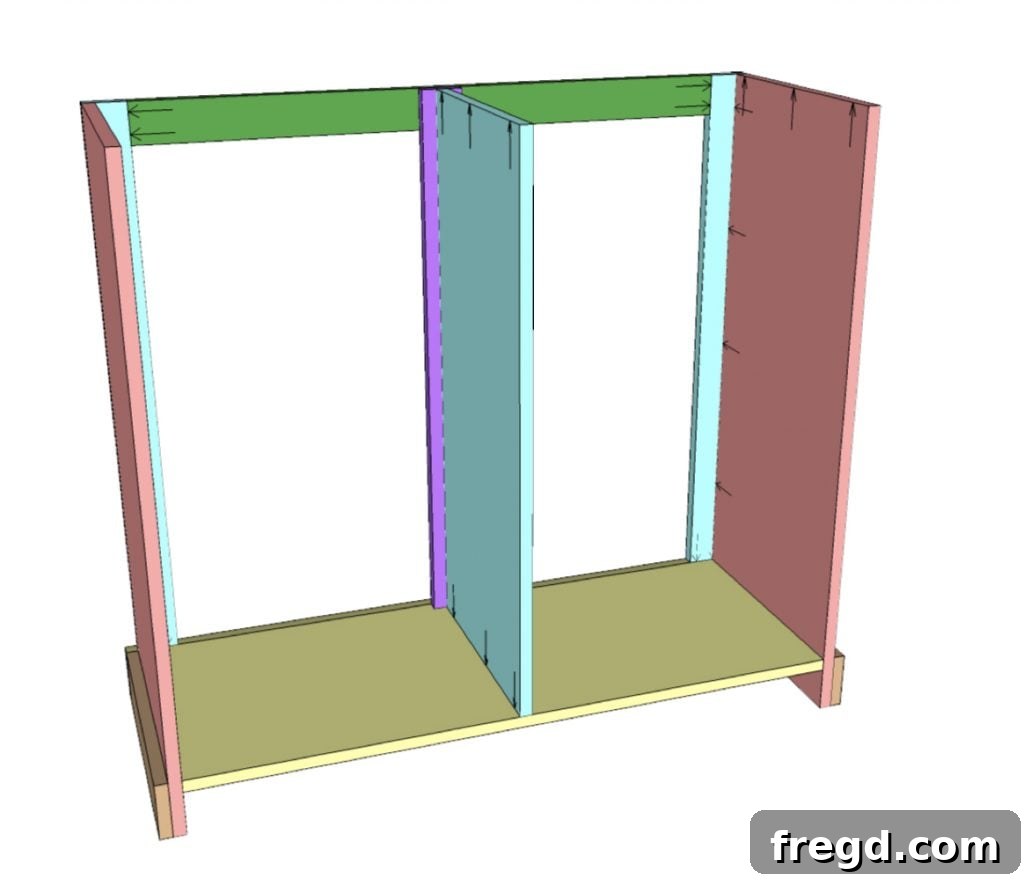
With the center trim board now firmly in place, you can proceed to fully and robustly secure the center divider, making it an integral part of the cabinet’s structure. Utilize pocket hole screws on the bottom end of the divider, fastening it securely to the cabinet base, which provides foundational strength. For the top section, use strong brad nails driven discreetly through the top of the previously installed center trim board directly into the top of the face frame. This intelligent two-point fastening method ensures that the divider is exceptionally robustly held in place, providing stable and rigid separation for your cabinet compartments, which is essential for long-term durability and organization.
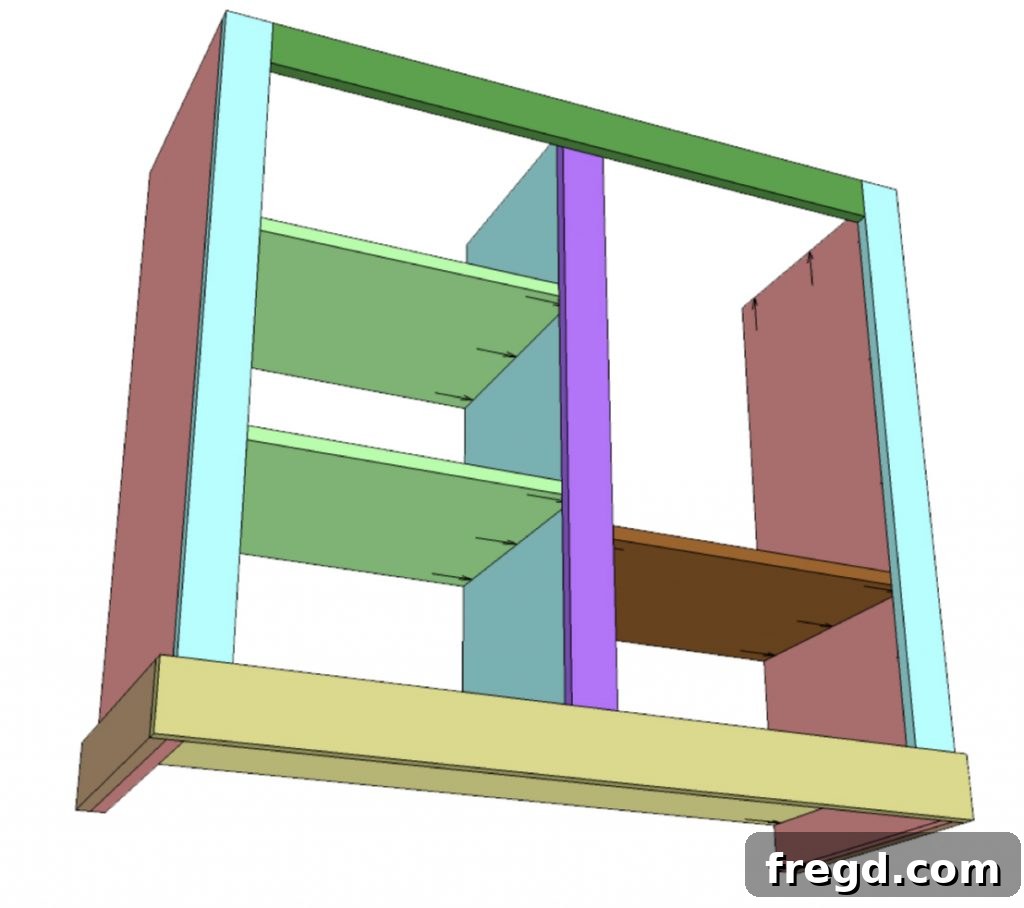
7. Thoughtfully Install Interior Shelves for Optimal Organization
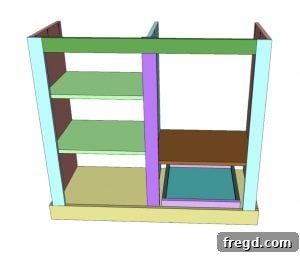
Now it’s time to customize the interior of your coffee cabinet for optimal storage and easy access to all your coffee essentials. Carefully add the shelves according to your specific needs and the types of items you plan to store. The initial design calls for one side of the cabinet to feature two shelves, spaced evenly, providing ample and accessible storage for a collection of mugs, smaller coffee containers, or other decorative items. The other side, however, should be strategically positioned and spaced to allow sufficient vertical room for larger appliances, such as a popular single-serve Keurig machine, a traditional drip coffee maker, or an espresso machine. I personally spaced my shelf to perfectly accommodate my Keurig, creating a dedicated spot. Take a moment to consider what specific items you intend to store to ensure optimal functionality and a truly personalized coffee station.
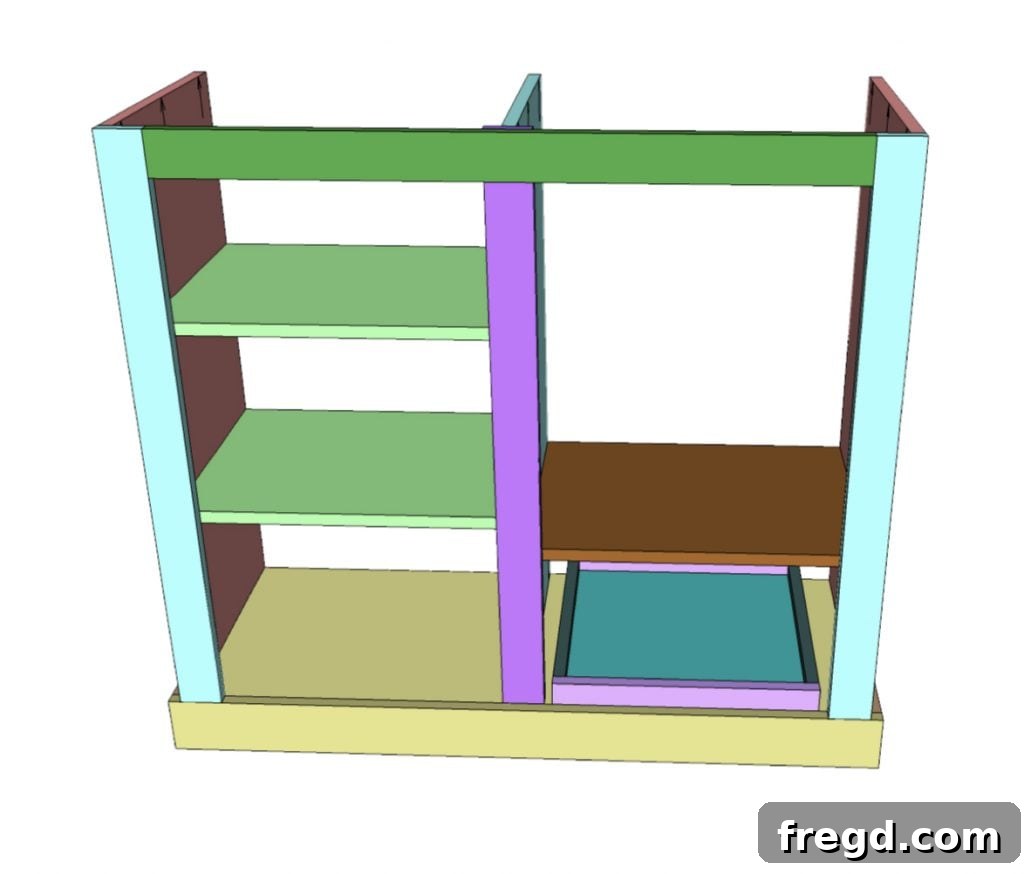
8. Assemble and Seamlessly Install the Shallow Drawer
A shallow drawer is an incredibly valuable addition, providing discreet and organized storage for smaller, often-used items like stirrers, neatly packaged sugar packets, coffee filters, or even small snacks. Assemble this drawer with meticulous care. The drawer itself is ingeniously simple yet highly functional, constructed from a robust piece of 3/4-inch plywood that is then elegantly trimmed out with 1×2 strips to form its sides, creating a clean and finished look. While the original plans suggest using pocket holes on the bottom of the plywood for assembly, you can certainly opt for brad nails if that method is more convenient and familiar for your woodworking style. Once the drawer is fully assembled, proceed to install it using reliable drawer runners on the bottom. These runners ensure smooth, effortless, and quiet operation every time the drawer is opened or closed. This small but significant detail greatly enhances the cabinet’s overall functionality and user experience.
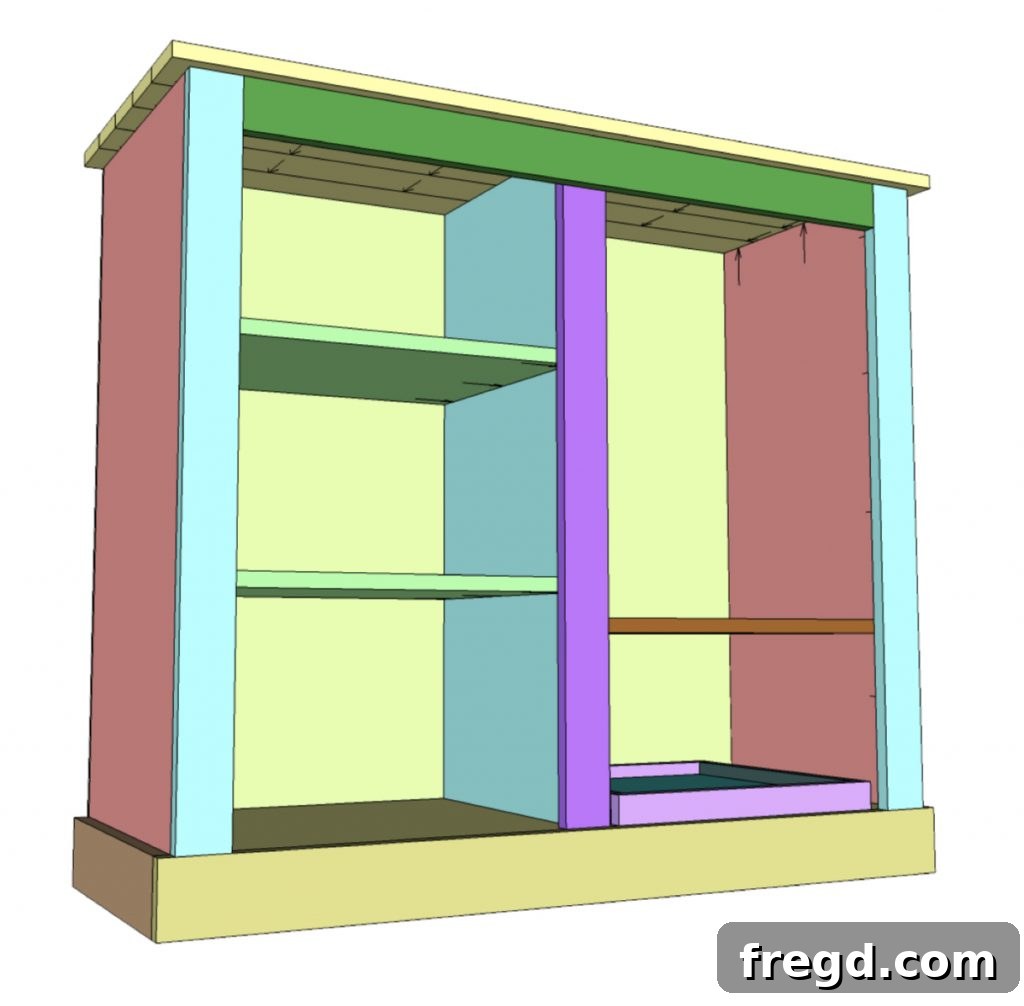
9. Attaching the Planked Top and the Essential Back Panel
Now, let’s move on to the crucial finishing touches for the main structure of your coffee cabinet. Begin by using pocket hole screws to meticulously assemble the planked top. This distinctive planked design is a hallmark of the modern farmhouse style, adding significant character, texture, and an authentic rustic feel to your piece. Once the top is assembled, carefully center this beautiful piece perfectly on the cabinet. Then, securely attach it using pocket hole screws driven discreetly through the vertical sides of the cabinet and firmly into the center divider from underneath, ensuring a strong, hidden connection. Finally, attach your 1/4-inch plywood panel for the back of the cabinet. Use a combination of strong wood glue and precise brad nails to ensure it is firmly and evenly in place. This back panel not only encloses the cabinet but also plays a vital role in squaring up the entire structure, enhancing its stability and providing a truly finished enclosure.
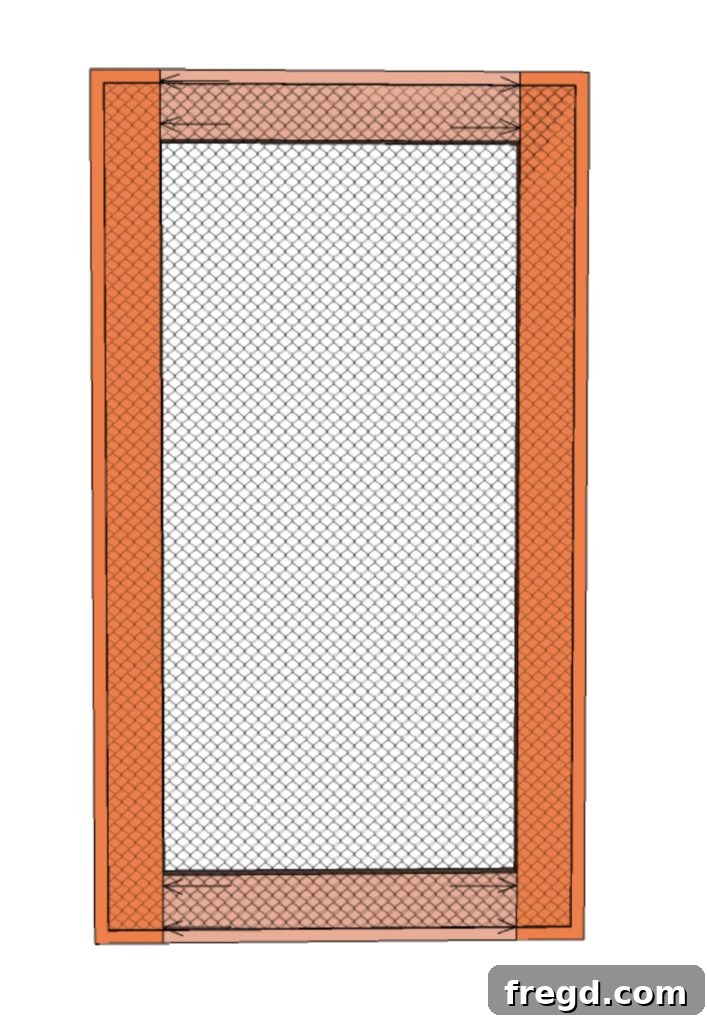
10. Constructing and Preparing the Distinctive Doors
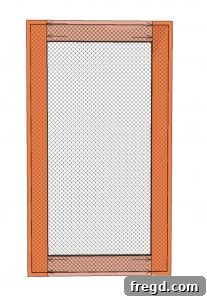
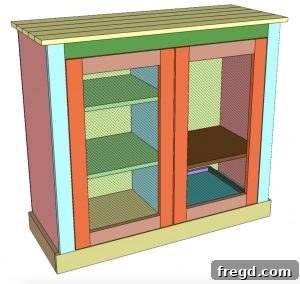
The doors are arguably the most visually striking and signature element of this modern farmhouse coffee cabinet design. Assemble both door frames using a reliable wood glue and secure them with pocket hole screws, mirroring the robust construction method you used for the main face frame. It is absolutely critical to accurately adjust your dimensions as needed to ensure a perfect, snug fit within your cabinet opening. The precise measurements provided in the plans are carefully designed to leave a consistent 1/8-inch spacing around each door, which is essential for allowing easy, unhindered opening and closing without any binding issues. Before you attach the 1/2-inch hardware mesh, make sure to thoroughly sand and apply your chosen finish (paint or stain) to the door frames. Finishing the frames before the mesh is attached significantly simplifies the process. Once the finish is completely dry and cured, carefully position and staple the wire mesh securely to the inside of the door panels, creating that distinctive and charming farmhouse look.
11. Final Finishing Touches and Thoughtful Personalization
You’re almost there – the grand finale! The final steps involve bringing your cabinet to its full glory and making it truly shine as a bespoke piece in your home. Start by meticulously filling any visible nail holes, minor imperfections, or small gaps with a high-quality wood filler, ensuring it dries completely according to product instructions. Then, thoroughly sand the entire cabinet, progressing through progressively finer grits of sandpaper (e.g., from 120-grit to 180-grit, then to 220-grit) until you achieve an exquisitely smooth, touchable, and blemish-free surface. This meticulous sanding is absolutely crucial for a professional-grade finish, regardless of whether you plan to paint or stain.
Once the sanding is perfected, apply your desired finish with care and attention. Whether you choose a rich, deep stain to highlight the natural beauty of the wood grain, a crisp, classic white paint for an authentic farmhouse look, or even a bold, contemporary color for a modern twist – this is where your personal style truly comes to life. Allow ample drying time between coats as per the specific product instructions for a durable and flawless result.
After the finish has fully cured and hardened, it’s time to elegantly attach the doors to the cabinet using your chosen decorative hinges. Take immense care to align them perfectly for seamless operation and a balanced aesthetic. Finally, complete the look by adding any desired door pulls or knobs. These small hardware choices are often considered the “jewelry” of furniture, adding that final touch of sophistication and personality. This entire finishing stage is your ultimate opportunity to truly personalize your coffee cabinet and make it uniquely yours – a stunning reflection of your creativity, dedication, and hard work! Make it look absolutely awesome!
We absolutely adore seeing your magnificent creations! Be sure to stop by our website or, even better, tag us on social media using relevant hashtags (like #DIYCoffeeCabinet #FarmhouseDecor #HomeBarBuild) to let us know if you decided to make one of these super easy, incredibly rewarding, and highly functional DIY coffee cabinets. Happy building, and enjoy your new favorite spot!
Modern Farmhouse Coffee Cabinet: Get Your Free Plans Here!
Ready to transform your home with this beautiful and highly functional piece? To print the free, detailed, and comprehensive plans for this modern farmhouse coffee cabinet, simply CLICK HERE to download the PDF! These invaluable plans include all the precise measurements, detailed diagrams, and critical insights you’ll need to successfully complete your project with confidence.
Modern Farmhouse Coffee Cabinet Quick Overview
Community Rating: 4 out of 5 stars (Based on valuable feedback from our enthusiastic DIY community)
Supply List (Detailed for Easy Shopping)
- 3 x 1x4x8’ Pine or whitewood board
- 1 x 1x4x6’ Pine or whitewood board
- 2 x 1x3x8’ Pine or whitewood board
- 2 x 1x3x6’ Pine or whitewood board
- 1 x 1x2x6’ Pine or whitewood board
- 1 x 41-1/2” x 38” x 1/4” plywood
- 1 x 48” x 96” x 3/4” plywood
- 1-1/4” pocket hole screws
- Brad nails
- Wood glue (high-strength, waterproof recommended)
- 2 x 1/2” wide drawer pulls
- Decorative hinges for cabinet doors
- 1/2” hardware mesh (for door inserts)
- Drawer runners/slides (for smooth drawer operation)
- Assorted grit sandpaper (e.g., 120, 180, 220)
- Wood filler (stainable or paintable)
- Primer (optional, but recommended for painting)
- Paint or stain (your choice of finish)
Step-by-Step Building Instructions (Simplified & Clear)
-
Secure the Main Panels: Apply wood glue at every joint. Secure the bottom panel to the two side panels. Ensure pocket holes are strategically positioned on these pieces for later face frame attachment. The top surface of the bottom shelf should be precisely 3-1/2” from the ground.

Begin by firmly attaching the cabinet’s base and side panels, preparing for the face frame. -
Assemble the Face Frame: Construct the face frame using strong pocket hole screws. The bottom board of the face frame needs to be perfectly centered, ensuring an even 3/4” overhang on both ends.
Carefully assemble the face frame, ensuring precise centering for a professional look. -
Attach Face Frame to Plywood Panels: Apply wood glue and then use screws to firmly attach the front face frame onto the plywood panels of the cabinet, creating a very strong, durable bond.
Securely join the face frame to the cabinet structure using both adhesive and fasteners. -
Attach Lower Side Trim: Using both wood glue and fine brad nails, carefully attach the lower side trim boards to the cabinet’s base for added detail and protection.
Adorn your cabinet’s base with elegantly attached lower side trim boards. -
Attach Center Trim Board: Apply wood glue and use brad nails to attach the center trim board to the middle divider. It is crucial that this trim board is perfectly centered on the plywood divider.
Precisely attach the center trim board, ensuring it is perfectly centered for symmetry. -
Secure Center Divider: Secure the center divider firmly in place with pocket hole screws on its bottom end, fastening it to the cabinet base. Then, use brad nails through the top of the center trim board into the top of the face frame for robust support.
Ensure the central divider is securely fastened from both the top and bottom for maximum stability. -
Add Shelves: Install the interior shelves. Designate one side for two evenly spaced shelves and position the other side’s shelf to comfortably allow room for larger items, such as a Keurig machine.
Strategically install interior shelves to accommodate all your coffee-making essentials. -
Assemble and Install Drawer: Assemble the shallow drawer (fabricated from 3/4” plywood trimmed with 1×2 strips; use pocket holes or brad nails). Install it smoothly with reliable drawer runners on the bottom.
Integrate a practical shallow drawer for organizing smaller coffee accessories. -
Attach Top and Back Panel: Use pocket hole screws to assemble the planked top, then center and attach it securely to the cabinet via the vertical sides and into the center divider. Finally, attach the 1/4” plywood back panel using wood glue and brad nails.
Complete the cabinet’s main structure by adding the stylish planked top and the stabilizing back panel. -
Construct and Finish Doors: Assemble both door frames using wood glue and pocket hole screws. Adjust dimensions precisely to achieve a 1/8” spacing around the doors. Sand and apply your chosen finish to the door frames. Once dry, staple the 1/2” hardware mesh to the inside panels.
Craft the distinctive cabinet doors, incorporating the signature hardware mesh. -
Final Finishing and Hardware: Fill any nail holes with wood filler and sand the entire cabinet thoroughly until smooth. Apply your desired paint or stain finish. Finally, attach the doors with decorative hinges and add any preferred door pulls to personalize your custom coffee cabinet.
Complete your project with careful finishing and the installation of all decorative hardware.