
Build Your Dream DIY Upholstered Bench: A Step-by-Step Guide
Happy Friday, fellow DIY enthusiasts! There’s nothing quite like the satisfaction of a weekend project, especially one that transforms your living space with a touch of personalized style. Today, we’re diving into a project that promises both beauty and functionality: building your very own upholstered bench. This isn’t just a piece of furniture; it’s a statement, a cozy spot, and a testament to your crafting skills.
This project has quickly become one of my favorites, and I’m thrilled with how it turned out. I’ve been eager to incorporate a custom upholstered piece into my home, and this elegant bench perfectly fits the bill. It’s a surprisingly straightforward build that delivers stunning results, proving that you don’t need years of experience to create something truly special.
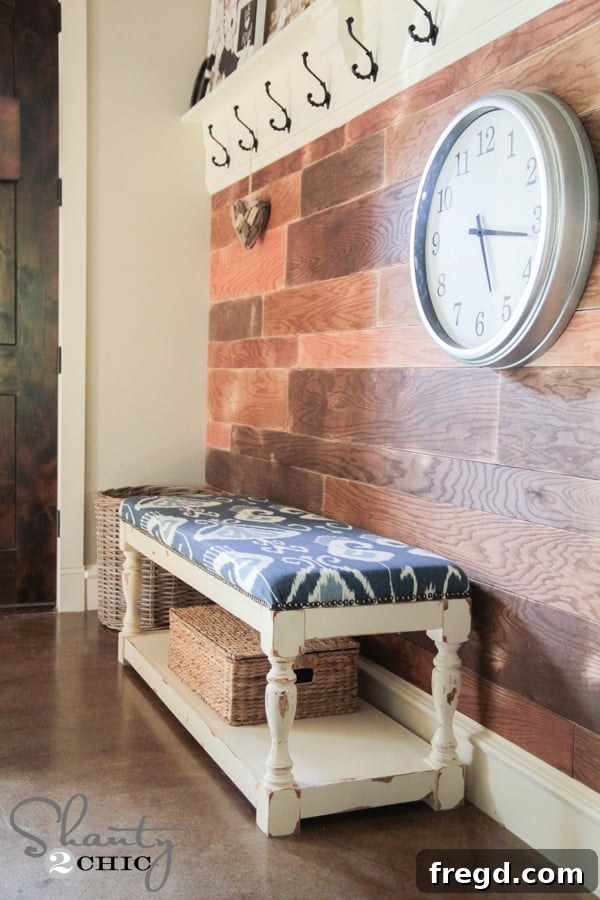
Isn’t it fantastic? A custom upholstered bench adds so much character and warmth to any room, whether it’s at the foot of a bed, in an entryway, or as extra seating in a living area. The best part? You can easily create this beauty yourself. To help you along, we’ve prepared comprehensive, free plans that you can download right here, or by simply clicking the button below. As always, I’ll walk you through every step of the process, sharing all the tips and tricks I picked up along the way. We even had our incredibly talented friend, Jay of Jay’s Custom Creations, transform my design into these easy-to-follow printable plans. He’s truly amazing, and I highly recommend you check out his site for more fantastic woodworking inspiration!
Before we grab our tools, let’s talk about the star of the show: the fabric! I am absolutely smitten with the fabric I chose for this project. It adds a sophisticated yet inviting touch to the bench. I discovered this gorgeous pattern at my all-time favorite destination for textiles:
You can explore the specific fabric I used and find your own perfect match HERE. Choosing the right fabric is crucial as it sets the tone for your entire bench. Don’t be afraid to experiment with patterns, colors, and textures to reflect your personal style.
The Building Process: Constructing Your Bench Frame
Our journey begins with the foundation of the bench – the plywood. Precision in these initial steps is key to a sturdy and level final product. I started by cutting the main plywood piece for the bottom structure. This piece requires specific square cutouts in each corner to accommodate the legs. For this task, my trusty Ryobi Cordless Jig Saw was indispensable. Its maneuverability allows for clean, precise cuts, which is vital for the leg fit.
Cutting the Leg Notches
First, I carefully traced the exact dimensions of the squares onto each corner of the plywood base. Accurate marking here ensures your legs will fit snugly and the bench will stand evenly.
Next, using the jigsaw, I made the first cut along one side of the traced square. Always ensure a stable work surface and proper safety gear when operating power tools.
Then, I completed the square by cutting the second line, removing the corner piece. Repeat this for all four corners, and you’ll have the perfect recesses for your bench legs.
Creating Strong Joints with Pocket Holes
With the corner cutouts done, it was time for pocket holes, which create incredibly strong and hidden joints. My K5 Kreg Jig was my tool of choice here. We often get asked about our preferred Kreg Jig model. Both my sister and I used the K4 model for over two years, and it’s fantastic for many projects. However, the K5 offers enhanced features that make it even more user-friendly and efficient, especially for larger pieces or repetitive tasks. You can explore the K5 model on Amazon.
For all the holes on the bottom shelf, I used 3/4″ pocket holes. Ensure your jig settings are correct for the material thickness to achieve optimal joint strength.
You’ll need to create pocket holes on all four sides of the plywood base. These will be used to attach the trim pieces, forming the sturdy frame of your bench.
Attaching the Trim Pieces
The next step is to attach the trim pieces that will form the perimeter of your bench frame. Our downloadable plans provide the general sizes for these pieces, but I strongly recommend re-measuring each side directly on your base to ensure an exact fit. This is where the old adage “measure twice, cut once” truly comes into play! Small discrepancies can lead to visible gaps, so taking an extra moment here can save a lot of frustration later.
You’ll attach the trim to the plywood base using the pocket holes you just created. For added durability and strength, I also applied a thin, even bead of Gorilla Wood Glue to all the joints before screwing them together. This combination of pocket screws and wood glue creates a bond that will last for years.
**A Quick Tip (Learned the Hard Way!):** Make sure to drill pocket holes on the ends of your trim pieces *before* you attach them to the main frame. Speaking from personal experience, I completely forgot this crucial step on one side! It meant I had to go back with my smaller Kreg R3 Jig to add them, which was far less convenient than doing it right the first time. You might even notice in the photo below that my trim pieces are missing their pocket holes – a testament to my momentary lapse! Don’t make my mistake; a little foresight saves a lot of time!
Attaching the Decorative Legs
Once your trim pieces are securely in place, it’s time for the legs – and let me tell you, I absolutely adore the legs we chose for this bench! They elevate the entire piece, both literally and aesthetically. I had the pleasure of collaborating with Osborne Wood to design these custom legs, and their craftsmanship truly shines through. I couldn’t be happier with how they turned out. You can purchase these very same stylish legs for your own project HERE! I opted for knotty pine, which kept the cost incredibly reasonable, under $17 a piece. Talk about a budget-friendly custom look!
Attaching the legs requires a bit of steady hand and precision. My Kreg Right Angle Clamp was an absolute lifesaver for this step. This ingenious tool acts like an extra set of hands, making the process much smoother. One end fits perfectly into a pocket hole, while the other arm clamps securely to your other surface, holding everything tightly in place while you drive your screws. It ensures perfect alignment and a solid connection.
Just like with the trim pieces, I applied Gorilla Wood Glue to all the joints where the legs meet the frame. This extra measure guarantees a robust and long-lasting structure for your bench.
Adding the Top Runners
My final step in building the wooden base was to attach the top runners. These pieces are essential because they will eventually provide the attachment points for the upholstered bench top. You’ll want to drill pocket holes into these runners, facing upwards and on each end. The pocket holes on the ends will be used to attach the runners to the legs, creating a fully integrated and sturdy frame. The upward-facing pocket holes will come into play later when we secure the upholstered cushion, keeping all fasteners hidden for a clean finish.
Finishing the Bench Frame: Stain, Paint, and Distressing
Once all four legs were securely attached and the frame felt solid, I moved on to finishing the wood. The goal was to achieve a beautifully distressed look, which requires a specific layering technique. First, I applied one coat of Varathane stain in Early American. This warm, rich tone provides a fantastic base layer that will subtly show through the paint later on, adding depth and character. I allowed it to dry thoroughly, as rushing this step can affect the final outcome.
After the stain was completely dry, I applied a thin layer of Vaseline to certain areas of the stained bench. This is a brilliant trick for achieving an authentic distressed look! The Vaseline acts as a resist, preventing the paint from adhering fully to those spots. You can learn more about this simple yet effective distressing method in THIS tutorial I previously shared.
Once the Vaseline was applied, I painted the entire bench frame using a lovely Sherwin Williams color called Antique White. This soft, creamy white provides a beautiful contrast to the darker stain. I made sure to let the paint dry really well – patience here is a virtue, as it allows the paint to cure properly before the next step.
Crafting the Upholstered Top: Comfort Meets Style
Now for the most exciting part: the upholstered top! This is where your bench truly comes to life, adding that essential element of comfort and style. I began with a precisely cut piece of plywood, which forms the sturdy base for our cushion.
Adding Foam for Plush Comfort
Next, I covered the plywood with a luxurious piece of furniture foam, sourced conveniently from Online Fabric Store. I used THIS specific upholstery foam, which was an absolute dream to work with. It came in the perfect size (2″ x 18″ x 54″), eliminating the need for any tricky cutting. This saved a lot of time and ensured a professional-looking finish right from the start. Just lay it directly on top of your plywood base.
The foam should sit flush and evenly on the plywood, ready to create that comfortable, inviting feel.
Layering with Batting for Smooth Edges
Following the foam, I carefully covered the entire piece with a thin layer of batting. While seemingly a minor step, batting plays a crucial role in upholstery. It helps to soften the edges of the foam, creating a smoother, more rounded appearance when the fabric is applied. It also provides an extra layer of protection and comfort, ensuring your upholstered top looks and feels plush.
Applying the Fabric: The Art of Upholstery
Now for the fabric! Lay your chosen fabric on a clean, flat surface, good side down. Then, carefully place your bench top piece (plywood + foam + batting) onto the fabric, with the batting facing down. This ensures that the fabric is properly aligned and ready for stapling.
Using my 18V Ryobi Airstrike Stapler, I started by pulling back the edge of one of the shorter sides of the fabric, pulling it taut but evenly, and stapling it to the underside of the wood board. I used 1/2″ staples for a secure hold. The key here is consistent tension – you want the fabric to be snug, without any wrinkles, but not so tight that it distorts the foam or batting.
Pull the fabric firmly and evenly as you staple, ensuring a smooth, wrinkle-free surface. Work your way across the side, placing staples every few inches.
After completing the two short sides, move on to the longer sides, repeating the same process of pulling and stapling. This will leave your corners loose and open, which is exactly what we want for now.
Neatly Finishing the Corners
Tackling the corners is often considered the trickiest part of upholstery, but with a simple technique, you can achieve a clean, professional look. I like to gather the excess fabric at each corner and fold it upwards a bit, almost like an accordion. Then, I carefully pull the folds taut and staple them down onto the underside of the wood. The goal is to minimize bulk while creating a smooth, rounded corner on the top side of the bench.
Once the corner is stapled, you can carefully trim any excessive fabric to reduce bulk. Don’t worry about absolute perfection on the underside; it will be hidden, but aim for neatness to avoid lumps.
The bottom of your upholstered top will look something like this – a testament to your hard work! Remember, the underside doesn’t need to be flawless; as long as the fabric is secure and the top is smooth, you’re doing great!
No need for absolute perfection on the underside, folks! The beauty is on top!
Final Assembly and Decorative Touches
Before attaching the upholstered top to the bench frame, it’s time to bring out the distressed look we prepared earlier. I used my Ryobi Corner Cat sander to gently go over the edges and corners of the painted bench frame. The beauty of the Vaseline technique is that wherever it was applied, the Antique White paint will effortlessly sand right off, revealing the beautiful Early American stain underneath. This creates a naturally aged and worn appearance, adding character and depth to your handmade bench.
Attaching the Upholstered Top
Now, to unite the two main components of our bench! For this step, I found it easiest to turn the entire bench frame upside down. This allows easy access to the upward-facing pocket holes on the top runners. Using 1.25″ pocket hole screws, I secured the upholstered cushion to the frame. The screws go through the pocket holes in the runners and firmly into the plywood base of the cushion. This method creates a strong, invisible attachment, ensuring the top is securely fastened without any visible hardware.
Adding Decorative Nail Heads for a Professional Touch
Once your upholstered top is securely attached, it’s time for the final, elegant detail: decorative nail heads! These small embellishments make a huge difference, adding a professional, high-end finish to your DIY project. I used THESE Spanish small nails, also found at Online Fabric Store. For my bench, I used exactly three bags of these beautiful nail heads.
I started by gently pushing each nail head into the wood bench top along the edge of the upholstery. This creates a small indentation, guiding the placement and ensuring a straight line. It’s important to space them evenly for a polished look.
To firmly secure them, I used THIS specialized upholstery hammer. Its magnetic tip helps hold the nail head in place, preventing smashed fingers and making the tapping process much easier and more precise. Gently but firmly tap each nail head into place until it’s flush with the fabric.
Once all your nail heads are perfectly tapped into place, your magnificent upholstered bench is complete!
The Finished Masterpiece!
And here she is, all finished up and ready to grace your home! I am incredibly proud of this DIY upholstered bench, and I hope you are too once you complete your own. The combination of the distressed antique white frame, the elegant custom legs, and that beautiful fabric creates a piece that looks incredibly high-end, yet was made with your own two hands.
How fun is it to see your vision come to life? It’s amazing how a little fabric and some woodworking can add so much character and a touch of elegance to any space. This bench isn’t just a functional item; it’s a piece of art that reflects your personal style and craftsmanship. Whether you place it in your entryway, at the foot of your bed, or as an accent in your living room, it’s sure to be a conversation starter.
Thank you so much for joining me on this creative journey! I hope this detailed guide empowers you to tackle your own DIY upholstered bench project with confidence. Don’t hesitate to reach out if you have any questions at all throughout your build. We love seeing your creations, so be sure to share your finished benches with us on Instagram and Pinterest!
Happy building!
~Whitney