
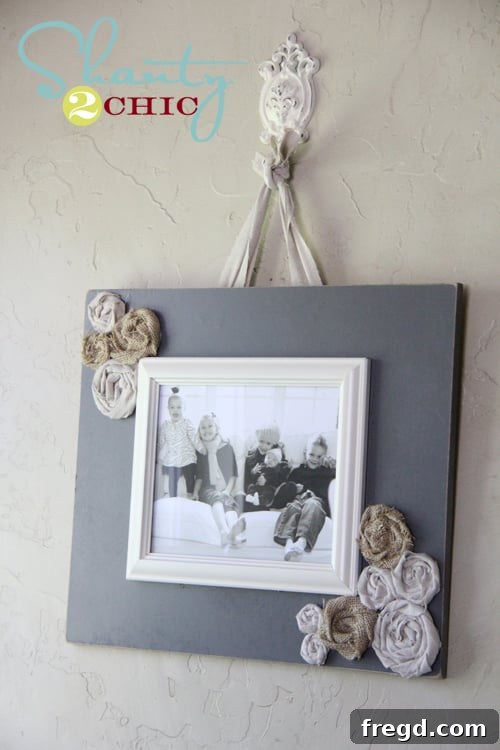
Craft Your Own Elegant DIY Fabric Rosette Photo Frame
Hey there, fellow DIY enthusiasts!
I’m absolutely thrilled to be back and share a comprehensive, step-by-step tutorial for the beautiful fabric rosette frame that caught so much attention a few days ago. Get ready to transform simple, everyday materials into a stunning piece of personalized home decor that truly reflects your unique style and creativity!
Why This DIY Fabric Rosette Frame is a Must-Try Project
In a world increasingly filled with mass-produced decor items, there’s something incredibly special and deeply satisfying about creating a handcrafted piece for your home. This DIY fabric rosette photo frame isn’t just a charming way to display your most cherished memories; it’s a testament to your personal touch and a unique addition that can elevate the ambiance of any room. Whether your interior design leans towards shabby chic, rustic farmhouse, or boasts an eclectic mix of styles, this customizable frame will integrate seamlessly while adding a distinct touch of vintage elegance and warmth. Beyond being a delightful project for yourself, it also makes an exceptionally thoughtful and personalized handmade gift for friends and family, perfect for special occasions.
Gather Your Supplies: A Comprehensive List of Materials and Tools
Before you embark on this exciting creative journey, it’s crucial to gather all your necessary materials and tools. Having everything organized and within reach will ensure a smooth, enjoyable, and efficient crafting experience. Here’s a detailed list to help you prepare:
- MDF Board: You’ll need one sheet of 1/2-inch thick Medium-Density Fiberboard, which we will cut to a practical size of 16×20 inches. A full 4×8-foot sheet is often the most cost-effective option, and many hardware stores provide the convenient service of ripping it down into smaller, more manageable boards for you.
- Inexpensive Wall Frame: Select one simple 8×10-inch photo frame. The beauty of this project is that the cheaper the frame, the better, as it will be completely transformed through paint and embellishments.
- Fabric Scraps: Prepare a collection of various fabric strips for crafting your rosettes. Soft fabrics like cotton, linen, broadcloth, or even repurposed old t-shirts or bedsheets work wonderfully, offering texture and body.
- Spray Paint (Base Coat): A can of Rust-Oleum Painter’s Touch in Granite (or a similar sophisticated neutral shade of your preference). This will provide a durable and aesthetically pleasing base for your MDF board.
- Spray Paint (Frame Accent): A can of Heirloom White spray paint (or another complementary, soft color that enhances a vintage or distressed look).
- Strong Adhesive: Gorilla Glue Epoxy is highly recommended for securely bonding the photo frame to the MDF base, offering a powerful and permanent hold.
- Hot Glue Gun and Glue Sticks: An indispensable tool for quickly and securely attaching the fabric rosettes and other lightweight embellishments to your frame.
- Cutting Tool: A Dremel Saw-Max™ is highly recommended for making precise and clean cuts, especially if you plan to create the optional access hole in your MDF. Alternatively, a jigsaw or even a careful hand saw can be used for cutting the MDF board.
- Staple Gun: Essential for securely attaching the decorative fabric strips to the back of the frame, ensuring they remain firmly in place.
- Small Decorative Hook: Look for a charming, rustic hook at your local craft store, such as Hobby Lobby. This small addition provides both functionality and an extra touch of character.
- Sandpaper or Sanding Block: Various grits of sandpaper will be useful for smoothing edges and, crucially, for distressing the painted surfaces to achieve that desirable aged, shabby chic finish.
- Safety Gear: Always prioritize safety when working with tools and paints. Ensure you have appropriate eye protection (goggles) and gloves.
Step-by-Step Guide to Crafting Your Unique Photo Frame
Let’s begin the exciting journey of bringing your DIY fabric rosette frame to life. Follow these detailed steps for a successful and immensely rewarding project, paying attention to each stage to ensure a beautiful final product.
Step 1: Preparing Your MDF Base with Precision
The very foundation of your beautiful new frame starts with the MDF board. Medium-Density Fiberboard is an incredibly popular choice for DIY projects due to its affordability, consistently smooth surface, and relative ease of cutting, which makes it an ideal canvas for painting and embellishing. For this particular project, we will be utilizing a 1/2-inch thick MDF board. Begin by accurately cutting your MDF to a size that is both manageable and perfectly suited for your desired frame. Our chosen dimensions are 16×20 inches, providing generous space to feature your photograph prominently while also allowing ample room for the decorative fabric rosettes that will adorn its perimeter. If you decide to purchase a full 4×8-foot sheet – an exceptionally cost-effective option, often priced around $25 – you’ll be pleased to know that most major hardware stores are typically happy to cut it down into smaller, more manageable boards for you. This service can save you significant time and effort, ensuring you start with clean, perfectly straight cuts, which are crucial for a professional-looking finish. When measuring and cutting, precision is paramount; a carefully prepared base guarantees that your finished frame will sit flush against the wall and provide a stable, level surface for all subsequent decorative elements.
Step 2: Cutting the Optional Access Hole for Seamless Picture Swaps
This subsequent step introduces incredible versatility and long-term adaptability to your DIY frame, although it remains entirely optional based on your preference. The ingenious idea of cutting an access hole within the MDF base grants you the remarkable ability to effortlessly change out your featured photograph whenever the mood strikes. This means you can keep your display perpetually fresh and dynamic, allowing it to evolve with your memories or seasonal decor themes, all without the hassle of having to painstakingly disassemble your beautifully crafted frame. If, however, you envision a permanent display or do not anticipate frequent picture changes, you can certainly opt to skip this step altogether; in such a case, you would simply attach your chosen photo directly to the MDF before proceeding to integrate the frame.
For those who choose the invaluable convenience of the access hole, I wholeheartedly recommend employing a precision cutting tool such as the Dremel Saw-Max™. Its compact form factor, combined with its robust and powerful motor, renders it exceptionally suited for making intricate and clean cuts on a diverse range of materials, including MDF. Begin by carefully marking the precise area for your opening – typically a rectangular aperture that is slightly smaller than the inner dimensions of your actual photo frame. With your lines clearly marked, proceed to follow them with steady hands to achieve a clean and crisp cut. Always exercise patience, ensure your workpiece is securely stabilized, and, most importantly, prioritize your safety by diligently wearing appropriate protective gear, such as safety goggles. This thoughtful addition of an easily accessible opening transforms your frame into a truly versatile and enduring piece of adaptable home decor.
Step 3: Imparting Elegance to the MDF Base with a Sophisticated Paint Finish
Once your MDF board has been meticulously cut to size and, if you opted for it, the access hole perfectly created, the next exciting phase is to bestow upon it a sophisticated and protective base coat of paint. Applying paint to the entire board serves a dual purpose: it not only effectively seals and protects the MDF material but also crucially establishes the foundational aesthetic tone for your entire project. I discovered a truly fantastic color that effortlessly lends itself to achieving a refined yet subtly rustic appearance: Rust-Oleum Painter’s Touch in Granite. This particular spray paint offers exceptional coverage, creating a wonderfully smooth and uniform finish that beautifully evokes the subtle elegance of natural stone. This muted, elegant base will provide a perfect and intriguing contrast to the soft, intricate fabric rosettes that we will be carefully adding later in the process.
For the best results, apply several light, even coats of spray paint, making sure to allow ample drying time between each application. This layering technique is essential for preventing unsightly drips and runs, ultimately ensuring a professional-looking and flawless finish. Always work in a well-ventilated area to ensure proper air circulation and protect your surrounding workspace from any potential overspray. You can readily find Rust-Oleum products, including this specific and versatile shade, at most major hardware retailers, such as Home Depot. While your beautifully painted MDF base is diligently drying, you can strategically move on to preparing your photo frame, effectively maximizing your crafting time and maintaining a continuous workflow for your DIY masterpiece.
Step 4: Transforming an Inexpensive Photo Frame into a Vintage Charm
While your MDF base is diligently drying and curing, shift your creative focus to the photo frame itself. The true allure of this DIY project lies in its remarkable ability to transform an ordinary, often overlooked, and inexpensive item into something truly extraordinary and imbued with character. For this project, I deliberately sought out a simple 8×10-inch wall frame from Hobby Lobby – the kind that can typically be acquired for just a few dollars. These budget-friendly frames are absolutely ideal because you’re liberated from the worry of altering an expensive piece; instead, they serve as perfect, unpretentious canvases eagerly awaiting your personalized customization and artistic touch.
To infuse it with that coveted charming, distressed, or elegantly vintage aesthetic, apply a coat of your chosen paint. I opted for another beloved shade from my palette: Heirloom White. This wonderfully creamy, off-white hue beautifully complements the “Granite” base, introducing a delightful touch of classic elegance and a subtle yet effective contrast that significantly enhances the overall shabby chic appeal. Apply your paint in a series of light, even strokes or sprays, ensuring uniform coverage. Once the paint is thoroughly dry, you can take a piece of fine-grit sandpaper and gently sand along the edges and any subtly raised areas. This technique will delicately reveal a hint of the original frame material underneath, masterfully creating that highly sought-after distressed finish. This crucial step not only adds immense character but also ensures your frame possesses the appearance of a cherished antique, rather than a freshly purchased, mass-produced item from a store shelf, giving it a rich history and story.
Step 5: Securely Attaching the Transformed Frame to the MDF Base
With both your MDF base and the photo frame beautifully painted and thoroughly dry – a critical condition for optimal adhesion – it’s now time to bring these two primary components together to form the core structure of your unique display. Achieving a strong, lasting, and unwavering bond between these elements is absolutely crucial for the overall durability and longevity of your finished piece. For this vital task, I found Gorilla Glue Epoxy to be an exceptionally reliable and effective choice. What truly sets this adhesive apart, and what I particularly appreciate about it, is its unique consistency; it exhibits an immediate workability that is surprisingly similar to hot glue, yet it possesses the remarkable ability to cure into an incredibly permanent and robust hold. This ensures that your frame will remain steadfastly attached to the MDF board for many years to come, providing a stable foundation for all your decorative efforts.
To begin, carefully apply the epoxy to the back edges of your painted photo frame. Work swiftly but with precise movements, then meticulously center the frame directly over the previously cut access hole (if you opted to create one) or simply position it exactly where you desire on the MDF board. Press down firmly and maintain consistent pressure for the manufacturer’s recommended curing time. If necessary, using clamps can further ensure maximum adhesion and prevent any shifting during the crucial setting period. Proper and accurate alignment at this stage is of utmost importance, as it significantly impacts the overall aesthetic balance and visual appeal of your finished frame. Allow the epoxy to fully set and cure according to the manufacturer’s instructions before proceeding to any subsequent steps, guaranteeing a strong, stable, and perfectly unified structure that will endure.
Step 6: The Art of Crafting Beautiful Fabric Rosettes
Now, we arrive at arguably the most charming, creative, and personalized aspect of this entire project: the crafting of the exquisite fabric rosettes! These delightful, intricate fabric flowers are pivotal; they instantly add a luxurious layer of texture, a softness that appeals to the senses, and an undeniable “shabby chic” or rustic appeal that elevates your frame from ordinary to truly extraordinary. While I have shared numerous rosette tutorials in the past, let’s take a moment for a comprehensive refresher, ensuring that everyone can confidently master this simple yet incredibly impactful embellishment technique.
Choosing Your Fabric: The beauty of fabric rosettes lies in their versatility. Almost any type of fabric can be utilized! Cotton, soft linen, burlap for a rustic touch, or even repurposed old sheets, pillowcases, or t-shirts can be wonderfully upcycled. For a luscious, full, and soft appearance, it’s best to select fabrics that are not overly stiff or rigid. Experimenting with varying shades within a single color family, or combining carefully chosen complementary colors, can introduce remarkable depth and visual interest to your floral arrangement.
Cutting Your Fabric Strips: Begin by cutting long strips of your chosen fabric. The width of your strip will directly dictate the ultimate height and prominence of your finished rosette, while the length will determine its overall fullness and density. For crafting charming, medium-sized rosettes, fabric strips approximately 1.5 to 2 inches wide and ranging from 12 to 24 inches long serve as an excellent starting point. Don’t feel pressured to achieve perfectly straight lines; in fact, slightly frayed or uneven edges can often enhance the inherent rustic charm and handmade aesthetic of your flowers, contributing to their unique character.
Mastering the Rolling Technique: Believe it or not, these fabric rosettes are genuinely as simple and straightforward to create as they appear! Start by folding one end of your fabric strip to fashion a small, tight triangle or a neat, compact knot. This initial fold or knot will form the very core, the heart, of your burgeoning flower. Apply a small, discreet dab of hot glue to secure this foundational starting point firmly in place. Then, with a continuous and steady motion, meticulously roll your fabric strip around this central core, gently twisting it as you go. This subtle twisting action is key to creating the illusion of delicate, unfolding petals, mimicking the natural structure of a blooming flower. As you progressively roll, periodically add small, judicious dots of hot glue to the back of the nascent rosette. These strategic glue points are crucial for securing each successive layer in place and effectively preventing the rosette from unraveling. Always work outwards from the center, gradually building up the layers and volume of your beautiful flower. Do not strive for absolute perfection; slight irregularities and variations in each rosette are not only acceptable but often contribute significantly to the authentic, charming, and undeniably handmade appeal of your overall composition.
Create a diverse array of rosettes, varying in both size and fullness. This deliberate variation will allow you to craft an interesting, dynamic, and visually rich display around your frame. I personally made a generous quantity of these charming fabric flowers. Once created, they can be effortlessly attached to your MDF base using a hot glue gun. Thoughtfully arrange them around the perimeter of your frame, meticulously filling any empty spaces and cultivating a beautiful, tactile, and textured border that will truly make this frame a one-of-a-kind artistic statement, a true embodiment of your personal flair.
Step 7: Enhancing Charm with Decorative Fabric Strips
After meticulously arranging your beautiful and varied fabric rosettes, I instinctively felt that the frame, though lovely, needed just a subtle “something” extra to fully complete its charming, rustic, and inviting look. Simple fabric strips emerged as the perfect, understated solution, adding an additional layer of gentle texture and a playful, untamed element that perfectly complemented the existing design. This particular step is wonderfully straightforward and easy to execute, yet it consistently makes a surprisingly significant and delightful visual impact, truly tying the aesthetic together.
Select two strips of complementary fabric – perhaps choosing colors that either subtly match your rosettes or opt for a gentle neutral tone that provides a soft contrast. The precise length of these strips will depend entirely on how long you desire them to gracefully hang, but aim for a length that will allow for an elegant and natural drape. Securely attach one end of each fabric strip to the very top, rear edge of your MDF frame using a reliable staple gun. Ensure that they are evenly spaced for visual balance and, crucially, that they are firmly stapled so they can withstand the gentle pull of gravity without coming loose. Once the strips are securely fastened, simply take the dangling ends and tie them into a loose, casual knot. This creates a lovely, soft drape that gracefully softens the otherwise defined edges of the frame and significantly contributes to its overall charming, handmade aesthetic. It’s a seemingly minor detail that, in fact, makes a profound difference in achieving that perfectly nuanced shabby chic or rustic farmhouse vibe you’re aiming for.
Step 8: Incorporating a Distressed Decorative Hook for Functionality and Flair
To further enhance both the inherent functionality and the irresistible rustic appeal of this unique and handcrafted frame, integrating a small, decorative hook is an absolutely wonderful and thoughtful idea. This seemingly minor addition provides a highly convenient and charming spot to hang a variety of small items, such as a set of keys, a lightweight ornamental trinket, or even a delicate, small dried flower bouquet, thereby significantly increasing the frame’s practical utility far beyond its primary role of merely displaying a photograph. I was fortunate enough to discover a lovely, unassuming hook at my local Hobby Lobby, which perfectly harmonized with the overall aesthetic and design direction I was striving to achieve.
To ensure it integrated seamlessly into the existing design, I gave the hook a quick, light, and even coat of the very same Heirloom White spray paint that was previously used on the photo frame itself. Once this layer of paint was completely dry and cured, I took a piece of fine-grit sandpaper and gently, yet deliberately, sanded the edges and any subtly raised areas of the hook. This time-honored technique, commonly known as distressing, masterfully imparts a wonderfully aged, “shanty,” or authentically vintage appearance to the hook, making it seem as though it has accumulated years of character and history. Carefully attach the hook securely to the bottom center of your MDF base, taking care to ensure it is positioned perfectly symmetrically and fastened firmly enough to hold small items. This final, delightful embellishment serves to elegantly tie all the diverse elements of your creation together, culminating in your beautifully custom-designed fabric rosette frame that is both visually stunning and wonderfully practical.
Bringing Your Masterpiece to Life: The Final Touches
And just like that, with careful planning and a touch of creativity, your exquisite DIY Fabric Rosette Photo Frame is complete and ready to adorn your home! The journey of transformation, from a few basic supplies to a deeply personalized and visually captivating piece of art, is truly one of the most rewarding aspects of engaging in DIY projects. The very final step, and arguably the most exciting one, involves selecting your chosen picture and finding that perfect, coveted spot to proudly display your handcrafted treasure. Whether it’s a cherished family photograph, a breathtaking landscape that evokes fond memories, or a unique piece of printed art, the unparalleled ability to easily change it out (thanks to our optional yet incredibly convenient access hole) means your frame can effortlessly evolve and adapt with your ever-changing memories, seasonal decor preferences, or even your personal artistic inclinations.
Consider hanging it in your cozy living room to inject a touch of inviting farmhouse charm, positioning it in your tranquil bedroom for a soft, romantic, and elegant accent, or placing it prominently in a hallway to warmly welcome guests with a truly unique and artisanal display. This frame transcends its basic functional purpose; it is not just an item to hold a photo. Instead, it transforms into a compelling conversation starter, a captivating focal point in any space, and a beautiful, tangible reflection of your personal style, your dedication to craftsmanship, and your innate creative prowess. It serves as a powerful testament and undeniable proof that with just a little bit of creative vision, some dedicated effort, and a keen eye for detail, you possess the ability to significantly elevate your home decor with custom-designed pieces that are not only profoundly meaningful but also exceptionally and visually stunning, making your living space truly your own.
Your Feedback Matters! Share Your Thoughts and Creations
What are your thoughts on this comprehensive DIY fabric rosette photo frame tutorial? I poured a considerable amount of passion and effort into creating this detailed guide, and I sincerely hope it ignites your creative spark and inspires you to embark on creating your very own personalized home decor pieces. I would absolutely LOVE to hear your impressions, questions, or any tips you might have in the comments section below! Your feedback is invaluable to me and the entire DIY community.
If you’re as excited and enthusiastic about this rewarding project as I am, please consider doing me a huge favor: pin it to your favorite Pinterest boards and generously share it across your social media channels. Spreading the word not only helps more aspiring DIY enthusiasts discover creative and fulfilling projects like this one but also supports the sharing of unique ideas and inspiration!
And remember, the wonderful world of DIY is incredibly vast and full of amazing tools that can make projects like this a seamless and enjoyable experience. Investing in versatile and reliable tools, such as the Dremel Saw-Max™, can truly unlock a whole new realm of possibilities for your future crafting and home improvement endeavors, allowing you to tackle even more ambitious projects with confidence and ease.
Happy crafting weekend, everyone!
Warmly,
Whitney