
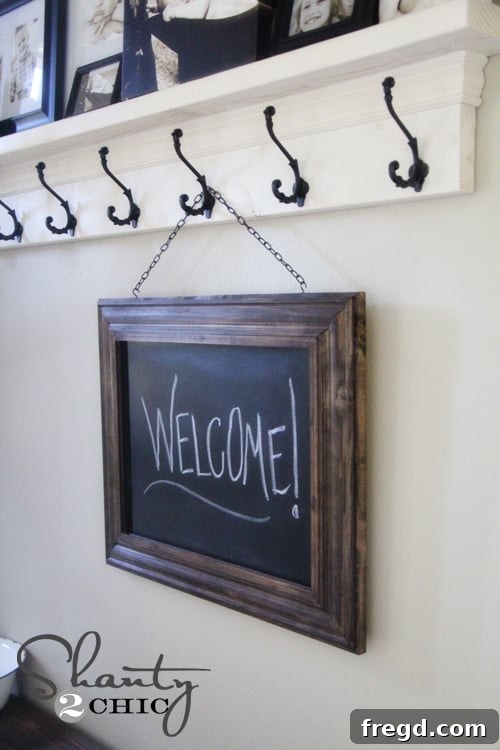
Create Your Own High-End Framed Chalkboard: A Budget-Friendly DIY Guide
Welcome, DIY enthusiasts! Today, we’re diving into a project that promises to transform your home decor without breaking the bank. If you’ve ever admired the stylish, oversized framed chalkboards from high-end retailers like Restoration Hardware, but balked at their hefty price tags—often soaring past $300—then you’re in for a treat. This guide will walk you through crafting your very own magnificent framed chalkboard for around $15, a fraction of the cost, and in surprisingly little time. Imagine having a versatile, rustic-chic piece that adds character and functionality to any room, all thanks to your own hands.
This project is not only incredibly affordable but also remarkably simple, making it an ideal choice for both seasoned crafters and those just beginning their woodworking journey. In less than an hour, you can have a beautifully stained, custom-built chalkboard ready to adorn your walls. Perfect for a weekend project or even a quick nap time craft, this DIY framed chalkboard brings that coveted farmhouse or vintage aesthetic into your home effortlessly. Let’s get started on creating a piece you’ll be proud to show off!
Why a DIY Framed Chalkboard is a Must-Have for Your Home
Beyond its stunning appearance and budget-friendly nature, a DIY framed chalkboard offers a wealth of practical and aesthetic benefits for any living space. It’s more than just a decorative item; it’s a dynamic canvas that adapts to your needs and style. For families, it can serve as a central communication hub, perfect for jotting down grocery lists, appointments, or sweet messages. In a child’s room, it becomes an inspiring space for creative expression and learning. For the home office or kitchen, it transforms into an elegant menu board or an organizer for daily tasks and goals.
This project allows for complete customization, letting you choose the exact size, stain, or paint color to perfectly complement your existing decor. Whether you’re aiming for a rustic farmhouse vibe, a sleek modern look, or a charming vintage feel, a DIY framed chalkboard can be tailored to fit. It’s an empowering project that builds confidence in your DIY skills and leaves you with a truly unique piece of wall decor that reflects your personal touch. Plus, the satisfaction of creating something beautiful and functional with your own hands is truly priceless.
Gather Your Materials & Tools: The Foundation of Your Project
One of the beauties of this DIY framed chalkboard is that it requires a minimal investment in both materials and tools. Most items can be found at your local craft store or hardware store, and many tools are beginner-friendly or can be borrowed. Here’s a detailed look at what you’ll need:
Essential Materials:
- Pre-Framed Chalkboard: The heart of your project! Look for an inexpensive chalkboard at craft stores like Hobby Lobby, often available for around $5 with a coupon. The key is to find one framed in unfinished wood. This allows you to stain the frame to match your desired aesthetic. If you can’t find an unfinished one, you can always paint a pre-finished frame, but staining provides a beautiful, natural wood look.
- Wood for the Main Frame: You’ll need one 1x4x8 furring strip or whitewood board. These are incredibly affordable, typically costing around $2, and provide a sturdy base for your expanded frame.
- Wood for Decorative Casing: Acquire 10 feet of pine casing. This trim piece, costing about $0.98 per foot at stores like Home Depot (HD), will add that professional, finished look around your chalkboard, elevating its design from simple to sophisticated.
- Wood Glue: A strong wood glue, like Gorilla Wood Glue, is crucial for durable joints.
- Finish Nails: These small nails will help secure the chalkboard and trim pieces without being overly visible.
- Wood Stain: For a rich, elegant finish, Rust-Oleum Ultimate Wood Stain in Dark Walnut is highly recommended. It’s the same stain used on the popular $15 entryway bench project and can be found at Lowe’s.
- Painter’s Tape: Essential for protecting the chalkboard surface during staining.
- Hanging Chain: A decorative chain, available at Lowe’s, adds a unique hanging element.
- Cup Hooks: These small hooks, often spray-painted black, secure the chain to the top of your chalkboard.
Tools You’ll Need:
- Miter Saw OR Miter Box and Hand Saw: While a miter saw offers precision and speed, a miter box and hand saw set (under $8 at HD) is perfectly adequate for this project and a great starter tool for aspiring woodworkers. It allows you to make accurate 45-degree angle cuts with ease.
- Hand Staple Gun: A cheap, simple staple gun will be used for quickly assembling the main frame pieces.
- Measuring Tape and Pencil: For precise measurements and markings.
- Pliers: Useful for cutting the chain to size.
- Safety Glasses: Always wear eye protection when cutting wood!
Step-by-Step Guide: Crafting Your Custom Chalkboard
With your materials and tools at hand, let’s dive into the creation process. Follow these simple steps for a seamless and rewarding DIY experience.
Step 1: Precision Cuts for Your Main Frame
The first step involves cutting the 1x4x8 furring strip to form the main outer frame of your chalkboard. If you’ve purchased the same chalkboard, you can use the exact measurements provided below. Otherwise, simply measure the existing frame of your chalkboard to determine the lengths needed. Remember, these cuts will be at a 45-degree angle on each side, meaning the cuts are not parallel. We use “short point to short point” measurements for accuracy when creating a mitered corner. This ensures your frame pieces fit together snugly for a clean, professional look.
Carefully mark your measurements on the wood. Then, using your miter saw or miter box and hand saw, make precise 45-degree cuts. Take your time with this step, as accurate cuts are key to a well-fitting frame. Once cut, you will have four pieces that will form the rectangular or square frame.
Step 2: Assembling the Main Frame
Now, it’s time to bring your frame pieces together. We’ll use a strong bonding method for durability. Apply a small amount of Gorilla Wood Glue to the ends of your mitered cuts. Then, carefully align two pieces to form a corner. Use a cheap hand staple gun to secure the joint. This method, often referred to as “Ashley’s famous method,” provides a quick and strong bond, allowing the glue to set while holding the pieces firmly in place. Repeat this process for all four corners until your main frame is complete and sturdy. Ensure the frame is square before the glue fully dries.
Step 3: Integrating the Chalkboard into the Frame
Once your main frame is assembled, flip it over so the stapled side faces up. This ensures a clean, finished look on the front. Now, gently place your pre-framed chalkboard directly onto the assembled wood frame. The chalkboard should lay neatly on top, fitting perfectly within the outer edges of your newly built frame. To secure it firmly, use finish nails and wood glue. Apply a thin bead of wood glue along the edges where the chalkboard meets your frame, then carefully nail the chalkboard in place. This step is incredibly straightforward, as the chalkboard essentially sits right on top of the frame, providing a solid foundation.
Step 4: Adding the Decorative Casing (Trim)
To give your chalkboard that desirable high-end finish, we’ll add decorative casing around its perimeter. This step truly elevates the project’s aesthetic. You’ll need to measure the “long point to long point” of both sides of your existing chalkboard frame. These measurements will then become the “short point to short point” measurements for your pine casing pieces. This ensures that when the casing pieces are cut at 45-degree angles, they will perfectly frame your chalkboard.
Once your casing pieces are cut, attach them using Gorilla Wood Glue and finish nails. Apply glue to the back of the casing and carefully position it around the chalkboard, pressing firmly. Then, secure with finish nails, ensuring the casing sits flush and creates a seamless decorative border. This step transforms your simple chalkboard into a sophisticated wall art piece.
That’s it for the construction! Your chalkboard should now look something like this:
Step 5: The Art of Staining for a Perfect Finish
Now for the magic touch that brings out the character of the wood: staining! Don’t worry if your frame has minor imperfections; a good stain can beautifully disguise them and enhance the natural wood grain. We used Rust-Oleum Ultimate Wood Stain in Dark Walnut, which provides a rich, deep hue and can be found readily at Lowe’s.
Before you begin staining, it’s crucial to protect your chalkboard surface. Apply painter’s tape meticulously along all the edges of the chalkboard itself, ensuring no stain seeps onto the writing surface. This creates a crisp, clean line between the stained wood and the chalkboard.
With the chalkboard taped off, apply a quick, even coat of stain to all visible wood surfaces of your frame. Use a brush or rag, wiping off any excess stain to prevent pooling and ensure an even color. Allow the stain to dry completely according to the manufacturer’s instructions. The dark walnut stain provides a beautiful, timeless finish that truly makes this DIY chalkboard look like a high-end piece.
Step 6: Creative Hanging Solutions
The final step is to prepare your chalkboard for hanging. We chose a decorative chain for a unique and stylish look. This type of chain can be found at Lowe’s and adds a rustic industrial touch to the piece.
To attach the chain, you’ll need a pair of cup hooks. For an enhanced aesthetic, consider spray painting them black to blend seamlessly with the chain and the dark stain of the frame.
Screw the cup hooks into the top edge of your chalkboard frame, spacing them appropriately for the desired hang of your chain. Once the hooks are securely in place, use pliers to cut the chain to your desired length. Attach the cut chain to the cup hooks, and your beautiful, custom-framed chalkboard is ready to hang!
Your Masterpiece Revealed: Inspiration for Your Space
And there you have it! A stunning, high-quality framed chalkboard created by you, for a fraction of the cost of its high-end counterparts. This versatile piece is ready to bring organization, creativity, and rustic charm into your home. Imagine it in your kitchen displaying the day’s menu, in your entryway for welcoming messages, or in a child’s room as an artistic outlet. The possibilities are endless!
Conclusion: Unleash Your Inner Crafter!
We hope you’ve enjoyed this journey into creating a beautiful, functional, and incredibly affordable DIY framed chalkboard. This project is a testament to the power of crafting and how a little creativity, combined with simple tools and materials, can yield stunning results. It’s perfect for adding that personalized touch to your home decor without the premium price tag.
Don’t hesitate to give this “nap time craft” a try this weekend! We would absolutely love to see your unique creations. Feel free to share your finished chalkboards in the comments below, or pin this project to inspire others. Thanks so much for joining us, and we wish you an awesome, craft-filled weekend!
~ Whitney