
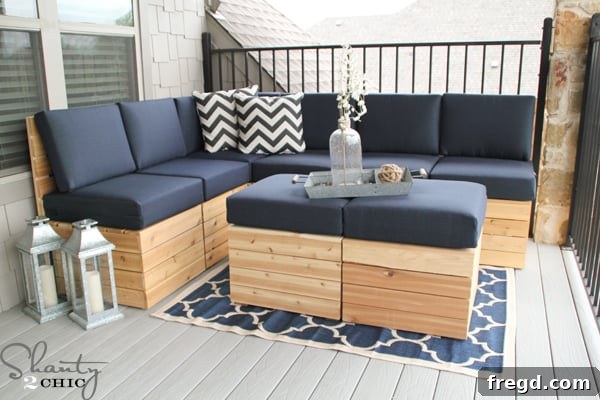
Mastering Your Outdoor Oasis: DIY Modular Sectional Corner Piece Plans
Welcome back, fellow DIY enthusiasts! Today, we’re diving deeper into creating your dream outdoor living space with the essential corner piece plans for the Modular Sectional. If you’ve been following along, you know the satisfaction of building functional, beautiful furniture tailored to your exact needs. This corner section is the key component that transforms individual modular pieces into a cohesive and inviting L-shaped or U-shaped seating arrangement, perfect for cozy gatherings or spacious lounging.
For those who are just joining us or wish to revisit the plans for the other versatile pieces of this modular outdoor seating collection, you can easily access them right here. Building these pieces yourself offers unparalleled flexibility, allowing you to customize your patio, deck, or porch layout to perfectly suit your space and lifestyle. From individual chairs to ottomans and now the all-important corner, you’re in control of your outdoor design.
Download Your Free Corner Piece Plans
Ready to get started? To obtain the comprehensive, printable plans for constructing this crucial corner piece, simply click on the image below or use the direct link HERE. We extend a huge thank you to Jay from Jay’s Custom Creations for his incredible work in preparing these user-friendly, printable plans, making this project accessible to everyone.
Building Your DIY Corner Section: Key Differences and Steps
While the fundamental construction techniques for the corner piece mirror those of the straight sections, it’s vital to note that the measurements are distinctly different. This is because the corner unit is designed to join two linear pieces at a 90-degree angle, requiring precise cuts and assembly to ensure a perfect fit and seamless aesthetic. Always double-check your measurements against the plans before making any cuts to ensure accuracy.
Step-by-Step Construction Guide
Our journey begins with the foundation, just like with the other modular components. A sturdy base is paramount for the longevity and stability of your outdoor furniture.
1. Constructing the Base Frame
You’ll build the base for the corner piece in the same robust manner as the other modular units. This involves cutting the primary frame pieces to size, ensuring all angles are perfectly square, and securing them with appropriate fasteners like screws and wood glue for maximum strength. The base serves as the bedrock for the entire structure, supporting the seat and providing the necessary stability for comfortable seating. Precision here will pay off immensely in the final product’s appearance and durability.
2. Attaching the First Set of Back Posts
Once your base is solid, the next step involves attaching the initial set of back posts. These posts are crucial for defining the backrest’s height and angle, contributing to both the comfort and the overall aesthetic of your sectional. Position them according to the plans, ensuring they are plumb and securely fastened to the base. This step begins to give your corner piece its distinct form and hints at the inviting seating it will soon provide.
3. Securing the Second Set of Back Posts
Following the first set, attach the second set of back posts, completing the frame for the backrest on both sides of the corner. This symmetrical approach is essential for the corner piece’s design, allowing it to seamlessly connect with other modular sections. Pay close attention to the spacing and alignment, as these posts will support the back slats and ultimately the cushions, which are critical for comfort.
4. Installing Back Slats and the Corner Post
After you’ve securely attached the first set of back slats to one side of the backrest, it’s time to integrate the corner post. This central post acts as the anchor, firmly connecting the two backrest sections. Carefully nail or screw the corner post into place, ensuring it aligns perfectly with the other corner post and the newly attached slats. This step is where the two sides of your corner piece truly come together, forming a robust and attractive union.
5. Completing the Backrest with Slats
With the corner post in place, proceed to install the remaining back slats on the other side of the corner piece. This completes the structural integrity of your backrest, providing full support and a finished look. Ensure all slats are evenly spaced and securely fastened, creating a uniform and appealing surface. The process is straightforward, and the result is a beautifully assembled corner unit, ready to be integrated into your full modular sectional.
The Versatility of Modular Design and Cushion Choices
This hands-on approach to building your own furniture is incredibly rewarding. There’s nothing quite like relaxing on a piece you crafted yourself. One of the greatest advantages of this modular design is the sheer number of configuration possibilities. Whether you have a small balcony or a sprawling patio, you can arrange these pieces to fit perfectly. Plus, you have the freedom to expand your seating as your budget and time allow, adding new modules whenever you’re ready. This scalability makes it a truly future-proof solution for your outdoor living space.
When it comes to cushions, I sourced mine from Target and designed the seat dimensions to accommodate them perfectly. This is a crucial step for comfort and aesthetics. If you opt for different cushions, remember to carefully measure them and adjust the dimensions on the plans if necessary to ensure a snug and comfortable fit. For this particular corner piece, I purchased the Threshold Heatherstone Sectional Corner Set in navy. You can try searching for it on target.com using item #16343152. While the back cushion of the set didn’t fit exactly, I cleverly repurposed two back cushions from my ottomans for the corner piece. Despite ending up with one extra corner back cushion, the overall cost was still significantly less than purchasing similar cushions elsewhere, making it a budget-friendly solution for stylish outdoor comfort.
Affordable Elegance: Project Cost Breakdown
One of the most compelling reasons to build your own outdoor sectional is the incredible cost savings compared to store-bought alternatives. The total cost for this entire build is remarkably affordable. Each base unit typically ranges from $20-$25, and the optional backrests add an additional $10-$12 per piece. This means you can create a complete sectional, including an ottoman or coffee table, for an estimated total of just $225-$250! Imagine the custom style and durability you get for a fraction of the retail price.
Protecting Your Investment: Introducing Rust-Oleum NeverWet Outdoor Fabric
Before you embark on your build, or as you’re putting the finishing touches on your new outdoor sectional, I absolutely must share an amazing product that has completely impressed me:
It’s a revolutionary product from Rust-Oleum called NeverWet, specifically formulated for outdoor fabrics. We first learned about this incredible innovation during a visit to the Rust-Oleum headquarters a few months ago, and I was eager to put it to the test. Our real-world experiment involved pouring a Coca-Cola directly onto a treated fabric sample—and to our astonishment, the coke simply beaded up and rolled right off the cushion! It was truly remarkable and incredibly effective.
There’s nothing more disheartening than investing in beautiful new outdoor cushions only to watch them fade, stain, and deteriorate from sun exposure, rain, and accidental spills. This innovative spray offers a fantastic solution. For only about $15 at Home Depot, it’s an investment well worth every penny to protect your more expensive cushions. The application is incredibly simple: just spray it evenly over your cushions and allow them to dry for 24 hours. That’s all it takes to create a powerful, invisible barrier against the elements and spills, keeping your outdoor furniture looking fresh and new for longer. This product is a game-changer for maintaining the beauty and longevity of your DIY outdoor oasis.
For a more in-depth look at this fantastic product and to see its impressive performance firsthand, check out the video below:
Seriously, how cool is that? I’m completely hooked on how effective and easy it is to use. This simple step can dramatically extend the life and beauty of your outdoor cushions, protecting your investment and ensuring your DIY sectional remains a comfortable and attractive focal point in your outdoor space for years to come.
Thank you so much for stopping by and embarking on this exciting DIY journey with us. We hope these plans and tips inspire you to create the perfect outdoor retreat.
~Ashley