
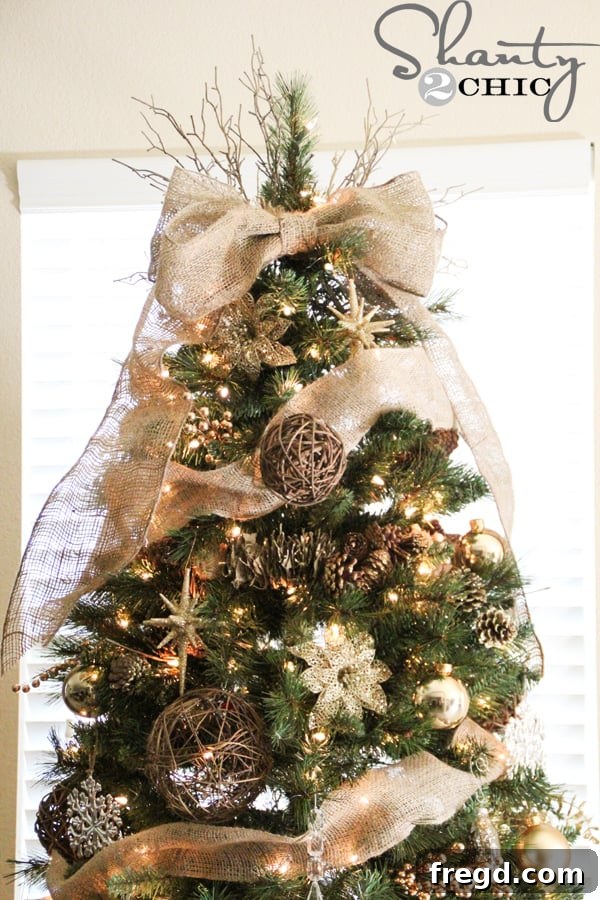
DIY Burlap Christmas Tree Topper Bow: Crafting Rustic Elegance for Your Festive Decor
The holiday season is a magical time for embracing warmth, charm, and personalized touches in our homes. Among the most cherished traditions is decorating the Christmas tree, a centerpiece that brings joy and festive spirit. If you’re looking to infuse your tree with a touch of rustic elegance and handmade charm, a DIY burlap bow tree topper is the perfect project. Many of you have reached out, asking about the beautiful burlap bow adorning my Christmas tree, and I’m thrilled to share just how incredibly simple it is to create your own!
This project requires minimal tools and skill, making it ideal for even the most novice crafters. All you truly need are a sharp pair of scissors and a trusty hot glue gun. Within a short amount of time, you’ll have a stunning, custom-made tree topper that adds character and a cozy, natural feel to your holiday decorations. Let’s dive into the simple steps to create this charming burlap masterpiece!
Why Choose Burlap for Your Christmas Decor?
Burlap has soared in popularity in recent years, especially in home decor and crafting, thanks to its unique blend of rustic appeal and versatility. For Christmas decorations, burlap offers several advantages:
- Rustic Charm: Its natural texture and earthy tone instantly add a farmhouse, vintage, or rustic aesthetic to any setting, perfectly complementing traditional and modern Christmas themes alike.
- Affordability: Burlap is a relatively inexpensive material, allowing you to create impressive decorations without breaking the bank, especially during the often costly holiday season.
- Durability: Made from jute fibers, burlap is incredibly robust. A well-made burlap bow will hold its shape and withstand the test of time, making it a decoration you can cherish for many years to come.
- Versatility: Burlap serves as an excellent base for various embellishments. Whether you want to keep it simple, add glitter, pinecones, berries, or other ribbons, burlap provides a neutral canvas that can be easily customized to match your existing decor.
- Ease of Use: Burlap is surprisingly easy to cut, fold, and glue, making it a favorite material for DIY enthusiasts. Its forgiving nature means small imperfections often blend in, adding to its handmade appeal.
Given these benefits, it’s no wonder that a burlap bow is a fantastic choice for your Christmas tree topper, offering both beauty and practicality.
Materials You’ll Need for Your Burlap Bow
Before we begin crafting, gather your simple supplies. This project is designed to be accessible and straightforward:
- Burlap Garland or Ribbon: A roll of burlap garland is perfect for this project due to its pre-finished edges, which minimize fraying. I found mine at a craft store like Michael’s. Look for a width that suits the scale of your tree – typically 2.5 to 4 inches wide works best for a tree topper.
- Sharp Scissors: Essential for clean cuts, which will make your bow look more professional.
- Hot Glue Gun and Glue Sticks: Your primary fastening tool. Hot glue sets quickly and provides a strong bond, ideal for securing the burlap in place.
- Twine or Floral Wire (Optional but Recommended): For attaching the finished bow securely to your Christmas tree.
Having all your materials ready before you start will ensure a smooth and enjoyable crafting experience.
Step-by-Step Guide: Crafting Your Burlap Tree Topper Bow
Step 1: Selecting and Preparing Your Burlap Garland
The foundation of your beautiful bow begins with choosing the right burlap. Burlap garland, often found in the floral or ribbon section of craft stores, is usually pre-wired or stiffened, which helps the bow maintain its shape beautifully. However, regular burlap fabric can also be used if you cut it into strips, though it might require a bit more effort to prevent fraying and achieve a crisp look.
Once you have your roll, ensure it’s clean and free from any major snags or imperfections, as these can distract from the finished look of your elegant bow.
Step 2: Cutting the First Strand for the Main Loops
The main body of your bow, comprising its most prominent loops, requires a substantial piece of burlap. This initial cut dictates the overall size and fullness of your finished bow.
Carefully cut a strand of burlap that is approximately 3 feet (or 36 inches) long. For a larger, more dramatic bow, you might extend this to 4 feet. Conversely, a slightly smaller tree might benefit from a 2.5-foot strand. Remember, it’s always better to cut a little longer than needed, as you can trim excess later. A clean, straight cut will make subsequent folding much easier.
Step 3: Forming the First Loop
Now, let’s begin shaping the first set of loops that will form the core of your bow. Precision here helps achieve symmetry.
Take one end of your 3-foot burlap strand and fold it over towards the center, creating a loop. Aim to fold it about two-thirds of the way across the strip. This creates one side of the bow. Once you’re happy with the size and shape of the loop, secure the folded end in place with a dab of hot glue. Press firmly for a few seconds until the glue sets.
Step 4: Completing the First Set of Loops
Once the first loop is secure, it’s time to create the corresponding loop on the other side, forming your first foundational layer.
Take the other free end of the burlap strand and mirror the first fold, bringing it towards the center to create a second loop of roughly the same size. Overlap the ends slightly in the middle. Apply a small dab of hot glue to secure this second loop in position, creating a figure-eight shape or two interconnected loops. This forms the base structure of your bow.
Step 5: Adding a Second Layer for Volume
To give your burlap bow a fuller, more luxurious appearance, we’ll add another layer of loops. This technique adds depth and dimension, making the topper truly stand out.
Repeat Steps 2 and 3 exactly as before, creating another set of two loops of approximately the same size. Once formed and secured with glue, carefully place this second set of loops directly on top of the first set. Arrange them slightly offset or rotated to create a fuller, more layered look. Secure the second layer to the first with a small amount of hot glue in the center.
Step 6: Preparing the Center Strip
The center strip is crucial for giving your bow that classic cinched appearance and neatly concealing the glued connections of the loops.
Cut another strip of burlap, this time about 1 foot (12 inches) long. This piece will be wrapped around the center of your loops. The exact length isn’t critical, as you’ll trim any excess later, but 1 foot provides ample material to work with.
Step 7: Narrowing the Center Strip
To ensure a neat and tidy center for your bow, the 1-foot strip needs to be made narrower. This step creates a cleaner “knot” appearance.
Take your 1-foot strip and fold both long edges inwards towards the center, overlapping them slightly, or simply bringing them together to create a thinner strip. Secure these folds with a line of hot glue along the length of the strip. This will reduce the width of the burlap, making it easier to wrap tightly around the bow’s center and giving it a more refined look.
Step 8: Assembling the Bow’s Core
Now it’s time to bring all the main components together. This is where your bow truly starts to take shape.
Lay your prepared two sets of loops flat. Position the narrower, 1-foot strip beneath the center of the loops. Ensure that the less presentable side (where the folds were glued) of the loops is facing upwards, and similarly, the ‘ugly’ or seam side of your skinny center strip is also facing upwards. This way, when you fold and wrap, the smooth, finished sides will be visible.
Step 9: Preparing for the Cinch
To create the characteristic “pinch” or scrunch of a bow, we’ll strategically apply hot glue.
Apply a small dab of hot glue in the exact center of the loops, about half an inch from what will be the bottom edge of your cinched area. This glue will help hold the initial scrunch in place, allowing you to manipulate the burlap without it slipping.
Step 10: Cinched and Secured Loops
This is the fun part where the loops transform into a recognizable bow shape.
Using your fingers, carefully gather and squeeze the loops towards the center, effectively scrunching the burlap where you applied the glue. This creates the classic bow “knot” effect. As you scrunch, apply additional small dabs of hot glue to any folds that touch each other, ensuring they stay compressed and secure. Hold it in place for a few seconds until the glue cools and hardens, creating a firm, cinched center.
Step 11: Wrapping the Center Strip
Now, take the narrow strip you prepared earlier and wrap it around the cinched center of your bow. This step not only secures everything but also provides a clean, finished look to the bow’s core.
Position the middle of the skinny strip over the front center of your pinched loops. Bring one end of the strip around to the back, pulling it taut. Secure this end in the middle of the “pinch” at the back of the bow with a generous dab of hot glue. Make sure the glue adheres firmly to the burlap beneath.
Step 12: Completing the Center Wrap and Trimming
Finish wrapping the center strip to fully conceal the mechanics of your bow and give it a polished appearance.
Take the other end of the skinny strip and wrap it around the center, overlapping the first wrapped end at the back of the bow. Pull it snug and secure it with hot glue, ensuring all raw edges are tucked in. Once secured, carefully trim any excess burlap from the center strip, making sure the cut edges are neatly hidden by the glue. This creates a clean, professional finish.
Step 13: Creating the Bow Tails
The tails add elegance and drama to your burlap bow, allowing it to cascade beautifully down your tree.
Cut another strip of burlap, similar in length to your initial loop strand – about 3 feet long. Find the very center point of this strip. Fold the two halves together at this center point and secure them with a dab of hot glue. This creates a neat fold at the top where it will attach to the main bow, and ensures the tails hang evenly.
Step 14: Attaching the Tails to the Bow
With the tails prepared, it’s time to integrate them with the main bow structure.
Flip your main bow over to its back. Apply a generous amount of hot glue to the back center of the bow, directly over the secured ends of your wrapped center strip. Carefully press the folded center of your burlap tails onto this glue, ensuring it’s centered and firmly attached. Hold in place until the glue dries completely.
Step 15: The Result of Your Hard Work
Once the tails are attached and the glue has set, flip your bow over to admire your creation!
You should now have a beautifully formed burlap bow with elegant tails flowing downwards. Take a moment to gently fluff the loops and arrange the tails to achieve your desired fullness and drape. This is where the rustic charm truly shines through!
Step 16: Finishing the Tails with a Decorative Cut
A simple angled cut can significantly enhance the appearance of your bow tails, giving them a professional and finished edge.
To finish each tail, fold the end of the burlap strip in half lengthwise. Then, using your sharp scissors, cut at an angle from the folded edge towards the bottom corner of the tail. This creates a V-shape or a fishtail cut when unfolded.
Step 17: The Elegant Finished Edge
Unfold the tails to reveal a perfectly notched, decorative edge that elevates the overall look of your bow.
When you unfold the burlap, you’ll see a charming, finished edge that prevents fraying and adds a touch of sophistication to the rustic material. Repeat this process for all ends of your tails.
Step 18: Preparing for Attachment to the Tree
To securely fasten your new burlap bow to the top of your Christmas tree, a simple string or piece of twine works perfectly.
Take a piece of sturdy twine or thin ribbon, about 1-2 feet long. Thread it behind the narrow strip that you wrapped around the middle of the bow. Bring the ends of the twine together and tie a secure knot in front of where the tails are attached. This creates a sturdy loop or tie-off point that won’t be visible from the front of the bow once it’s on the tree.
Step 19: Displaying Your Handmade Tree Topper
The final, most satisfying step: placing your beautiful, handmade burlap bow atop your Christmas tree!
Carefully position the bow at the very top of your tree. Use the twine you attached in the previous step to secure it firmly to the top branch or spire. Adjust the loops and tails until they fall gracefully, creating a stunning and personalized focal point for your holiday decor. Step back and admire the rustic charm and handmade beauty your burlap bow brings to your festive display!
Tips for a Perfect Burlap Bow
- Safety First: Always exercise caution when using a hot glue gun to avoid burns. Keep a bowl of cold water or ice nearby, just in case.
- Practice Makes Perfect: If it’s your first time, consider doing a small practice bow with scrap fabric to get a feel for the material and glue.
- Fluffing is Key: Once assembled and on the tree, gently pull and shape the loops to give your bow maximum fullness and dimension. Burlap is forgiving, so don’t be afraid to manipulate it.
- Consistent Loop Size: Strive for consistency in the size of your loops. This creates a balanced and professional-looking bow.
- Conceal Raw Edges: Whenever possible, fold and glue raw burlap edges inwards to prevent excessive fraying and create a neater finish.
Customization Ideas to Make Your Bow Unique
While a plain burlap bow is beautiful in its simplicity, you can easily customize it to match your personal style and existing decorations:
- Layer with Other Ribbons: Incorporate a narrower ribbon (velvet, plaid, or glittered) into the loops or around the center for added texture and color.
- Natural Accents: Hot glue small pinecones, faux berries, cinnamon sticks, or sprigs of evergreen onto the center of the bow for a truly organic look.
- A Touch of Sparkle: Lightly spray the bow with glitter adhesive or fabric paint for a festive shimmer, perfect for catching the tree lights.
- Painted Details: Use fabric paint to add subtle patterns, monograms, or festive words to the burlap before assembly.
- Fairy Lights: Weave a delicate string of battery-operated fairy lights through the loops for an enchanting glow.
Caring for Your Burlap Bow
To ensure your beautiful burlap bow lasts for many holiday seasons:
- Storage: Store your bow in a box or container where it won’t be crushed. You can stuff the loops with tissue paper to help maintain their shape.
- Cleaning: Burlap isn’t typically washable. If it gets dusty, gently shake it out or use a lint roller. For minor spots, a damp cloth might suffice, but test in an inconspicuous area first.
Frequently Asked Questions About Burlap Bows
Q: Can I use regular burlap fabric instead of garland?
A: Yes, you can. You’ll need to cut it into strips of your desired width. To minimize fraying, you might consider stitching the edges or using fabric stiffener, but for a rustic look, some fraying can be charming.
Q: How do I make my bow bigger or smaller?
A: The size of your bow primarily depends on the length of the burlap strips you cut for the loops and tails. For a larger bow, use longer strips (e.g., 4-5 feet for loops). For a smaller bow, shorten these lengths.
Q: Can I use fabric glue instead of hot glue?
A: While fabric glue can work, hot glue is highly recommended due to its quick drying time and strong hold, which is crucial for building a structured bow. Fabric glue often requires clamping or long drying periods, making the process more challenging.
Q: My burlap is very stiff. How can I make it softer?
A: Some burlap is naturally stiffer than others. If you prefer a softer drape, you can try gently massaging the fabric or lightly misting it with water and letting it air dry while manipulating it. However, some stiffness can be beneficial for holding the bow’s shape.
Conclusion
Crafting your own burlap Christmas tree topper bow is a rewarding project that adds a deeply personal and charming element to your holiday decor. It’s an opportunity to create something beautiful with your own hands, infusing your home with warmth and rustic elegance. With just a few simple materials and steps, you can transform a humble roll of burlap into a stunning focal point for your festive celebrations. We hope you adore your new Burlap Tree Topper as much as we do, and we always appreciate your shares and comments!
Happy crafting, and happy holidays!