
Build an Easy & Affordable DIY Pet Bed: Perfect for Beginners!
Are you looking for a fun, rewarding, and incredibly budget-friendly weekend project that will spoil your furry friend? Look no further! This comprehensive guide will walk you through building a stylish and comfortable DIY pet bed for a fraction of the cost of store-bought alternatives. Designed with beginners in mind, this project requires minimal tools and materials, with the wood costing under $12! Plus, you’ll be amazed at how quickly you can complete it – many DIYers finish in just a couple of hours.
Crafting a custom pet bed not only saves you money but also allows you to personalize it to perfectly match your home decor and your pet’s specific needs. Imagine a bespoke piece of furniture, lovingly made, providing a cozy sanctuary for your beloved dog or cat. This particular design is sized to accommodate a standard smaller dog bed cushion, which you can often find affordably at home goods stores or online. For instance, a comfortable option like this pet bed on Amazon would fit perfectly. Stay tuned, as plans for a larger dog bed will be shared soon!
Get ready to unleash your inner carpenter and create something truly special for your pet. Let’s gather our supplies and dive into building this fantastic DIY pet bed!
DIY Pet Bed Project Overview
This project is designed to be straightforward and accessible. We’ll be using common lumber known as furring strips, which are readily available and very inexpensive. The core construction relies on a combination of pocket hole joinery for strong, hidden connections and wood glue with nails for robust assembly. Even if you’ve never tackled a woodworking project before, the step-by-step instructions and visual aids will guide you through every phase, from cutting the wood to applying the finishing touches.
Essential Supplies & Tools
Before we begin, ensure you have all the necessary materials and tools on hand. This will make your building process smooth and efficient.
Materials:
- 3 – 1x4x8 furring strips (for back, sides, and feet)
- 2 – 1x2x8 furring strips (for side supports)
- 1 – 2x4x10 furring strip (for the sturdy base)
- Wood Glue (Gorilla Wood Glue recommended for strong bonds)
- 1 1/2″ pocket hole screws
- 2 1/2″ pocket hole screws
- 1 1/4″ pocket hole screws
- 1 1/2″ nails
- 2″ nails
- Wood stain (Varathane Ultimate Wood Stain in Early American, or your preferred color)
- Chalkboard spray paint (Rust-Oleum Chalkboard Spray Paint suggested)
- Painter’s tape
- Wet erase chalk pen (optional, for personalization)
- Sandpaper or a sanding tool
- Pet bed cushion (to fit inside your finished bed)
Tools:
- Miter saw or circular saw (for precise cuts)
- Kreg Jig (for creating strong pocket hole joints – this Kreg Jig is excellent for beginners)
- Cordless nailer (e.g., Ryobi AirStrike Nailer, highly recommended for speed and ease)
- Drill (for driving pocket hole screws)
- Measuring tape
- Pencil
- Safety glasses and hearing protection
- Ryobi Corner Cat sander (optional, for distressing edges)
Step-by-Step Construction Guide
Follow these detailed steps to construct your pet’s new favorite sleeping spot. Remember to always measure twice and cut once, and prioritize safety by wearing appropriate protective gear.
Step 1: Building the Robust Base
The foundation of any good piece of furniture is its base. For this pet bed, the base provides crucial stability and support. Begin by preparing your 2x4x10 furring strip. You will need to make five precise cuts, with each piece measuring 22 inches long. These will form the core slats of your bed’s base.
Once your cuts are made, it’s time to assemble. I utilized my Kreg Jig to create strong, concealed pocket holes, which are excellent for robust furniture construction. Set your Kreg Jig to make 1 1/2-inch pocket holes. Secure these pieces together using 2 1/2-inch pocket hole screws. This method creates a very sturdy platform that will comfortably support your pet and their cushion. Ensure all connections are tight and square for the best results.
Upon completion, your base should resemble a sturdy wooden platform, ready for the next stages of assembly.
Step 2: Constructing the Back Panel
Next, we will build the back panel of the pet bed, which provides both structural integrity and a cozy enclosure for your pet. Take one of your 1×4 furring strips. You will need to cut three pieces, each precisely 22 inches long. These three pieces will be joined together to form the back panel.
For these thinner boards, use your Kreg Jig to drill 3/4-inch pocket holes. Attach the boards using 1 1/4-inch pocket hole screws. Positioning your pocket holes strategically (as shown in the accompanying image) will ensure a strong and clean join. These hidden fasteners create a seamless look, ready to be attached to the base.
Step 3: Attaching the Back to the Base
Now that both the base and back panel are complete, it’s time to join them. This step forms the initial L-shape of the bed structure. For a secure and long-lasting connection, I highly recommend using a combination of wood glue and fasteners.
Apply a generous, continuous line of Gorilla Wood Glue along the edge of the back panel where it will meet the base. Wood glue is incredibly strong and forms a bond that is often stronger than the wood itself once cured. Position the back panel squarely onto the base. Then, using a cordless nailer like the Ryobi AirStrike Nailer, secure the back panel to the base with 1 1/2-inch nails. The nails will hold the pieces firmly in place while the wood glue dries, ensuring a robust and stable joint. Drive nails every few inches for optimal hold.
Step 4: Building the Side Panels
Now, let’s construct the two side panels of the pet bed. Each side panel will require three 1×4 furring strips cut to 18.25 inches in length, and two 1×2 furring strips cut to 10.25 inches. These dimensions create a perfectly sized frame for the pet bed cushion.
Arrange your three 1×4 boards side-by-side to form the main body of the side panel. Apply a continuous line of wood glue along the edges where the 1×2 strips will be placed. The 1×2 strips will act as braces, securing the three 1×4 boards together.
Using your cordless nailer, attach the two 1×2 strips to each end of the joined 1×4 boards. This creates a strong, framed side panel. Ensure the 1x2s are flush with the ends of the 1x4s for a clean finish.
Additionally, each side will require two more 1×2 pieces cut to 15.25 inches. A crucial tip for accuracy: always measure these pieces directly on your assembled side panels before making the cut. Wood can vary slightly, and “measure as you go” often yields more precise results than relying solely on a pre-cut list. Attach these 1×2 pieces to the top and bottom edges of the side panel using wood glue and your nailer. These pieces will add rigidity and complete the framed look of the sides.
Step 5: Attaching the Side Panels to the Frame
With both side panels now constructed, it’s time to integrate them into the main bed frame. This step will begin to give your pet bed its complete, enclosed structure. Carefully place the base of the bed on its side to easily access the edges where the side panels will attach. Apply a generous bead of wood glue along the end of the base that will connect to the side panel.
Align a side panel with the glued edge of the base and the back panel. Use your nailer with 2-inch nails to securely fasten the side panel. Remember, wood glue is your best friend here; the nails primarily hold the pieces in position until the glue fully cures, creating an incredibly strong bond. Don’t be shy with the glue! Repeat this process for the other side panel. At this point, your pet bed will really start to take shape!
After attaching both sides, your bed structure will be nearly complete, resembling a cozy nook for your pet.
Step 6: Installing the Front Board
The front board completes the enclosure and offers a perfect spot for personalization, like adding your pet’s name. For this section, use a 1×4 furring strip cut to 24 inches. This board will span the front opening of the bed.
Apply wood glue to the edges where the front board will meet the side panels and the base. Secure it firmly in place using your nailer. Ensure it’s level and flush with the rest of the structure for a clean, finished look. This final board gives the bed its defined shape and adds to its structural integrity.
Step 7: Adding the Decorative Feet
Adding feet to your pet bed elevates it slightly off the floor, which can help with air circulation and also adds a touch of design flair. The feet are also crafted from 1×4 furring strips. You’ll need to cut four pieces, each 4 inches long.
Attach one foot piece to each corner of the bed’s base. Apply wood glue to the contact surfaces and then use your nailer with 1 1/4-inch nails to secure them in place. The combination of glue and nails will ensure these feet are very stable and durable, even with active pets moving in and out of the bed.
With the feet attached, the main structural assembly of your DIY pet bed is complete!
Finishing Touches: Stain, Distress, and Personalize
The structural work is done, but the finishing process is where you truly bring your pet bed to life and make it unique. This stage allows for creative expression and adds protection to the wood.
Step 8: Applying a Protective Finish
Staining the wood not only enhances its natural beauty but also provides protection against wear and tear. I opted for Varathane Ultimate Wood Stain in Early American, and I highly recommend it. This particular stain is fantastic because it’s a 3X formula, meaning it offers deep color saturation in just one coat. It also dries incredibly fast, usually in under an hour, which significantly speeds up the finishing process. You can find this quality stain at Home Depot or similar hardware stores.
Before staining, ensure your wood is clean and free of any dust or debris. Apply the stain evenly with a brush or cloth, following the wood grain. Allow it to penetrate for a few minutes, then wipe off any excess. Always follow the manufacturer’s instructions for drying times and re-coat recommendations, although with this product, one coat is usually sufficient.
Once the stain has thoroughly dried, you can add an extra layer of character by distressing the edges. I used my Ryobi Corner Cat sander to lightly sand the edges, creating a worn, aged look that beautifully highlights the bed’s rustic charm. This technique adds depth and personality to the piece.
Step 9: Creating a Chalkboard Label
A chalkboard label on the front of the bed is a fantastic way to personalize it with your pet’s name or a cute message. To create a crisp, clean label, use painter’s tape to mark off a rectangular area on the front 1×4 board. Ensure the tape is pressed down firmly to prevent any paint bleed.
Using Rust-Oleum Chalkboard Spray Paint, apply a few thin, even coats within the taped-off area. Allow sufficient drying time between coats as per the product instructions. This specialized paint transforms the wood surface into a writable chalkboard. Always spray in a well-ventilated area.
Allow the chalkboard paint to dry completely. Patience here is key for a durable finish.
Once dry, you can gently remove the painter’s tape. If desired, lightly sand the edges of the chalkboard label to soften them, blending it seamlessly with the distressed wood. Finally, use a wet erase chalk pen to write your pet’s name. These pens are fantastic for chalkboards, offering vibrant, smudge-resistant writing that can still be easily cleaned if you wish to change the message.
The Finished Pet Bed: A Cozy Haven for Your Companion
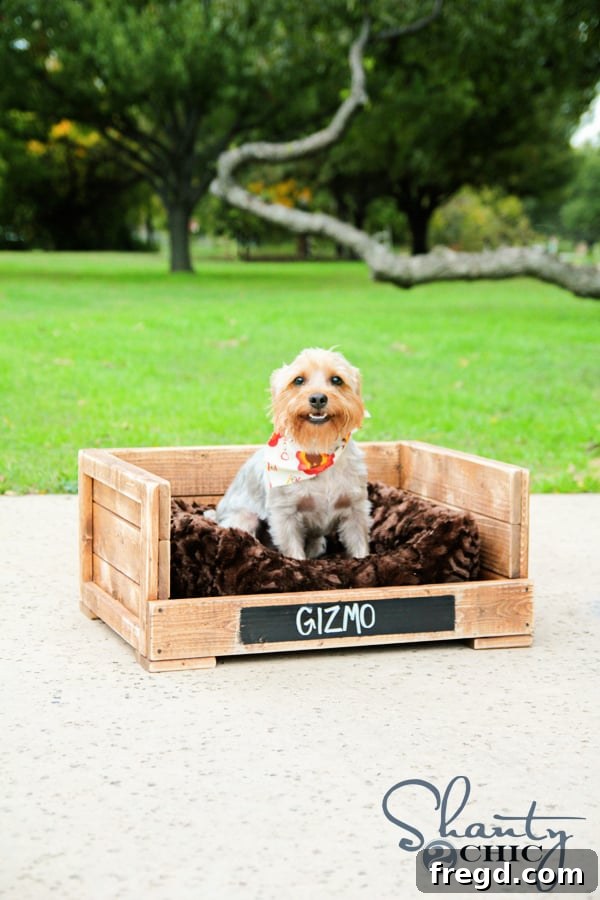
That’s it! Your beautiful, custom-built DIY pet bed is now complete. For this particular project, I crafted the bed for my sister’s dog, Gizmo. We brought him over to test it out for the photoshoot, and as you can see, he looks like a thoroughly satisfied customer!
Customization Tips & Further Ideas
This DIY pet bed design is wonderfully versatile. Feel free to adapt it to your specific style and your pet’s needs:
- Color Palette: Experiment with different wood stains or paints. A bright pop of color could add a modern touch, while a dark stain provides a more classic look.
- Decorative Elements: Consider adding decorative trim, carved embellishments, or even small metal accents to the sides or front.
- Sizing Up or Down: While this guide is for a smaller bed, the principles can be applied to create larger beds. Simply adjust the length of your 2×4, 1×4, and 1×2 pieces to accommodate a bigger cushion. Always ensure the base remains robust enough for the increased size and weight.
- Bedding: Beyond a standard cushion, you could sew a custom fabric cover, use a favorite blanket, or layer several soft throws for ultimate comfort.
- Durability: For outdoor use or pets prone to accidents, apply a weather-resistant sealant over the stain to protect the wood.
Conclusion: A Project Worth Every Effort
Building this DIY pet bed is more than just a woodworking project; it’s an act of love for your pet and a fantastic way to develop your DIY skills. The satisfaction of seeing your furry friend curled up in a bed you crafted yourself is truly immeasurable, especially when it costs so little to make.
If you have any questions at all during your build, please don’t hesitate to ask! We’re here to help you succeed.
We would absolutely LOVE for you to share your finished pet bed projects and PIN this tutorial to inspire other pet owners and DIY enthusiasts. Spread the joy of handmade comfort!
Have a wonderful day building something amazing!
~Whitney