
DIY Kids Bookcases with Smart Storage Solutions: A PureBond Plywood Project
What a whirlwind of a weekend it was! Between bustling family activities like a lively ball game, four energetic cheer practices, hosting a garage sale, attending church, and celebrating my Meme’s wonderful 80th birthday party, I also managed to complete a much-anticipated DIY project: two beautiful bookcases for my girls. It’s safe to say I’m still recovering, but the satisfaction of a job well done, especially when it creates something special for my children, is truly unmatched.
These new bookcases have been on my daughters’ wishlist ever since I finished their beds and nightstands. They’ve been patiently asking, and I was determined to deliver. When I stumbled upon the perfect design inspiration, I knew these custom pieces would be a game-changer for their room organization and aesthetic. I found the ideal plans through Ana-White.com, a fantastic resource for DIY enthusiasts, and they truly came to the rescue with their brilliant kids’ storage bookshelf design. I absolutely adore them!
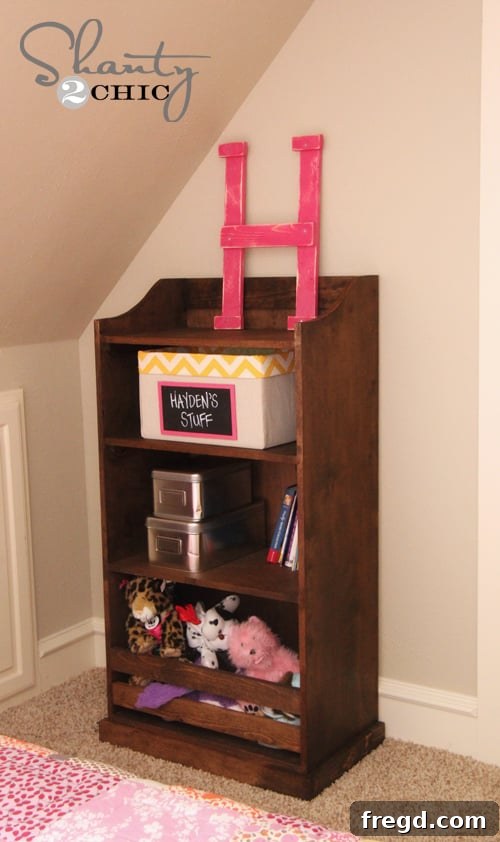
One of the key features that drew me to these plans was their ideal height – not overly tall, making them perfectly accessible and safe for little ones. Additionally, I modified the original design by incorporating dedicated storage at the bottom. This clever alteration created the perfect, cozy cubby space for their beloved dolls and an ever-growing collection of stuffed animals, transforming the bookcases into multifaceted storage solutions.
Transforming Their Room: The Finished Bookcases
The moment these bookcases found their place in the girls’ room, the space instantly felt more organized, inviting, and personalized. The combination of functional storage and classic design adds immense charm and practicality. Witnessing my daughters excitedly arrange their books and toys in their new custom furniture brought a huge smile to my face.
Aren’t they just adorable? I’m thrilled with how they turned out. While I’ll be sharing some invaluable tips and modifications I made right here, for the comprehensive, step-by-step building instructions, you’ll want to head over to Ana-White.com where you can access the full set of plans. These plans provide a fantastic foundation, and with a few personal touches, you can create something truly unique for your home.
Essential Tips for Your DIY Bookcase Project
Building custom furniture offers a unique opportunity to tailor every aspect to your specific needs and aesthetic preferences. Here are some key decisions and techniques that contributed to the success and durability of these kids’ bookcases.
Choosing the Right Finish: Stain vs. Paint
When it came to deciding on the finish for these bookcases, I gave it considerable thought. Given that my girls would be using them extensively – daily interaction, books sliding in and out, and general play – durability was a top priority. While paint offers a vast array of colors and can instantly transform a piece, I ultimately decided to stain these bookcases. The primary reason? Stain holds up incredibly well against wear and tear. Unlike paint, which can chip, scratch, or scuff over time, particularly in high-traffic areas or on children’s furniture, stain penetrates the wood fibers, offering a much more resilient finish. This means the beautiful wood grain remains visible, and minor scrapes are far less noticeable, ensuring these bookcases will look fantastic for years to come, even with active use.
The Power of PureBond Plywood
For any woodworking project, the choice of materials is paramount. The plans originally called for plywood cut into 16-inch boards, and I knew exactly which product would deliver both quality and peace of mind: PureBond Plywood from Home Depot. I utilized both 3/4-inch plywood for the main structure and 1/4-inch for the backing. My decision to use PureBond Plywood isn’t just a matter of convenience; it’s a commitment to using superior, healthier materials in our home.
Here’s why PureBond stands out and why it’s become our go-to choice for almost every project:
- Formaldehyde-Free Glue: This is a massive selling point for us. The thought of harmful chemicals off-gassing into our home environment, especially in areas where our children spend a lot of time, is concerning. PureBond uses a soy-based, formaldehyde-free adhesive, which means better indoor air quality for your family. It’s truly reassuring to know we’re not breathing in toxic fumes.
- Made in America: We love supporting local industries, and PureBond plywood is proudly made right here in America. This not only signifies a commitment to quality but also supports domestic jobs and reduces the environmental footprint associated with long-distance shipping.
- Sourced from Sustainable Forests: In an age where environmental responsibility is crucial, knowing that the wood used in PureBond plywood comes from sustainably managed forests is incredibly important. It’s an eco-friendly choice that aligns with our values of preserving natural resources.
- Extremely Easy to Work With: From cutting to sanding to finishing, PureBond plywood is a dream to work with. Its consistent quality and smooth surfaces make the construction process smoother and more enjoyable, even for intricate designs.
- Exceptional Beauty and Value: Perhaps the biggest selling point for us is its stunning aesthetic appeal. PureBond offers the luxurious look of real hardwood at a fraction of the cost. Home Depot typically stocks beautiful birch and oak options, but you can also order other species like hickory or maple and have them conveniently delivered to your local store. This flexibility allows for truly customized projects without breaking the bank.
After experiencing the myriad benefits of PureBond Plywood, it’s clear we’ll never go back to conventional plywood. It’s an obvious choice that perfectly blends quality, safety, and affordability, fitting quite nicely into our “shanty budgets” for high-quality DIY projects.
For those interested in learning more about why we’re so passionate about this product, you can find out more about PureBond and why Ash and I took the PureBond Pledge in this short video:
Smart Cuts: Saving Time at Home Depot
To streamline the building process, I highly recommend utilizing the cutting services available at Home Depot. I had the incredibly helpful associates cut my 3/4-inch PureBond plywood into the necessary 15 3/4-inch boards, and my 1/4-inch PureBond backing into the precise dimensions specified in the plans. This simple step saves an immense amount of time at home, minimizes waste, and ensures accurate, square cuts, which are crucial for a professional-looking finish on any furniture project. Arriving home with pre-cut pieces means you can dive straight into assembly!
Crafting Custom Elements: The Curvy Tops
Adding unique, custom details can truly elevate a DIY project from ordinary to extraordinary. For these bookcases, I wanted to incorporate a gentle curve to the top edges, adding a touch of whimsy and elegance that perfectly suits a child’s room. Here’s a quick tip on how I achieved these beautiful curvy tops:
First, I drew my desired curve onto a scrap piece of wood. This scrap piece served as my initial template. Then, using my jigsaw – an indispensable tool for intricate cuts – I carefully cut along the drawn line to create a smooth, curved edge. This initial template doesn’t have to be perfect, but it gives you a solid starting point for refinement.
Once my scrap piece was perfectly curved, I used it as a master template. I carefully traced this template onto all four sides of the bookcase tops. This method ensures consistency and symmetry across all pieces. After tracing, I used the jigsaw once more to cut out the curves on the actual bookcase components, resulting in uniformly beautiful and custom-shaped tops. This technique is incredibly versatile for adding unique profiles to any furniture piece.
Secure Shelving: Gorilla Wood Glue and Finish Nails
For the shelf supports, ensuring maximum durability and stability is key, especially in furniture designed for children. I relied on the tried-and-true combination of Gorilla Wood Glue and finish nails. Wood glue creates an incredibly strong, permanent bond between wood surfaces, preventing any wiggling or eventual separation. The finish nails, driven in strategically, provide immediate holding power while the glue dries, acting as clamps and reinforcing the joint for long-term strength. This two-pronged approach guarantees that the shelves will firmly support books and toys for years without sagging or loosening.
Adding Unique Angles: Beyond the Curve
Beyond the custom curved tops, I also decided to introduce another subtle design element to the shelf fronts. Instead of simply leaving them flat or rounding them, I opted for a clean, angled cut. This was achieved by making a 45-degree cut approximately 1/2 inch from the edge of the board. This small detail provides a refined, contemporary look that adds visual interest without overcomplicating the build. It’s a straightforward modification that yields a surprisingly sophisticated result, proving that simple angles can have a big impact on a piece’s overall aesthetic.
Finishing Edges Like a Pro: The Magic of Edge Banding
Working with plywood, while offering many benefits, typically leaves you with rough, exposed edges that can detract from an otherwise beautiful project. To achieve a perfectly finished, professional look, edge banding is an absolute lifesaver. This thin strip of material, often pre-glued, is designed to cover these raw plywood edges seamlessly. The brand I used, readily available at Home Depot, provides an excellent solution.
The application process is incredibly simple: you just position the edge banding over the rough plywood edge and apply heat with a regular household iron. The heat activates the adhesive, bonding the strip securely to the wood. Once cool, any excess banding can be easily trimmed with a sharp utility knife or an edge-banding trimmer for a flush, clean finish. This technique instantly transforms raw plywood into a polished, finished surface, making your DIY projects look like they came from a high-end furniture store. It’s a small step that makes a huge difference in the overall perceived quality and durability of the piece.
The Final Polish: Staining with Rust-Oleum Dark Walnut
With all the structural elements and custom details in place, the final step was to apply the stain. As mentioned, I opted for a stain over paint for enhanced durability and to highlight the natural beauty of the PureBond plywood. I chose Rust-Oleum Ultimate Wood Stain in Dark Walnut. This rich, deep hue perfectly complements the existing furniture in their bedroom, creating a cohesive and elegant look. The stain was easily applied, penetrating the wood to produce a beautiful, long-lasting finish that will stand up to the rigors of daily use. You can typically find this high-quality stain at Lowe’s, making it easily accessible for your own projects.
Innovative Storage Solutions: The Cubby Modification
Originally, I envisioned filling the bottom sections of these bookcases with storage baskets. However, after a fruitless search for baskets that perfectly fit the dimensions I needed, an even better idea sparked in my mind. Why force a fit with store-bought baskets when I could create a custom, integrated solution? This led to the innovative decision to transform the bottom sections into permanent cubby spaces specifically designed for their stuffed animals and dolls.
This modification was surprisingly simple and incredibly cost-effective – almost free! I merely added two 1×3 inch boards, cut precisely to fit horizontally inside each bookcase. These boards effectively partitioned the open bottom space into two distinct cubbies. I secured them firmly using a combination of wood glue for a strong bond and finish nails driven from the outside of the bookcase for immediate hold and reinforcement. This brilliant solution not only solved my “basket problem” but also addressed a long-standing storage issue we’d had for their overflowing collection of soft toys. The result is a dedicated, tidy home for their plush friends, perfectly integrated into the bookcase design. I absolutely love how functional and organized it makes their room!
Bringing It All Together: A Functional & Beautiful Space
The combination of thoughtful design, quality materials like PureBond plywood, and clever modifications has resulted in a pair of bookcases that are not only aesthetically pleasing but also incredibly functional for my daughters. They now have a dedicated space for their books and a neat solution for their toys, fostering a more organized and enjoyable bedroom environment.
Conclusion and Next Steps for Your DIY Journey
I genuinely hope you love these DIY storage bookcases as much as we do! They represent more than just furniture; they’re a testament to the joy of creating something with your own hands, perfectly tailored to your family’s needs. The combination of easy-to-follow plans and high-quality, safe materials like PureBond plywood makes this project accessible and rewarding for any DIY enthusiast looking to enhance their home.
If you’re inspired to tackle this project, I would be absolutely delighted for you to pin and share these bookcases on your favorite social media platforms! Spreading the word about rewarding DIY projects helps others discover the satisfaction of building. And remember, for the comprehensive, step-by-step instructions to build these exact bookcases, be sure to check out the full set of plans HERE at Ana-White.com. Her detailed guides are invaluable for turning ideas into reality.
Furthermore, if you’re looking for more inspiration to personalize your children’s bedrooms or other spaces, you can also explore a variety of other bedroom projects I’ve completed. These projects often share similar principles of smart design, practical functionality, and the use of quality materials to create lasting pieces for your home: