
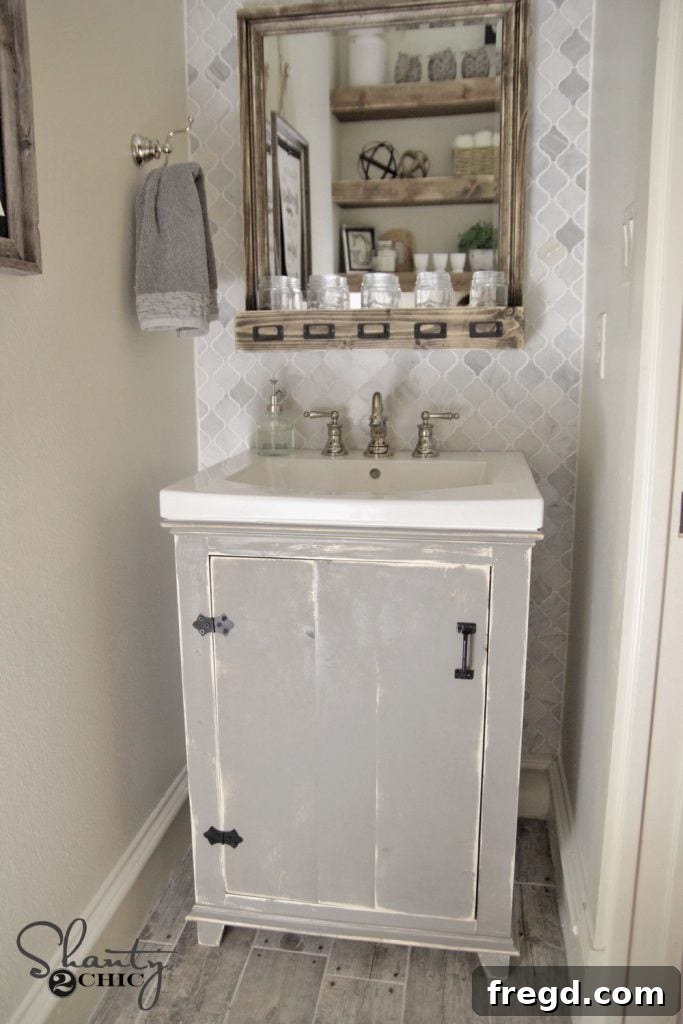
Hello DIY enthusiasts and home decor lovers! I am absolutely thrilled to share the incredible transformation of our small hall powder room, a project that has truly exceeded my expectations. For far too long, this little space has been a dark, overlooked corner of our home, lacking natural light and crying out for a refresh. My goal was simple yet ambitious: to brighten it up, infuse it with character, and create a custom feel that only a handmade touch can provide. And so, the journey to craft a stunning DIY Bathroom Vanity began! Get ready to be inspired by this custom build that perfectly blends functionality with charming aesthetics.
Before we dive into the nitty-gritty details of this DIY bathroom remodel, I must admit a minor challenge: photographing this compact powder room was quite the feat! Its small dimensions made capturing a full wall in a single shot nearly impossible, even with the widest lens. However, I’ve done my best to provide you with clear, detailed images of every crucial step and element. This first glance showcases the upper portion of the beautifully renovated space. Later in this post, I’ll reveal all the sources for the delightful decorative touches and essential fixtures that complete this small bathroom makeover.
Transform Your Powder Room: An Easy DIY Vanity Build
Alright, let’s get building! You might be surprised to hear that this DIY vanity project is remarkably straightforward. In fact, I completed the entire construction and painting in just one afternoon, proving that a custom look doesn’t always require weeks of effort. Whether you’re a seasoned woodworker or new to home improvement projects, you’ll find these steps easy to follow. As always, I’ll guide you through each stage with clear instructions, and for those who prefer working from a detailed blueprint, you can download and print the FREE plans by clicking HERE or by using the button below. These comprehensive plans will make your custom bathroom vanity build even smoother!
Choosing the Perfect Sink Top: The Foundation of Your Vanity
The very first step in designing this modern farmhouse bathroom vanity was selecting the sink top, as it dictates the dimensions and overall style of the build. I specifically wanted a sink top that was not only aesthetically pleasing but also readily available and easy to integrate. My absolute favorite is this particular sink top; I adore how it seamlessly functions as both a basin and a spacious countertop, maximizing utility in a small space. Its size strikes a perfect balance, and its blend of traditional charm with modern lines perfectly complements my desired aesthetic. Plus, it’s incredibly easy to clean, which is a huge bonus for any busy homeowner! I discovered this fantastic Kohler sink top, the Persuade 25.25-inch Vitreous China Vanity Top, at Home Depot. I opted for the biscuit finish to ensure it harmonized with the existing elements in my bathroom. Keep an eye out after Christmas – I’ll be sharing another exciting DIY bathroom project featuring this versatile sink top!
Building the Sturdy Frame: Step-by-Step Construction
Crafting the Vanity Legs with a Kreg Jig
My initial construction phase involved cutting and assembling the four robust legs for the bathroom vanity cabinet. For this critical part, I chose sturdy 1×3 pine boards, known for their durability and ease of workability. A key tool in this process was my K5 Kreg Jig, which allowed me to create precise pocket holes. If you’re considering investing in a Kreg Jig for woodworking projects and are unsure which model to choose, the K5 is an outstanding option. It’s incredibly user-friendly for beginners yet robust enough for complex projects, ensuring you won’t outgrow its capabilities. These were 3/4-inch pocket holes, which I securely fastened using 1.25-inch pocket hole screws, ensuring a strong and stable foundation for the entire vanity.
The precision of these 3/4-inch pocket holes, combined with the strength of the 1.25-inch pocket hole screws, created incredibly secure joints. This method is fundamental to building strong and professional-looking furniture, and it’s especially effective for DIY furniture projects like this vanity, where stability is paramount.
Assembling the Side Frames
Next, I moved on to constructing two identical side frames. Each frame consists of two legs joined by two horizontal pieces of wood. This step quickly brings the initial structure to life. Again, I utilized 3/4-inch pocket holes and secured the joints with 1.25-inch pocket hole screws, maintaining consistency and strength throughout the build. This method ensures that each side of your custom bathroom vanity is robust and perfectly aligned.
Integrating Plywood Panels for Structure and Style
To enhance the aesthetic appeal and structural integrity of the homemade vanity, I incorporated 1/2-inch Purebond Plywood into each of these side frames. For this project, I specifically chose birch plywood for its smooth finish and beautiful grain. A helpful tip: many home improvement stores, including Home Depot, can rip hardwood plywood down to your desired size, saving you time and ensuring accurate cuts. To attach these plywood pieces firmly to the side frames, I used a combination of Titebond III wood glue for a strong, lasting bond, and 1-inch brad or finish nails for immediate hold and reinforcement. This method creates a sturdy panel that will look fantastic once painted or stained.
Forming the Main Vanity Box
With the side frames complete, the next logical step was to connect them to form the main “box” of the vanity. I achieved this by attaching the two side frames with two additional boards at the front and two at the back. This critical stage brings the entire structure together, creating a robust and functional enclosure for your powder room vanity. Consistent with the previous steps, I used the same size pocket holes and screws for all these connections, ensuring uniform strength and durability throughout the entire assembly. This careful construction guarantees a long-lasting and reliable piece of DIY bathroom furniture.
Adding the Essential Bottom Shelf
During this stage of forming the main box, you’ll also integrate the bottom shelf, which adds both storage functionality and structural rigidity to your custom vanity. This shelf is typically made from 1/2-inch hardwood plywood, offering a sturdy surface for storing towels, toiletries, or decorative items. For my project, I actually opted for a slightly thicker 3/4-inch piece of plywood, simply because I had a scrap piece large enough that fit the dimensions perfectly. This demonstrates the flexibility you have in material choices for your DIY projects – sometimes using what you have on hand can save you time and money, without compromising the quality of the finished product. This shelf is an ideal spot to add baskets or containers for organized storage in your small bathroom space.
And just like that, the core “box” of the DIY bathroom vanity is complete! At this point, it’s a robust and functional structure, eagerly awaiting the elegant touches of trim and the custom-built door. Seeing the box come together like this truly highlights the progress and brings the vision of your custom powder room vanity one step closer to reality.
This perspective offers a clear view of how the top section of the vanity comes together, providing a solid and level surface that will eventually support your chosen sink top. The careful alignment and secure joinery are evident here, which are crucial for the overall stability and aesthetic of the finished bathroom furniture piece.
Adding Decorative Trim and Building the Vanity Door
To elevate the design of the DIY vanity and give it a more finished, elegant appearance, I applied a delicate pine molding around the top edge. This subtle trim adds a touch of sophistication without overpowering the clean lines of the design. I secured the molding using a combination of wood glue for a strong, permanent bond and 1-inch brad nails for immediate adhesion. Precision is key here; each corner was meticulously miter cut at a 45-degree angle, ensuring seamless joints and a professional finish. This attention to detail can truly transform a simple build into a refined piece of custom bathroom furniture.
Once the trim was perfectly in place, my focus shifted to building the vanity door. This element is designed with simplicity and style in mind, utilizing three pieces of wood for its construction. One crucial step here is to accurately rip down the middle piece to achieve the precise width required for your specific vanity dimensions. This ensures a snug and aesthetically pleasing fit. Just as with the main frame, I employed 3/4-inch pocket holes and 1.25-inch pocket hole screws to join all three boards securely. This method provides a strong, durable door that will stand up to daily use in your powder room remodel. With the door constructed, the main woodworking phase of your DIY vanity is essentially complete!
That’s it for the structural build of this amazing DIY bathroom vanity! A key design choice was to leave the back of the vanity completely open. This strategic decision provides ample clearance and flexibility for plumbing installations, making the process of connecting your sink and faucet much simpler. It’s a practical consideration that minimizes complications during the final hook-up, ensuring an easier and faster installation of your new custom bathroom furniture.
Finishing Touches: Paint, Hardware, and Fixtures
With the construction complete, it was time to bring the custom vanity to life with color and hardware. I opted for Sherwin-Williams Amazing Grey, a color I absolutely adore. It’s a truly versatile grey—not too light, not too dark—that provides the perfect contemporary backdrop, allowing other elements to pop while maintaining a sophisticated feel. After the paint had fully dried, I used my Corner Cat sander to strategically distress the vanity, adding a touch of rustic charm and character that beautifully complements a modern farmhouse aesthetic. This distressing technique gives the piece a loved, worn-in look, enhancing its unique appeal.
All the hardware for this bathroom vanity makeover was conveniently sourced from Home Depot. I found the ideal hinges in a brass finish, but to ensure they perfectly matched the aesthetic of the pull I had selected, I simply spray painted them black. This clever trick allows for budget-friendly customization, creating a cohesive and polished look without needing to search for specific, hard-to-find hardware. It’s a great way to personalize your DIY projects and achieve a designer finish.
Attaching the sink top was a straightforward process. I applied a continuous bead of caulk around the top perimeter of the vanity, ensuring a watertight seal, and then carefully set the sink into place. This simple step firmly secures the sink and prepares it for plumbing connections.
For all the plumbing fixtures, I had the pleasure of collaborating with Moen, and I truly couldn’t be more delighted with their products. The centerpiece of this renovation is that stunning Moen Waterhill 8-inch widespread faucet in polished nickel. Its elegant high-arc design and traditional yet refined style instantly elevate the entire space, adding a touch of luxury to this powder room renovation. Moen’s commitment to quality and design truly shines through in this beautiful fixture.
To complement the faucet and maintain a cohesive design, I also utilized the matching Waterhill robe hook. In a creative twist, I repurposed it as a stylish hand towel holder, a perfect example of how thoughtful accessories can enhance both functionality and aesthetic appeal in a small bathroom design. This small detail adds an extra layer of elegance and practicality to the space.
And the light fixture… Oh, the light! It’s another beloved element that significantly contributes to the bright and airy feel of the room. I discovered this exquisite piece on Wayfair.com. Its design perfectly complements the blend of traditional and modern styles, casting a warm and inviting glow that beautifully illuminates the newly transformed powder room. Good lighting is crucial in a windowless bathroom, and this fixture delivers both style and ample brightness.
Stunning Surfaces: Tile Selection for a Luxurious Feel
Moving on to one of the most impactful elements of this powder room makeover: the tile! The wall behind the vanity is adorned with the most breathtaking marble mosaic tile from The Tile Shop. This exquisite selection is known as Hampton Polished Arabesque Marble Mosaic Tile, and its intricate pattern and polished finish instantly add a layer of luxurious sophistication to the space. It’s a true showstopper, catching the light beautifully and creating an elegant backdrop for the new vanity. For the flooring, I also turned to The Tile Shop for another fantastic option. The floor features their Cottage Grey Faux Wood tile. This choice offers the charming aesthetic of real wood with the superior durability and water resistance of tile, making it a perfect, low-maintenance solution for a bathroom environment. Both tile selections work in harmony to create a cohesive and stylish foundation for the room.
Completing the Look: Mirror, Art, and Future Projects
To tie the entire room together, I custom-built the mirror, and I’m excited to announce that I’ll be sharing the detailed plans for this DIY mirror frame very soon! Additionally, I created a charming free printable, which will also be available for download in an upcoming post. These personalized touches truly make the space feel unique and inviting.
If you look closely at the reflection in the mirror, you might just catch a glimpse of some beautifully crafted shelves. Rest assured, I’ll be sharing the plans and details for those versatile DIY storage solutions very soon too, as they add invaluable functionality and style to the powder room!
Phew! I believe that covers every delightful detail of our powder room transformation and this rewarding DIY bathroom vanity project. It’s truly amazing what a custom build and a thoughtful selection of finishes can do to completely revitalize a small, often-overlooked space. This once-dark powder room is now a bright, elegant, and highly functional oasis, thanks to a bit of elbow grease and creative vision. Thank you so much for joining me on this journey and stopping by to see the finished result! Your support and interest mean the world. If you have any questions at all about the build process, material choices, or design elements, please don’t hesitate to ask in the comments below. I’m always happy to help fellow DIY enthusiasts bring their home dreams to life!