
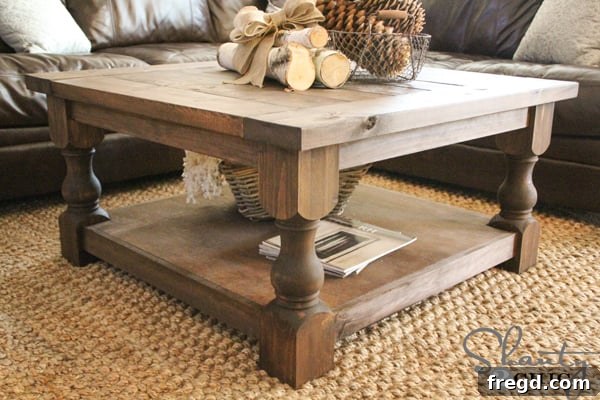
Craft Your Dream Home: Building a Stunning DIY Square Coffee Table on a Budget
There’s an undeniable magic in creating something beautiful with your own hands, especially when it comes to transforming your living space. We recently embarked on a project that truly captured our hearts – a magnificent square coffee table, born from inspiration found in a high-end home decor catalog. That feeling of spotting the perfect piece, only to realize the price tag is out of reach, is a familiar one. But instead of giving up, we decided to bring that vision to life ourselves, proving that exquisite design doesn’t have to come with an exorbitant cost. This journey culminated in a stunning, custom-built coffee table that looks like a million bucks but was crafted for less than $200!
For this ambitious endeavor, we knew we needed solid plans. We reached out to our incredibly talented friend and woodworking guru, Ana White, renowned for her fantastic, user-friendly designs. As always, Ana delivered beyond our expectations, providing the blueprint for a table that is not only robust and functional but also boasts an elegant aesthetic. Her plans were the cornerstone of this project, simplifying complex steps and making this DIY dream attainable for enthusiasts of all skill levels.
The moment we saw the finished table, we were absolutely captivated, especially by the legs. They possess a unique charm and character that truly elevate the entire piece, transforming a simple coffee table into a striking centerpiece. Don’t let their intricate appearance intimidate you, though – while they are a custom design, we didn’t craft them ourselves. We collaborated with the outstanding team at Osborne Wood Products, who expertly designed and manufactured these custom legs based on Ana’s detailed plans. Their craftsmanship truly shines through, offering both stability and sophisticated style. It’s astonishing how easy this table was to build, especially considering the professional-grade look and feel we achieved, all while staying well under a $200 budget. Let us guide you through the process, step by step, so you can create your own masterpiece.
The Foundation of Style: Custom Legs from Osborne Wood Products
Every great piece of furniture begins with a strong foundation, and for this square coffee table, that foundation came in the form of these absolutely gorgeous custom legs from Osborne Wood Products. You might have caught a sneak peek of them on our Instagram feed, and the excitement they generated was immense. While these legs are custom-designed for this specific project, Osborne Wood Products has generously made them available to our readers at a significantly reduced price, essentially making them half-off the cost of a typical custom piece. This incredible offer truly makes a custom-look coffee table more accessible than ever before! High-quality legs are crucial not just for aesthetics but also for the overall stability and longevity of your furniture. Osborne Wood Products is renowned for its exceptional craftsmanship and a wide array of woodworking components, making them an invaluable resource for any DIY enthusiast. Choosing superior components like these legs ensures your handmade furniture looks and performs like a professional, store-bought piece for years to come.
Building the Frame: Attaching the Aprons with Precision
The first structural step in building our DIY square coffee table was attaching the side aprons to the sturdy legs. This process is remarkably straightforward, especially when utilizing the right tools. Our secret weapon for clean, strong joints is the Kreg Jig. This ingenious tool allows you to drill “pocket holes” into your wood pieces at an angle, creating concealed pilot holes for screws. The beauty of pocket hole joinery lies in its strength, hidden fasteners, and the ease with which even beginner woodworkers can achieve professional results. We simply clamped our apron boards and drilled the necessary pocket holes, ensuring they were strategically placed for maximum stability and a seamless finish.
Here’s a closer look at the apron boards for the sides of the coffee table, clearly showing the precisely drilled pocket holes. Proper placement of these holes is key to ensuring a strong, invisible joint once the table is assembled. Each hole provides a secure anchor point, distributing the stress evenly and preventing wobbling or weakness in the frame.
With the pocket holes prepared, it was time to join the components. We applied a generous amount of Gorilla Glue wood glue to the mating surfaces for an incredibly strong bond, then secured the boards to the custom Osborne legs using our reliable Ryobi 18V Lithium Drill. The combination of high-quality wood glue and strong screws driven into pocket holes creates a joint that is virtually unbreakable, ensuring your coffee table will stand the test of time and heavy use. Always wipe away any excess glue promptly with a damp cloth to prevent it from interfering with staining or finishing later.
Following the same method, we attached the lower set of aprons, carefully aligning them and securing them with pocket hole screws and wood glue. Consistency in assembly is vital for maintaining the squareness and integrity of the table frame. Working methodically around each leg, we ensured every joint was tight and flush, building a robust and stable base for our beautiful coffee table. This attention to detail in the early stages pays off immensely in the final product.
And just like that, the main frame of the coffee table was complete! It’s incredibly satisfying to see the structure come together so quickly and easily. With the top and bottom aprons securely fastened to the legs, the table already began to take on its impressive form. This simple yet effective joinery method, combined with quality materials, truly makes DIY furniture building a joyous and accessible pursuit. Now, let’s move on to adding the practical and stylish bottom shelf, which will provide additional storage and visual interest to our square coffee table.
Crafting the Functional Bottom Shelf
For the bottom shelf of our coffee table, we selected Purebond Plywood, an exceptional material that we wholeheartedly endorse. The first step was to accurately measure and cut notches out of the plywood, allowing it to fit snugly around the table legs and rest perfectly within the lower apron frame. Our trusty Ryobi Jigsaw made quick work of these precise cuts. We are firm believers in using Purebond Plywood whenever possible for several compelling reasons: it boasts a gorgeous natural wood grain that finishes beautifully, it’s formaldehyde-free, making it a healthier choice for your home, and it’s produced using wood from sustainably managed forests, aligning with environmentally conscious practices. Choosing Purebond isn’t just about quality; it’s about making a responsible choice for both your family and the planet. You can delve deeper into why we’ve enthusiastically taken the Purebond Pledge by watching this informative video HERE!
After meticulously cutting the notches for the legs, the next step was to prepare the Purebond Plywood shelf for attachment. Just as we did with the aprons, we utilized our indispensable Kreg Jig to drill pocket holes. This time, the pocket holes were strategically placed along all four sides of the plywood shelf. These concealed holes would allow us to securely fasten the shelf to the inside of the lower apron, ensuring a clean look without visible screws from the top or sides. The Kreg Jig makes this process incredibly efficient and accurate, contributing significantly to the overall professional finish of the coffee table.
With the pocket holes ready, attaching the bottom shelf to the apron was a straightforward process. We carefully laid the table on its side, making it easier to access the interior of the frame. Working our way around the perimeter, we secured the plywood shelf to the bottom apron using screws driven into the pocket holes. A crucial detail here was ensuring the plywood remained perfectly flush with the top edge of the apron boards as we went. This meticulous alignment is essential for a clean, even surface that will look polished and professional once the table is complete. Take your time during this step to achieve the best possible fit and finish.
Building and Attaching the Elegant Planked Top
Once the robust bottom shelf was securely in place, it was time to turn our attention to the star of the show: the planked top of our square coffee table. A planked top adds significant character, texture, and a touch of rustic elegance to any piece of furniture. To construct this, individual wood planks are joined together to form a solid surface. As you can see in the image, we meticulously drilled pocket holes along the edges of each plank. These holes are absolutely critical for creating a strong, seamless top without any unsightly nail or screw holes visible from the surface. The Kreg Jig once again proved invaluable, allowing for precise, angled holes that pull the planks tightly together, ensuring a flat and stable top that will withstand daily use. Building the top separately allows for easier handling and a more controlled assembly process before final attachment to the base.
Finally, the moment arrived to unite the beautifully crafted planked top with the sturdy table base. This step, often a point of anxiety for many builders, was surprisingly simple thanks to the strategically placed pocket holes we drilled into the side aprons earlier. By driving screws up through these hidden pocket holes and into the underside of the tabletop, we achieved an incredibly strong and secure connection. The best part? No visible nail holes to fill, sand, or conceal! This method results in a flawlessly smooth surface, preserving the natural beauty of the wood and the clean aesthetic of the design. The satisfaction of seeing the entire coffee table take its final, complete form is truly immense, a testament to thoughtful planning and effective woodworking techniques.
The Finishing Touches: Staining and Protecting Your Masterpiece
With the construction complete, it was time to bring out the natural beauty of the wood and protect our newly built square coffee table for years to come. This is where the finishing process truly makes the piece shine.
Applying the Perfect Stain
We opted for one coat of Rust-Oleum Dark Walnut stain, a timeless choice that imparts a rich, deep hue, enhancing the wood grain without overpowering it. Applying stain is a crucial step that can dramatically transform the appearance of your furniture. We used a foam brush for a smooth, even application across all surfaces of the table. After applying the stain, we allowed it to sit for approximately five minutes. This dwell time permits the pigment to penetrate the wood fibers, creating a deeper, more vibrant color. Following the recommended time, we then gently wiped the stain with a clean, lint-free cloth. It’s important to remember that the purpose of wiping isn’t to remove the stain entirely, but rather to blend it, ensuring an even tone and preventing any streaking or pooling. This technique helps achieve a consistent, professional-looking finish across the entire piece, truly highlighting the craftsmanship of your DIY square coffee table.
Ensuring Lasting Durability with Polyurethane
Given that this is a coffee table, destined to be a central hub of activity in our living space, it will undoubtedly endure its fair share of daily wear and tear – from spilled drinks to resting feet and decorative items. To provide optimal protection and ensure its longevity, we applied two coats of Rust-Oleum Polyurethane in a Matte finish. Polyurethane creates a durable, protective layer over the stained wood, shielding it from moisture, scratches, and general abuse. The matte finish was chosen specifically to maintain a natural, understated look, preventing the table from appearing overly glossy or artificial. Applying multiple thin coats, with adequate drying time in between, is key to building up a strong, resilient barrier. This final step is vital for preserving the beauty and structural integrity of your DIY coffee table, allowing you to enjoy your handmade furniture for many years to come with minimal maintenance.
And that, as they say, was that! The journey from inspiration to a magnificent finished piece was incredibly rewarding.
Your New Centerpiece: A DIY Success Story
Thanks to the brilliantly engineered plans from Ana White and the exquisite, custom-designed legs from Osborne Wood Products, we now proudly possess a truly beautiful, unique, and highly functional DIY square coffee table. The most incredible part? We achieved this high-end look and robust construction for an astonishingly low price, staying comfortably under the $200 mark! This project is a shining example of how accessible and rewarding woodworking can be, turning an ambitious idea into a tangible, cherished piece of furniture. The generous base at the bottom of the table offers ample space for decorative elements, making it an absolute joy to style and re-style throughout the seasons. We’re already envisioning all the creative ways we’ll be decorating with this beauty year-round!
This square coffee table isn’t just a piece of furniture; it’s a statement. It speaks to the joy of creation, the satisfaction of a budget-friendly build, and the enduring beauty of handcrafted items. Its generous dimensions make it perfect for entertaining, family game nights, or simply as a stylish spot to display your favorite decor. The rich Dark Walnut stain, protected by the matte polyurethane, ensures it will continue to impress for many years to come.
The versatility of this design is truly remarkable. Whether your home decor style leans towards modern farmhouse, rustic chic, or even a touch of industrial, this square coffee table seamlessly integrates and enhances the aesthetic. Its robust construction and timeless design ensure it will remain a beloved piece in your home, serving as a functional and beautiful focal point that garners compliments from every guest.
We sincerely hope you love this custom-built square coffee table as much as we do, and that our detailed guide inspires you to embark on your own DIY woodworking adventure! The satisfaction of creating something this beautiful and functional is truly unparalleled. Don’t forget to explore the extensive range of high-quality wood working products that Osborne Wood Products has to offer. Their incredible selection of legs, corbels, and other decorative elements is a treasure trove for any builder. We found ourselves incredibly inspired, just by browsing their catalog, dreaming up countless other furniture pieces we could build. Happy building!
Your shares and pins mean the world to us and help fellow DIY enthusiasts discover inspiring projects like this. We always appreciate your support!
Thanks for stopping by and happy crafting!
Ashley