
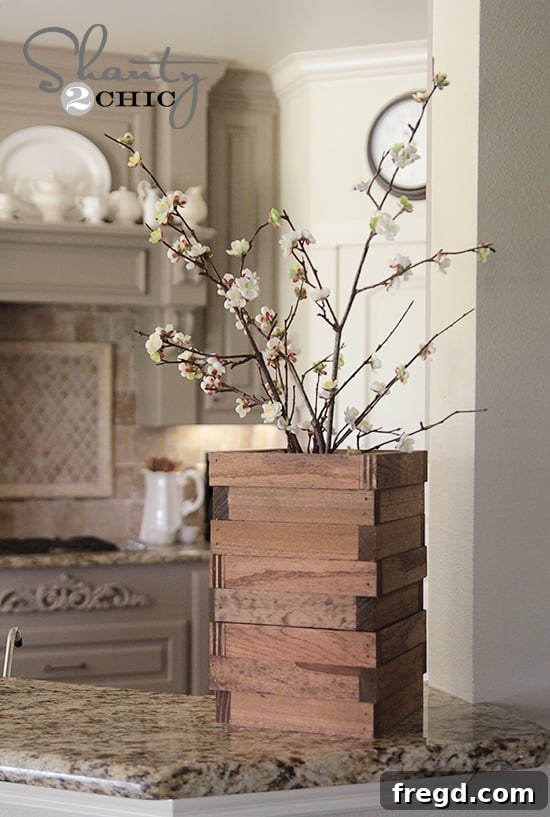
Transforming Scraps into Style: Your Guide to a DIY Rustic Wood Vase Sleeve
Hello, fellow DIY enthusiasts and home decor lovers! We trust you’re having an incredibly productive and inspiring week. As Ash and I navigate our current travel adventures – hitting four cities in two weeks while our wonderful eight kiddos hold down the fort at home (your prayers are always appreciated!) – we couldn’t wait to share a truly delightful and incredibly simple project with you today.
If you’re anything like us, you cherish projects that are not only budget-friendly but also allow you to put those seemingly insignificant wood scraps to good use. This project is precisely that: a perfect blend of rustic charm, functionality, and straightforward execution, proving that beautiful home accents don’t require a hefty investment or advanced carpentry skills. Get ready to elevate your home decor game with a stunning piece that’s as practical as it is aesthetically pleasing.
Today, we’re diving into creating what I affectionately call a “vase sleeve.” While it might look like a traditional vase, its clever design makes it infinitely more versatile and easy to maintain. The secret lies in its open bottom, which eliminates the common woes of cleaning and water damage associated with wooden containers. This innovative approach allows you to simply place a mason jar or any suitably sized vase inside, slide the wooden sleeve over it, and *bam!* – you have a gorgeous, rustic display ready for both fresh-cut blooms and long-lasting artificial arrangements without any fuss. It’s the ultimate solution for those who love the warmth of wood decor but prefer the practicality of conventional vases.
Why a DIY Wood Vase Sleeve is Your Next Must-Do Project
Beyond its charming aesthetic, this DIY wood vase sleeve offers a multitude of benefits that make it an exceptional addition to any home. Firstly, its design solves the inherent challenge of using wood with water. By housing your flowers in a separate glass or ceramic container, you protect the wood from moisture damage, ensuring your beautiful creation lasts for years to come. This also means you can easily switch out containers for cleaning, refilling, or even to accommodate different sizes of floral arrangements.
Secondly, versatility is at the heart of this project. Whether you’re a fan of vibrant fresh flowers, maintenance-free silk arrangements, or even decorative branches, this sleeve provides the perfect rustic backdrop. It instantly upgrades any plain container into a statement piece, adding a touch of farmhouse chic, industrial edge, or cozy cabin warmth to your living space. Imagine it as a centerpiece on your dining table, a welcoming accent in your entryway, or a stylish organizer on your mantelpiece – the possibilities are endless.
Moreover, this project aligns perfectly with sustainable living principles by encouraging the use of scrap wood. Instead of discarding leftover lumber from previous projects, you can give it a new lease on life, transforming what would be waste into a functional piece of art. It’s a rewarding way to minimize waste, save money, and infuse your home with handcrafted personality that tells a story.
Gather Your Supplies: Tools and Materials for Your Rustic Vase Sleeve
One of the most appealing aspects of this project is its simplicity and affordability. You likely already have many of the necessary tools, and the materials are inexpensive, especially if you’re tapping into your scrap wood pile. Here’s what you’ll need to bring this rustic vision to life:
Essential Materials:
- 1×2 Boards: The backbone of your vase sleeve. You’ll need enough to cut 32 pieces, each approximately 7 inches long. If you’re starting from scratch, two 1x2x8 boards will provide more than enough material. For an even more economical approach, consider using furring strips, which are often found at a lower price point. The total cost for new wood should be under $5, or completely free if your scrap pile is as generous as ours!
- Wood Glue: We highly recommend Gorilla Wood Glue for its superior bonding strength and quick drying time. It forms a durable bond that complements the nails.
- Finish Nails: You’ll need 2-inch finish nails for securing the pieces. These provide additional structural integrity and a clean finish.
- Wood Stain (Optional but Recommended): Rust-Oleum Ultimate Wood Stain in Early American is our absolute favorite for this project. Its rich, warm tone enhances the natural grain of the wood, and its quick-drying, one-coat formula makes the finishing step a breeze.
Required Tools:
- Miter Saw (or Hand Saw): For precise and efficient cutting of your wood pieces. A hand saw with a miter box can also work if you don’t have a power saw.
- Tape Measure: For accurate measurements of your wood pieces.
- Pencil: For marking your cut lines.
- Nail Gun (or Hammer): A nail gun will make assembly much faster and easier, but a traditional hammer and nail set will work perfectly fine.
- Safety Glasses: Always prioritize eye protection when working with saws and nails.
- Gloves: Recommended for staining to protect your hands.
- Clean Rag or Foam Brush: For applying the wood stain evenly.
This project is truly a testament to what you can create with minimal investment and a little creativity. Let’s get started on transforming those simple materials into a stunning piece of decor!
Step-by-Step Construction: Building Your Rustic Wood Vase Sleeve
Now that you’ve gathered all your materials and tools, let’s dive into the fun part: bringing your vase sleeve to life. This process is broken down into easily manageable steps, perfect for beginners and seasoned DIYers alike.
Step 1: Precision Cutting for Rustic Appeal
Begin by cutting your 1×2 boards. You will need a total of 32 pieces. While aiming for consistency, embrace a touch of rustic charm by allowing for slight variations in length. I cut each piece to be approximately 7 inches long. For a truly authentic, handmade look, don’t worry about every single piece being exactly identical; some can be a hair bigger, others slightly smaller. This subtle inconsistency will add character and depth to your finished vase sleeve, enhancing its unique rustic appeal.
Remember to always prioritize safety when operating a saw. Wear your safety glasses and ensure your workpiece is securely clamped before making any cuts. Measure twice, cut once, and take your time to achieve clean, straight cuts that will form the foundation of your sleeve.
Step 2: Assembling the Foundation Squares
Once all 32 pieces are cut, your next step is to assemble them into eight identical squares. Each square will consist of four of your 7-inch wood pieces. Apply a generous bead of Gorilla Wood Glue along the ends of two pieces, then butt them up against two other pieces to form a square shape. For added strength and stability, secure these joints with finish nails. A nail gun makes this process incredibly fast and efficient, but a hammer and careful nailing will achieve the same sturdy result.
Ensure that each square is as true as possible – using a carpenter’s square can help verify right angles before the glue sets. This foundational step is crucial for the overall structural integrity and appearance of your finished vase sleeve. Allow the glue to set for a few minutes before handling extensively, though the nails will hold them firmly in place immediately.
Step 3: Constructing the Vase Sleeve Body
With all eight squares now assembled, it’s time to bring them together to form the main body of your vase sleeve. This is where the unique “mismatched” or “alternating” look comes into play, adding an extra layer of rustic charm. Carefully stack your squares one on top of the other. As you add each new square, rotate it 90 degrees from the previous one. This creates a visually interesting pattern where the wood grain and joints are staggered, breaking up any uniformity and emphasizing the handcrafted nature of the piece.
Just as before, apply Gorilla Wood Glue generously between each stacked square. Then, use 2-inch finish nails to secure them firmly together. Drive the nails through the top square into the one below it, ensuring they penetrate deep enough for a strong hold. Work your way up, carefully aligning each piece, until all eight squares are stacked and securely attached, forming a hollow, open-bottomed column.
Step 4: The Art of Staining and Finishing
The beauty of rustic design often lies in its imperfections, and this project embraces that philosophy wholeheartedly. For this vase sleeve, I chose not to bother covering the nail holes. Instead, I view them as part of the authentic, rugged character that defines a rustic aesthetic. They tell a story of craftsmanship and add to the overall charm, rather than detracting from it.
To truly bring out the warmth and character of the wood, I stained the entire sleeve using one of my absolute favorite products: Rust-Oleum Ultimate Wood Stain in Early American. This stain is truly remarkable! It requires only a single coat to achieve a rich, beautiful color, and best of all, it dries in under an hour. This means you can go from raw wood to a beautifully finished piece in a surprisingly short amount of time. Simply apply the stain evenly with a clean rag or foam brush, wiping off any excess. The Early American shade provides a timeless, inviting hue that perfectly complements any decor style, from modern farmhouse to classic traditional.
This stuff is an absolute game-changer for quick projects! The rapid dry time means less waiting and more enjoying your newly crafted item. Once the stain is dry, your rustic wood vase sleeve is complete and ready to house your favorite floral arrangements.
Your New Home Decor Statement Piece
That’s it! Seriously, this might just be one of the fastest and easiest projects we’ve tackled to date. And as an added bonus, my infamous scrap pile actually shrunk a bit in the process – well, only just a tiny bit, but every little bit counts!
What do you think of this versatile, charming, and incredibly simple DIY creation? We are absolutely thrilled with how it turned out, and we hope you love it as much as we do. This wooden vase sleeve is more than just a container; it’s a testament to the beauty of repurposed materials and the satisfaction of creating something beautiful with your own hands.
Imagine this piece gracing your coffee table, adding a touch of natural elegance to your bookshelf, or bringing a warm, inviting feel to your dining room centerpiece. Its rugged texture and classic stain make it a perfect fit for a wide range of interior styles, from modern farmhouse to industrial chic, and everything in between. It’s an instant upgrade that feels both timeless and perfectly on-trend.
The beauty of this project lies not only in its outcome but also in its accessibility. It’s a fantastic beginner-friendly woodworking endeavor that yields professional-looking results without requiring extensive tools or specialized skills. It’s a wonderful way to dip your toes into DIY home decor, build confidence, and create something truly unique that reflects your personal style.
This project is also a testament to the magic of repurposing. By taking simple, often overlooked materials like scrap wood, we can transform them into items of beauty and utility. It’s a small step towards a more sustainable lifestyle, proving that creativity can often overcome the need to buy new.
Share Your Creativity!
We truly hope you feel inspired to tackle this project and create your very own rustic wood vase sleeve. It’s a rewarding experience that adds character and warmth to any room, and it’s incredibly satisfying to know you made it yourself. Don’t forget to experiment with different types of wood, stains, or even paints to match your unique home aesthetic. The beauty of DIY is making it your own!
Thanks so much for stopping by and spending some time with us today. Your support and enthusiasm mean the world! We would absolutely love for you to PIN this project to your favorite home decor boards and share it with your friends and family below. Let’s spread the joy of DIY and inspire more people to create beautiful things from humble beginnings.
Thanks again for being part of our creative community!
Whitney