
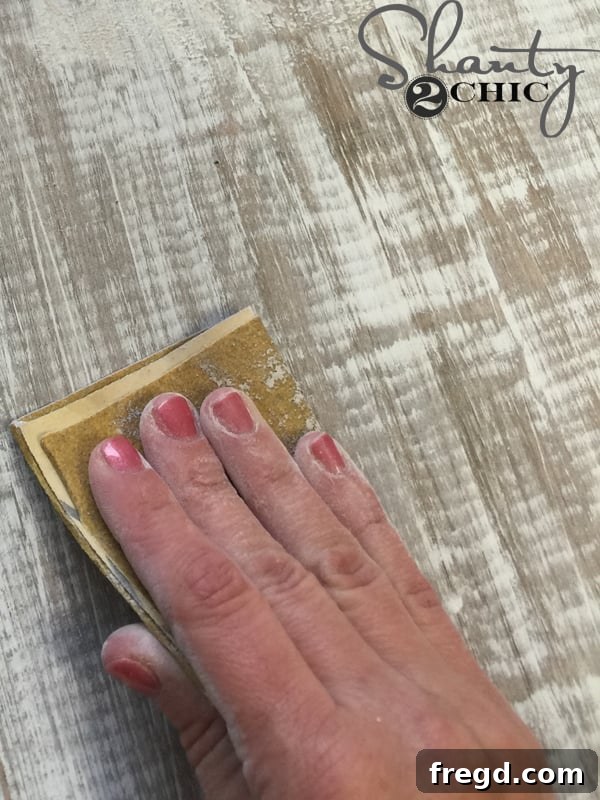
Have you ever admired a piece of furniture with a charming, timeworn appearance and wondered how to achieve that look yourself? It’s a question we hear constantly: “How do you create those beautiful distressed finishes on your furniture pieces?” The allure of vintage, rustic, or shabby chic furniture lies in its unique character, telling a story of years gone by without the hefty price tag of genuine antiques. The good news is, you can replicate these captivating looks with relatively simple DIY techniques. We believe the best way to demystify this popular style is through a comprehensive guide, paired with visual examples and a helpful video demonstration.
Whether you’re looking to revitalize an old dresser, add character to a new piece, or simply infuse your home with a touch of farmhouse charm, mastering distressed finishes is a rewarding skill. These techniques are not only aesthetically pleasing but also incredibly forgiving, making them perfect for beginners and seasoned DIYers alike. They allow you to personalize your decor, transforming ordinary items into extraordinary focal points that truly reflect your individual style.
Unlock the Secrets of Distressed Finishes: Watch Our Expert Tutorial
To give you the best possible start on your furniture transformation journey, we’ve put together a quick, easy-to-follow video that walks you through the essentials of distressing furniture. This visual guide will provide invaluable insights into the techniques we’re about to explore. You can click the play button below or HERE to watch our “How to Get a Distressed Finish” video on YouTube. For more DIY tips, tricks, and furniture makeover inspiration, make sure to subscribe to our channel. And if you click the bell icon, you’ll get notified every time we release a new video, ensuring you never miss an update!
In this comprehensive guide, we’ll delve deep into four of our absolute favorite distressed finishes, each offering a distinct aesthetic and method. These techniques are incredibly versatile, allowing you to customize colors, textures, and levels of distress to perfectly match your personal taste and home decor style. Get ready to explore the endless possibilities of aged beauty!
The Art of Aging: Four Signature Distressed Finishes Explained
1. The Distressed Stain Finish
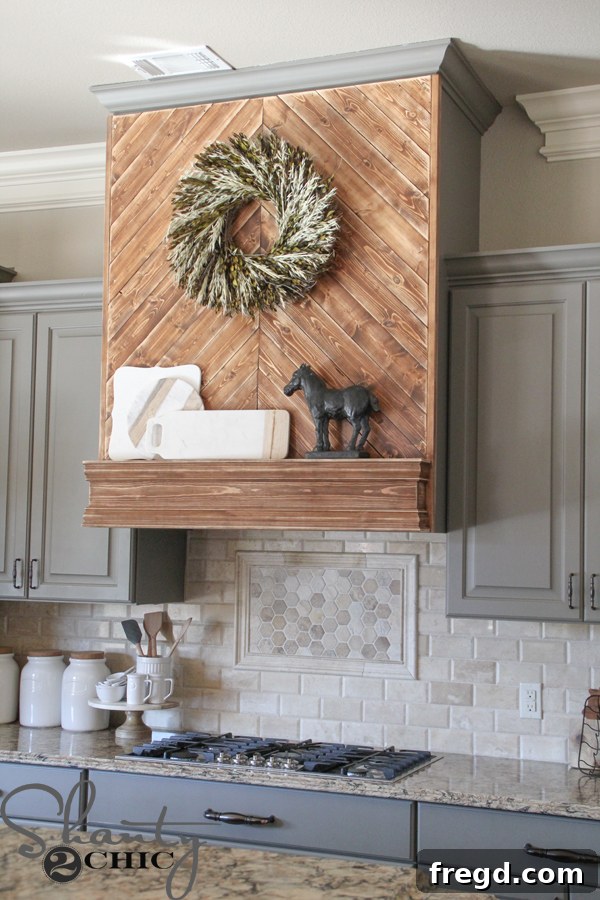
The distressed stain finish is a sophisticated and subtle way to achieve an aged look that beautifully highlights the natural grain and inherent character of wood. Unlike painted finishes that cover the surface, this technique enhances the wood’s texture and patterns, imparting a sense of history and warmth. It’s an ideal choice for those who appreciate the authenticity of natural wood but desire a touch of rustic charm, farmhouse elegance, or a gently weathered appearance without concealing the material itself.
How to Achieve It: This method typically involves applying a wood stain and then strategically removing or lightening it in specific areas to simulate the natural wear and tear a piece would accumulate over decades. Begin by preparing your furniture piece; ensure it’s clean and, if necessary, lightly sanded to open up the wood pores for better stain absorption. Apply your chosen wood stain generously, allowing it sufficient time to penetrate the wood fibers. Before the stain completely dries, use a clean rag or a piece of fine-grit sandpaper (such as 220-grit or higher) to gently wipe back or lightly sand away some of the stain from prominent edges, corners, raised details, and other areas that would naturally experience friction and fading over time. For a more complex, multi-layered effect, you might apply a darker base stain, allow it to dry partially, and then lightly apply a contrasting lighter stain or a diluted wash over it, wiping it back before it fully sets. Another effective technique involves pre-distressing the wood by creating subtle dents, scratches, or wormhole effects before staining. These imperfections will absorb the stain more deeply, making them stand out and adding to the aged illusion.
Essential Tools & Materials: A selection of wood sandpaper (ranging from medium to fine grits for preparation and distressing), steel wool, clean rags, your preferred wood stain (water-based or oil-based, depending on your project), an optional pre-stain conditioner to ensure even absorption, and a clear protective topcoat (like polyurethane or lacquer) to seal and protect your finished piece.
Best For: This finish excels on pieces where the natural wood grain is an asset, such as dining tables, coffee tables, dressers, console tables, and wooden shelving. It beautifully complements farmhouse, industrial, traditional, and rustic chic decor styles, adding a timeless elegance that feels both new and authentically old.
2. The Distressed Paint Finish
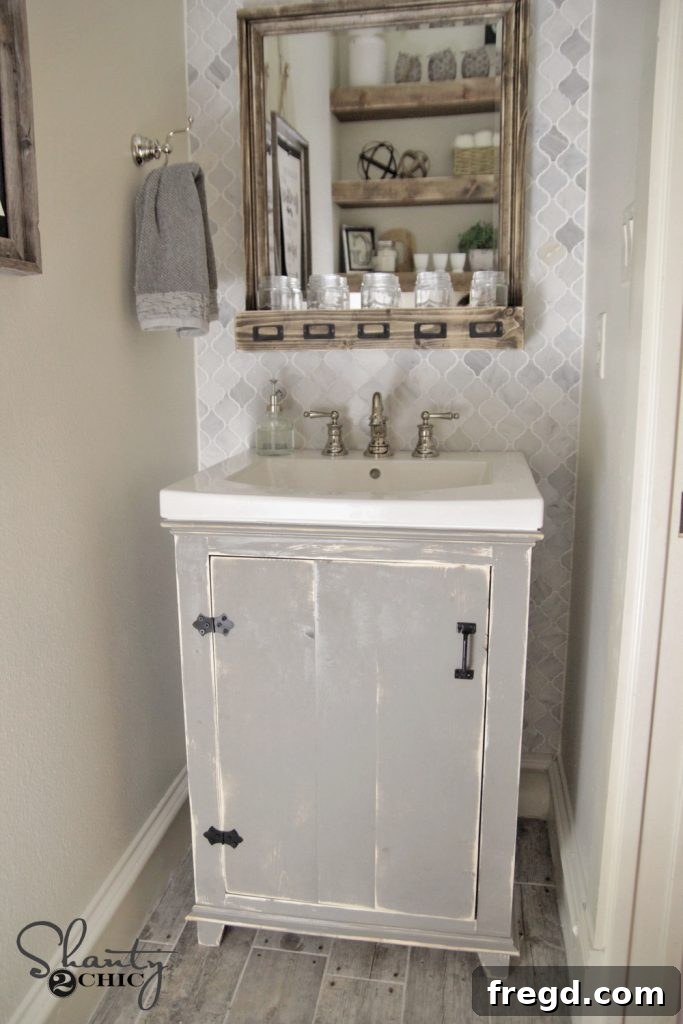
The distressed paint finish is arguably the most popular and recognizable method for achieving a vintage or shabby chic look. It creates a beautifully worn appearance by strategically removing layers of paint to reveal the underlying wood or even a contrasting base coat. This technique imparts a cherished history to a piece, making it feel like an antique that has been loved and used for generations. Its versatility allows for a wide range of aesthetics, from subtle hints of wear to more pronounced “chipping,” depending on your desired outcome and the specific style you aim to achieve.
How to Achieve It: There are several effective methods to create a distressed paint finish. The most straightforward is “dry distressing,” where you paint your furniture piece with your chosen color and allow it to dry completely. Once dry and fully cured, use sandpaper (a fine to medium grit, typically 120-220, or even a sanding block) to gently sand away paint from prominent edges, corners, raised details, and other areas that would naturally receive friction and wear over time. Focus on spots where natural abrasion would occur. For a richer, multi-layered effect, you can apply a base coat of one color, let it dry, then apply a second contrasting or complementary top coat. After the top coat dries, sand through it to reveal hints of the base color beneath. Another technique is “wet distressing,” which involves using a damp cloth or sponge to gently rub away paint while it’s still slightly wet but firm enough not to smear entirely. This method produces softer, less defined edges. For more dramatic and controlled distressing, consider the “wax resist” method: apply a layer of wax (such as from a candle or a beeswax stick) to specific areas where you want the paint to chip or rub off easily. Then, paint over these waxed spots. Once the paint is dry, you can effortlessly scrape off the topcoat of paint where the wax was applied, revealing the underlying layer or the raw wood beneath. This method is excellent for creating clean, distinct distressing lines.
Essential Tools & Materials: Your choice of paint (chalk paint, milk paint, or latex paint are all excellent options for distressing), a variety of sandpaper grits, a sanding block for comfortable use, damp rags, a wax stick or candle (for the resist method), and a clear protective topcoat (wax, polycrylic, or polyurethane) to seal your artistic work.
Best For: This finish is a staple for rejuvenating dressers, bedside tables, dining chairs, cabinets, and decorative items like picture frames. It’s a hallmark of shabby chic, cottage, French country, and modern farmhouse decor styles, offering limitless possibilities for color combinations and customizable levels of distress to perfectly suit any interior.
3. The Chippy Paint Finish
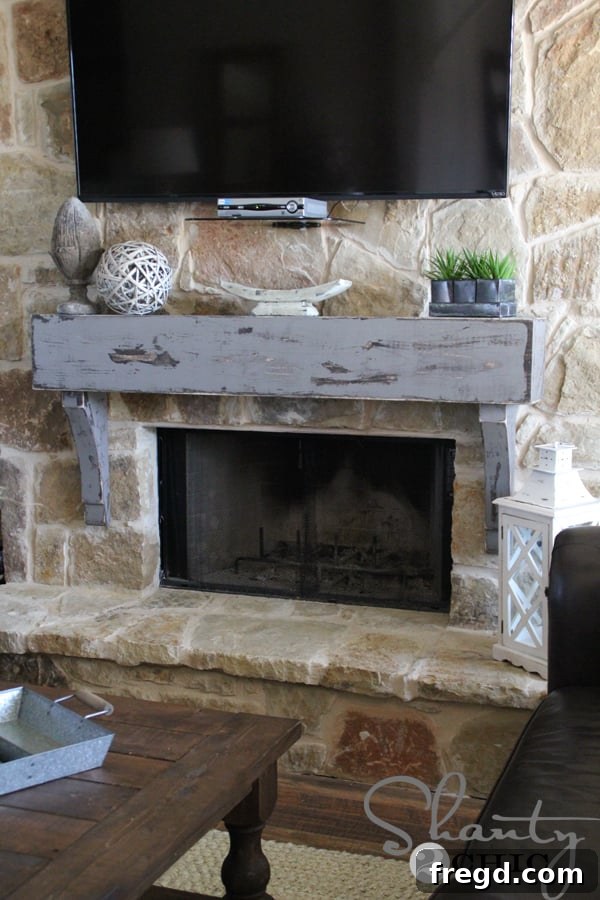
Distinct from merely “distressed,” the chippy paint finish takes the aged aesthetic a significant step further, emulating the natural flaking, peeling, and cracking of old, weather-beaten paint that has genuinely endured the elements for decades. This finish creates a wonderfully authentic antique or primitive vibe, giving pieces a rich, tangible story and a truly unique, tactile texture. It is often associated with rustic farmhouse pieces, industrial decor, or items that have truly stood the test of time, showcasing their resilience and character.
How to Achieve It: Achieving a genuinely natural-looking chippy finish often relies on specific paint types or deliberate surface preparation techniques that encourage paint to resist adhesion in certain areas. Milk paint is famously known for its ability to create a desirable “chippy” effect, especially when applied over existing sealed, glossy, or oil-based finishes without prior sanding or a bonding agent. When applied this way, milk paint can naturally resist adherence in random spots, leading to beautiful, spontaneous chipping and flaking as it dries and cures. You can also strategically encourage chipping by applying a bonding agent only where you want the paint to firmly stick, leaving other areas untreated and prone to flaking. Another effective method involves creating a physical barrier, such as a thin layer of petroleum jelly, mineral oil, or a soft wax, in specific spots on your furniture before applying the paint. This barrier prevents the paint from adhering properly. Once the paint has dried, you can then use a scraper, a putty knife, a wire brush, or even your fingernail to gently remove the loose, flaking paint, revealing the underlying surface or a previously applied base coat. The key to a successful chippy finish is to make the peeling and flaking look organic and natural, rather than forced or artificial. Layering different colors of paint and allowing them to chip unevenly will add incredible depth, realism, and visual interest to your piece.
Essential Tools & Materials: Milk paint (highly recommended for natural chipping), chalk paint (which can be heavily distressed to simulate chipping), or even latex paint (used in conjunction with resist methods). Other necessary items include petroleum jelly or a soft wax, various scrapers, putty knives, stiff brushes, sandpaper (for refining edges), and a clear topcoat—often a natural wax or a matte polycrylic—to preserve the authentic, unpolished feel of the chippy surface without adding gloss.
Best For: This finish is ideal for primitive pieces, old doors, rustic barn wood signs, antique chests, and any item where you want to evoke a deeply weathered, time-worn appearance. It is a hallmark of authentic farmhouse, industrial, and truly rustic decor styles, adding unparalleled character and charm to any space.
4. The Barn Wood Finish
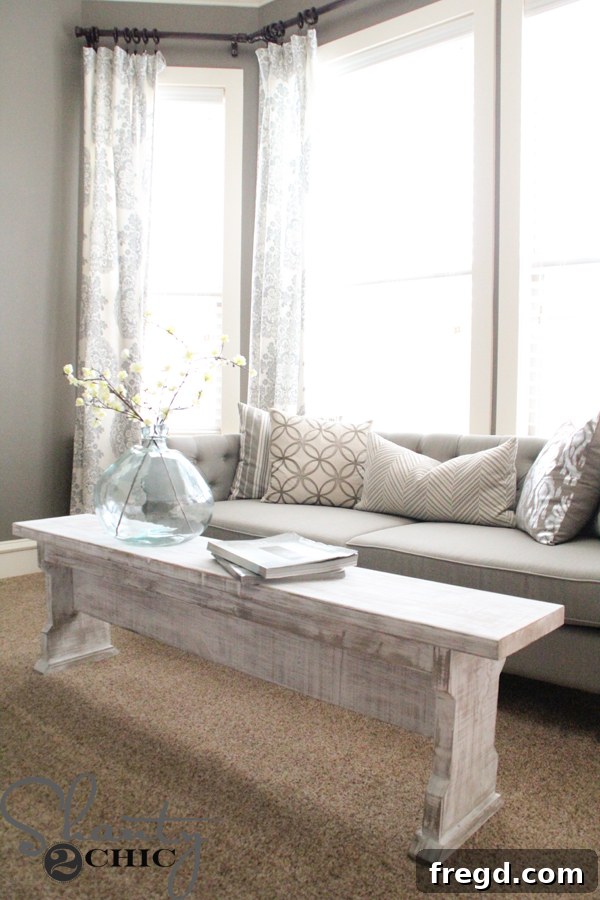
The barn wood finish is specifically designed to replicate the distinctive, rugged appearance of aged, weathered wood found on old barns, fences, and forgotten structures. This look is typically characterized by its muted greyed tones, rough and textured surface, and deep character marks accumulated over decades of exposure to the elements. By bringing this finish indoors, you can infuse any space with an undeniable sense of rugged authenticity, natural beauty, and rustic charm, perfect for creating a cozy, industrial, or farmhouse-inspired ambiance.
How to Achieve It: This technique often involves a strategic combination of physical texturizing and specialized staining or washing to mimic genuine weathering. Begin by physically distressing the wood itself. Use a stiff wire brush to create deeper, more pronounced grain patterns and add subtle texture. Lightly hammer the surface with a chain or a ball peen hammer to create subtle dents, dings, and surface imperfections that resemble natural wear. You can also use chisels or other tools (carefully!) to create shallow grooves, splits, and character marks. Once the physical distressing is complete, the transformative magic happens with color. A highly popular and effective method involves creating a “weathering wash” or a solution of steel wool and vinegar. To make this, soak fine steel wool in white vinegar for a few days (the longer it soaks, the darker and more potent the reaction will be). Apply this solution generously to the prepared wood; the acetic acid in the vinegar will react with the tannins naturally present in the wood, causing it to turn a beautiful range of grey-brown tones, almost perfectly mimicking true weathered barn wood. You can also achieve this effect by layering thin, diluted washes of grey, brown, and even a hint of diluted white paint. Apply these washes unevenly, allowing some layers to dry partially before adding others, to build up the complex, multi-toned appearance of aged wood. For added depth and dimension, consider a dry brush technique with a very light grey or white paint after the primary finish has dried, lightly skimming the raised grain to make it pop. Ensure your final topcoat is a matte or satin finish to maintain the natural, unpolished, and authentic look of real barn wood, avoiding any glossy sheen that would detract from the rustic appeal.
Essential Tools & Materials: A wire brush, hammers or chains (for texture), chisels or similar tools, fine steel wool, white vinegar, various wood stains (specifically grey and brown tones), diluted paints (white, light grey, brown), clean rags, and a matte or satin clear topcoat (polycrylic or similar) to protect and seal the finish.
Best For: This finish is exceptionally suited for headboards, accent walls, coffee tables, shelving units, custom built-ins, or even picture frames where you desire to evoke a strong sense of reclaimed, natural, and rugged aesthetic. It is an ideal choice for farmhouse, industrial, and modern rustic interior design schemes, adding a touch of timeless, rugged elegance.
Customize Your Creation: Colors, Layers, and Your Personal Touch
The truly wonderful aspect of all these finishing techniques, besides being surprisingly easy to master, is their incredible customizability. You, the DIY enthusiast, are the artist! You have the freedom to use any color stain imaginable, from rich, warm oaks to cool, contemporary greys, allowing the wood’s natural beauty to shine through. Similarly, you can apply any color paint that sparks your imagination, be it a vibrant teal for a pop of color or a classic antique white for timeless elegance.
Don’t be afraid to experiment with layering different colors to achieve unique depth and dimension, especially with painted finishes. Try varying the intensity of your distressing to suit the specific piece of furniture and its intended placement within your home. Perhaps a subtle distress for a formal living room piece, or a heavily chipped finish for a casual, rustic accent.
Even better, don’t shy away from mixing and matching elements from different techniques. Imagine a coffee table with a barn wood finished top paired with chippy painted legs, or a distressed paint finish revealing intriguing hints of a bold stain beneath. The possibilities are truly endless, allowing you to create genuinely bespoke furniture pieces that perfectly reflect your unique personal taste and seamlessly complement your existing home decor. Let your creativity be your guide!
Expert Tips for Success in Furniture Distressing
- Start Small: If you’re new to the world of distressing, we recommend beginning with a smaller, less prominent piece of furniture. This allows you to get a comfortable feel for the techniques, experiment with different approaches, and build confidence before tackling a larger or more cherished heirloom.
- Practice Makes Perfect: Before applying any technique to your main project, grab some scrap wood or an old, discarded board. Practice your sanding, scraping, wet distressing, and washing techniques until you’re completely confident and satisfied with the results.
- Think About Natural Wear: When distressing, visualize where a piece of furniture would naturally show wear over time. Focus on prominent edges, corners, around handles and knobs, areas where hands frequently touch, or where feet might scuff the floor. This thoughtful approach ensures your distressed look appears authentic and organic, not forced.
- Layering is Key for Depth: For deep, rich, and truly captivating distressed looks, especially with painted finishes, consider layering multiple complementary or contrasting colors of paint or stain. This strategic layering adds incredible depth and visual interest when revealed through the distressing process.
- Always Seal Your Work: After you’ve achieved your desired distressed effect, it’s crucial to finish your piece with a protective topcoat. Options include furniture wax, polycrylic, or polyurethane. This step is essential not only to prevent further unwanted wear and tear but also to preserve and protect your beautiful new finish for years to come.
- Thorough Cleaning is Essential: Before you begin any distressing or painting, ensure your furniture piece is thoroughly cleaned, completely dry, and free of any loose debris, grime, or flaking old paint. Proper preparation is the foundation for any successful furniture makeover.
Which Distressed Finish Will You Try First to Transform Your Home?
We sincerely hope this comprehensive guide has not only answered your burning questions about distressed finishes but has also thoroughly inspired you to pick up your tools and embark on your very own furniture transformation journey. Distressing furniture is far more than just a simple technique; it’s an incredible opportunity to breathe new life into old pieces, create truly unique and personalized decor, and powerfully express your individual style throughout your home.
Whether you find yourself gravitating towards the subtle elegance of a distressed stain, the charming, time-worn appeal of distressed paint, the authentic, rugged age of a chippy paint finish, or the robust natural beauty of a barn wood finish, there is an entire world of creative possibilities waiting for you to explore. Each technique offers a distinct character, allowing you to curate a space that feels deeply personal and inviting.
So, we ask you: which of these captivating distressed finishing techniques is your favorite? Or perhaps you’re already envisioning a unique combination in mind? We’d love to hear your thoughts, ideas, and see your incredible creations! Happy distressing, and may your furniture tell a beautiful story!