
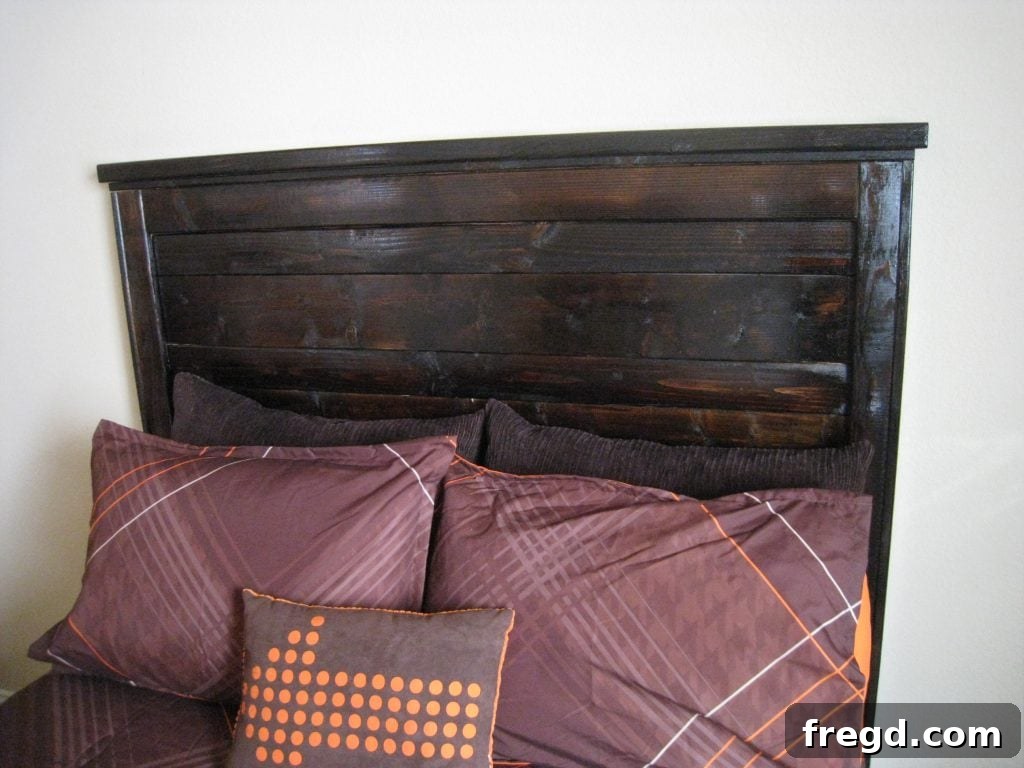
The journey to crafting bespoke furniture is always a rewarding one, and few projects offer as much satisfaction and rustic charm as a DIY reclaimed wood headboard. Today, we’re thrilled to unveil our completed Reclaimed Wood Headboard, a piece that perfectly marries sustainability with timeless style. This project was not only incredibly straightforward to construct but also remarkably quick, proving that a significant bedroom upgrade doesn’t require weeks of effort or advanced woodworking skills.
Transform Your Bedroom: Easy DIY Reclaimed Wood Headboard Plans
If you’ve been searching for a way to add character, warmth, and a unique focal point to your bedroom, building a reclaimed wood headboard is an excellent choice. This particular project stands out for its simplicity, taking approximately an hour to assemble once the wood pieces were cut to size. For those looking for detailed schematics, you can find the original inspiration and comprehensive plans on Ana White’s site, a fantastic resource for aspiring woodworkers. However, in this article, we’ll take you through our personal building experience, offering insights and tips to guide you through your own rewarding DIY adventure.
Why Choose Reclaimed Wood for Your Headboard?
Opting for reclaimed wood is a conscious decision that offers numerous benefits beyond just aesthetics. Environmentally, it’s a sustainable choice, giving old timber a new life and reducing demand for newly harvested lumber. Aesthetically, reclaimed wood brings unparalleled character. Each piece tells a story through its unique knots, grain patterns, nail holes, and weathered imperfections, ensuring your headboard will be truly one-of-a-kind. It effortlessly adds a rustic, farmhouse, or industrial chic vibe to any bedroom decor. Furthermore, aged wood often boasts superior stability and strength compared to new lumber, making it an excellent material for durable furniture.
Essential Tools and Materials for Your DIY Headboard Project
Before diving into construction, gathering your tools and materials is crucial. While the original build was straightforward, having the right equipment makes the process even smoother and safer. Here’s a comprehensive list:
Wood Selection:
- Reclaimed Wood Planks: The beauty of this project lies in the character of the wood. Look for planks that are relatively straight but embrace their natural imperfections. The original design used a pattern of 1×6 and 1×4 boards, creating visual interest. You’ll need enough to cover the width and height of your desired headboard. Ensure they are free from excessive rot or pests.
- Framing Lumber: For the sturdy outer frame that holds everything together.
Cutting & Assembly Tools:
- Miter Saw or Circular Saw: Essential for precise cuts. A miter saw offers excellent accuracy for repetitive cuts.
- Measuring Tape and Pencil: For accurate dimensions.
- Safety Glasses and Gloves: Always prioritize safety when working with power tools and wood.
- Ryobi Battery Brad Nailer: As highlighted in the original build, a brad nailer significantly speeds up assembly and minimizes visible fasteners.
- Gorilla Glue Wood Glue: A generous amount of high-quality wood glue is paramount. Glue provides structural integrity that nails alone cannot achieve, ensuring your headboard lasts for years.
- Clamps: Useful for holding pieces together while the glue dries, ensuring tight joints.
Finishing Supplies:
- Elmer’s Wood Filler: Perfect for concealing any visible nail holes or minor imperfections, creating a seamless surface.
- Putty Knife or Plastic Spreader: For applying and smoothing wood filler. The original builder cleverly used a plastic knife, proving improvisation can sometimes save the day!
- Sandpaper (various grits): From medium (120-150 grit) to fine (220 grit) for smoothing surfaces before staining.
- Minwax Dark Walnut Stain: For achieving that rich, deep color that accentuates the wood grain. Choose your preferred shade.
- Minwax Polycrylic Protective Finish: A water-based, clear topcoat that protects the wood and provides a durable, smooth finish without yellowing over time.
- Stain Rag/Brush and Applicator for Polycrylic: For even application of stain and sealant.
Step-by-Step Construction Journey: Bringing Your Headboard to Life
Here are some pictures of the steps I took in order, detailing the process from raw wood to a finished masterpiece.
1. Initial Assembly: Building the Foundation
I started by carefully placing one board on top of another. This initial step is critical for establishing the overall dimensions and ensuring your frame is square. For this headboard, we followed Ana White’s ingenious method, which involves starting construction from the backside. This clever technique significantly reduces the number of visible nail holes on the front, resulting in a cleaner, more professional finish—a huge plus for anyone who, like me, dislikes the tedious task of filling nail holes!
2. Constructing the Outer Frame
This image showcases the robust outside frame of the headboard. The frame provides the structural integrity, ensuring the entire piece is sturdy and capable of standing up to daily use. We meticulously cut these pieces to ensure they would perfectly encapsulate the inner panel, creating a solid foundation. Remember to apply a generous amount of wood glue to all mating surfaces before securing with nails from your brad nailer. Clamping these joints while the glue dries will further enhance their strength.
3. Crafting the Panel: The Alternating Pattern
Next, it’s all about the visual pattern! The design for this headboard ingeniously uses an alternating sequence of 1×6 and 1×4 planks. This creates a beautiful, dynamic texture that highlights the unique variations in each piece of reclaimed wood. Measure and cut your planks, ensuring they fit snugly within your frame. Again, apply wood glue to the edges and secure them from the back with your brad nailer. This method not only looks fantastic but also reinforces the entire structure.
4. Adding the Front Trim: The Polished Edge
This picture shows the trim being applied to the front side of the headboard. The trim serves multiple purposes: it conceals the raw edges of the internal planks, frames the entire piece, and adds a sophisticated, finished look. Precision in cutting these trim pieces is key for mitered corners and a professional appearance. Liberal use of wood glue and brad nails ensures they are firmly attached.
5. Continuing the Front Trim Application
More front trim! We continued to carefully apply the trim pieces around the perimeter, ensuring seamless joints and a consistent reveal. This step truly elevates the project from a simple panel to a piece of furniture art. The combination of glue and brad nails provides a strong, almost invisible hold.
6. A Moment of Reflection: “Lookin’ good!”
At this stage, with most of the trim in place, the headboard truly started to take shape, looking more and more like the finished article. It’s moments like these during a DIY project that fuel your motivation and reinforce the satisfaction of building something with your own hands. The character of the reclaimed wood was already shining through.
7. The Final Top Trim: Completing the Frame
With the sides and bottom trimmed, the final top trim piece was added. This completes the frame and provides a sturdy, flat surface along the top edge of the headboard. Again, wood glue and brad nails were used for a secure and lasting bond. The headboard was now fully constructed and ready for the finishing stages.
Tools of the Trade: Ryobi Brad Nailer and Gorilla Wood Glue
I cannot overstate the efficiency of my Ryobi Battery Brad Nailer in constructing this entire piece. Its cordless convenience and consistent power made assembly incredibly fast and straightforward. Coupled with a generous amount of Gorilla Glue Wood Glue, the resulting joints are incredibly strong and durable. The combination of a mechanical fastener (brad nails) and a strong adhesive (wood glue) is the golden standard in woodworking for maximum longevity and structural integrity.
Finishing Touches: Achieving a Flawless Surface
Even with careful construction, there are usually a few nail holes to address. I used Elmer’s Wood Filler to meticulously fill in any visible nail holes. As mentioned earlier, Ana White’s method of constructing from the back minimizes these, which is a huge relief for me as I strongly dislike the process of filling and sanding! For smoothing the wood filler, I grabbed the closest thing at hand – a plastic knife. While a dedicated putty knife would be ideal, this quick improvisation worked perfectly, demonstrating that you don’t always need specialized tools for every step.
Sanding: The Key to a Smooth Finish
After the wood filler dried completely, I moved on to sanding. This step is often underestimated but is critical for a professional finish. I started with a medium-grit sandpaper (around 120-150 grit) to smooth any rough areas and level the wood filler. Then, I progressed to a finer grit (220 grit) to achieve a silky-smooth surface, ensuring the stain would apply evenly and beautifully. Always sand with the grain of the wood for the best results.
Staining and Sealing: Unleashing the Wood’s Natural Beauty
Ahhh! There’s nothing quite like the rich, deep tones of stained wood. For this reclaimed wood headboard, I opted for two coats of Minwax Dark Walnut stain. This particular stain penetrates deeply, highlighting the unique grain and character of the wood while imparting a timeless, elegant hue. I applied it generously, allowing it to soak in, then carefully wiped off any excess to prevent a patchy finish. After allowing ample drying time between coats, I sealed the headboard with one coat of Minwax Polycrylic. Polycrylic is a fantastic, water-based protective finish that dries clear, resists yellowing, and provides excellent durability. It truly makes the wood pop and ensures the headboard will withstand the test of time. I am absolutely in LOVE with the outcome! My only regret is that this stunning piece isn’t destined for my own bedroom.
The Grand Reveal: A Perfect Match for the Full Storage Bed
And here she is, in all her glory, gracefully adorning the Full Storage Bed! The synergy between these two pieces is simply perfect. The rustic charm of the reclaimed wood headboard beautifully complements the practical design of the storage bed, creating a cohesive and inviting bedroom ensemble. If you’re inspired to create the complete look, you can find the detailed plans for the full storage bed by clicking HERE!
Conclusion: The Joy of DIY and Future Projects
I love, love, love how this headboard looks on the Full Storage Bed! The overall aesthetic is exactly what we envisioned, bringing a sense of rustic elegance and handcrafted charm to the space. This project has truly motivated me to tackle the rest of the bedroom. It’s a common, delightful phenomenon in the world of DIY: one successful project almost always leads to another, and I absolutely adore it! The satisfaction of creating functional, beautiful pieces for your home is unparalleled.
I hope this detailed guide encourages you to embark on your own DIY reclaimed wood headboard project. It’s an approachable build that yields stunning results, perfect for anyone looking to personalize their space. Wishing you all a fun and safe weekend filled with creative endeavors!