
Build Your Own Stunning Large Wooden Mirror for Under $50 – A Beginner-Friendly DIY Guide!
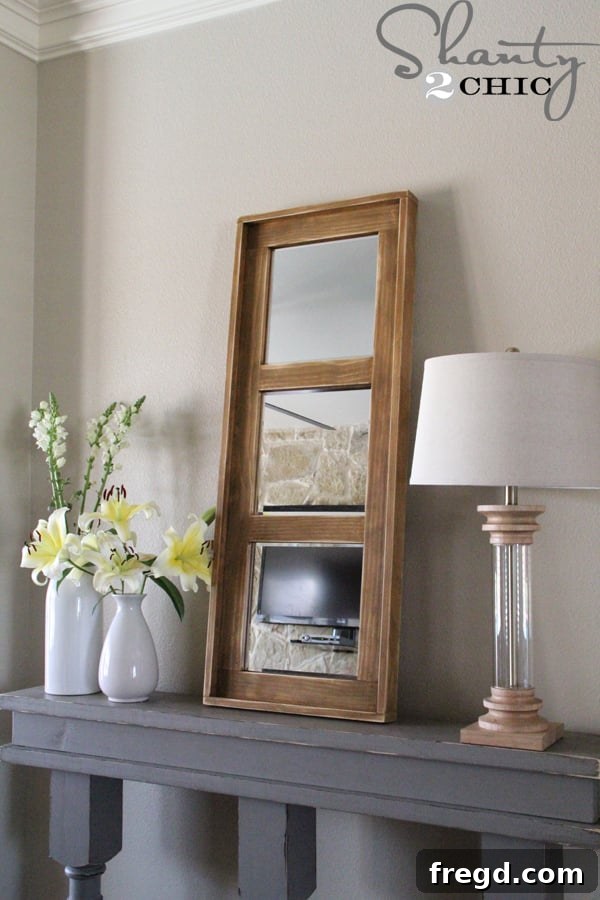
Hey there, DIY enthusiasts! Are you ready to tackle an incredibly rewarding project that will transform your living space without breaking the bank? Today, I’m thrilled to share a detailed guide on how to create the gorgeous, oversized wooden mirror you might have spotted gracing the top of my DIY Console Table last week. This project isn’t just about building a mirror; it’s about crafting a statement piece that exudes charm and elegance, all while being incredibly budget-friendly and perfect for beginners.
Imagine a beautiful, large mirror, standing over 4 feet tall, ready to brighten any room – from your entryway to your bedroom, or even as a focal point in your living area. What if I told you that this impressive piece of home decor cost me around $30 in materials? Yes, you read that right! This project is super easy, requires minimal tools, and is absolutely perfect for anyone new to woodworking. Get ready to impress your friends and family with your new handmade masterpiece!
Why Choose a DIY Wooden Mirror?
Custom-made mirrors can often come with a hefty price tag, especially when you’re looking for larger sizes or specific frame styles. By building your own, you gain complete control over the dimensions, finish, and overall aesthetic, ensuring it perfectly complements your existing decor. This DIY mirror offers:
- Significant Cost Savings: At an estimated $30-$50, this project is a fraction of the cost of similar retail mirrors.
- Customization: Choose your wood type, stain or paint color, and even adjust the dimensions to fit your unique space.
- Beginner-Friendly: The steps are straightforward, making it an excellent entry point into woodworking and DIY home projects.
- Personalized Touch: There’s immense satisfaction in creating something beautiful and functional with your own hands.
- Versatile Design: The classic wooden frame design adapts well to various interior styles, from farmhouse and rustic to modern minimalist.
Materials You’ll Need for Your DIY Mirror Project
Before we dive into the construction, let’s gather all our materials. Planning ahead ensures a smooth and efficient building process.
- Plywood: One piece of 3/4″ thick plywood, cut to 46″ x 17″. (A 2’x4′ panel is usually sufficient). We used Purebond Plywood for its quality and formaldehyde-free composition.
- Common Boards (1x3x8): Three 1x3x8 boards (standard pine or common board).
- Mirrors: Several 12″ x 12″ beveled mirrors (we used 4 for our design, but quantity may vary based on your layout). Look for sales at craft stores like Hobby Lobby; we snagged ours for about $2.50 each!
- Wood Glue: High-quality wood glue like Elmer’s ProBond, which offers an incredibly strong bond on various materials without a strong odor.
- Wood Stain or Paint: Your preferred finish (we used Rust-Oleum Wheat Stain).
Tools Required: Simple & Efficient
You don’t need a professional workshop for this project. Here are the tools that will make your DIY mirror building a breeze:
- Circular Saw: Essential for cutting your plywood and common boards to size.
- Kreg Jig Rip Cut (Optional, but Recommended): If you’re working with scrap plywood or don’t have a table saw, this attachment for your circular saw is a game-changer for straight, precise rip cuts. It’s incredibly affordable and space-saving.
- Brad Nailer (or Hammer and Nails): For quickly and securely attaching your frame pieces. A brad nailer makes the job much faster and leaves smaller holes.
- Sander: A random orbital sander or a detail sander (like a Corner Cat Sander) with 80-grit sandpaper for prepping wood and distressing.
- Measuring Tape & Pencil: For accurate measurements and markings.
- Safety Glasses & Ear Protection: Always prioritize safety when working with power tools.
- Clean Rags: For applying and blending stain.
- Box Cutter: For removing foam pads from mirrors.
Let’s Get Started: Your Step-by-Step DIY Mirror Tutorial
Step 1: Preparing Your Plywood Base
Our journey begins with the foundation of your mirror: the plywood backer. I started with a piece of scrap Purebond Plywood, which I cut down to a precise 46 inches by 17 inches. This size provides a sturdy and appropriately sized base for our planned mirror layout.
Since I was working with a larger scrap piece from another project, I found my Kreg Jig Rip Cut to be an absolute lifesaver. This fantastic tool attaches to your circular saw, transforming it into a precise rip-cutting machine, perfect for achieving straight cuts without the need for a bulky table saw. It’s an incredibly smart investment if you have limited workshop space or aren’t ready to commit to a larger saw. You can often find it for around $30-$40 online with free shipping!
Pro Tip for Beginners: If you don’t own a circular saw or have scrap plywood, don’t fret! Simply purchase a 2’x4′ sheet of 3/4″ thick plywood at your local hardware store. Most stores offer cutting services, so they can precisely cut your panel down to 46″x17″ for you, often for free or a small fee. This makes the project even more accessible!
Step 2: Cutting Your Frame Boards
Next up, we’ll create the inner framework for our mirror. I purchased three standard 1x3x8 common boards. From these, you’ll need to make the following cuts:
- Two pieces at 41 inches long (for the vertical sides of the main frame).
- Two pieces at 17 inches long (for the top and bottom of the main frame).
- Two pieces at 12 inches long (these will serve as horizontal dividers within the mirror grid).
Accuracy here is key for a flush and professional-looking finish. Double-check your measurements before making any cuts.
Step 3: Assembling the Main Frame
Now, let’s bring our mirror frame to life! I used my trusty brad nailer for speed and precision, but you can also use wood glue and small finish nails (and a hammer) if you don’t have a nailer. First, attach the two 17-inch boards to the top and bottom edges of your plywood panel. Ensure these pieces are flush with the ends of the plywood. A little wood glue along the contact points before nailing will provide extra strength and durability to your frame.
Next, secure the two 41-inch pieces along the vertical sides of the plywood, making sure they are also flush with the edges. This forms the main rectangular frame. Finally, it’s time to add the internal 12-inch pieces. These will act as horizontal dividers for your mirrors. I placed the bottom 12-inch piece 14.5 inches from the bottom edge of the plywood, and the top 12-inch piece 14.5 inches from the top edge. This creates three distinct, evenly spaced openings for your mirrors.
Step 4: Adding the Decorative Trim
To give our mirror a polished and finished look, we’ll add an outer trim. Using the remaining parts of your 1×3 boards, cut two pieces at 46 inches long and two pieces at 18.5 inches long. These dimensions are designed to perfectly frame the entire assembled piece, overlapping the edges slightly for a clean aesthetic.
For attaching the trim, I highly recommend using a combination of your brad nailer and Elmer’s ProBond glue. This glue is absolutely amazing – it’s odorless, incredibly strong, and creates a lasting bond on various materials, including wood, metal, and glass. It’s a true workhorse for DIY projects!
Start by attaching the two 46-inch trim pieces to the top and bottom edges of your frame. Apply a generous bead of ProBond glue, then secure them with brad nails. Once those are in place, add the two 18.5-inch trim pieces to the vertical sides. This method ensures all edges are beautifully enclosed, hiding any raw plywood edges and giving your mirror a truly custom, built-in look.
Step 5: Preparing for Your Chosen Finish
With the frame fully assembled, it’s time to prepare the wood for its finish. Proper preparation is crucial for a smooth, professional result.
I used my Corner Cat Sander and quickly went over the entire piece with 80-grit sandpaper. The goal here is not to completely strip the wood, but to smooth out any rough spots, splintered edges, and prep the surface for optimal stain absorption. Don’t skip this step – a well-sanded surface makes a world of difference in the final appearance of your stained or painted piece.
Step 6: Staining Your Wooden Mirror Frame
For this project, I chose Rust-Oleum Wheat stain, and I can’t recommend it enough! It provides a beautiful, warm, and rich tone that instantly elevates the look of the wood. If “Wheat” isn’t your style, feel free to choose any stain color that matches your home decor, or even paint it for a bolder statement.
To apply the stain, I used a clean rag. Apply one even coat, allowing it to sit for approximately 5 minutes. This allows the pigment to penetrate the wood fibers. After 5 minutes, gently wipe the excess with a separate clean rag. The key here isn’t to wipe off all the stain, but rather to blend it smoothly and evenly across the surface. As you can see in the picture, Rust-Oleum stains deliver incredible richness with just one coat and typically dry within an hour, making them a favorite for quick and impactful projects!
Step 7: Distressing for a Rustic Charm
Once your stain has thoroughly dried (usually within an hour with Rust-Oleum), it’s time to add character! I used my sander again with an 80-grit sandpaper to strategically distress the edges and corners of the entire mirror frame. This step beautifully highlights the natural wood beneath the stain, giving it an authentic, worn-in, and rustic or farmhouse aesthetic. Don’t be afraid to experiment a little to achieve your desired level of distressing – a lighter touch for subtle wear, or more pressure for a more aged look.
Step 8: Installing Your Beveled Mirrors
Now for the sparkling star of our project – the mirrors! I found these super cheap 12×12 beveled mirrors at Hobby Lobby during a 40% off sale, making them an incredible steal at around $2.50 each. Always keep an eye out for sales at craft stores, as mirrors can often be the most expensive component. You’ll need four 12×12 mirrors for this design to fit perfectly into the sections we created with the internal 12-inch boards.
Most inexpensive mirrors come with small foam pads on the back corners. Before attaching them, flip your mirrors over and carefully remove these foam pads using a box cutter. This ensures the mirror sits flush against the plywood backer and allows for a strong, even bond with the adhesive.
To securely attach the mirrors to the wooden frame, I used a generous amount of Elmer’s ProBond glue. Apply the glue to the back of each mirror, focusing on the edges and a few spots in the center. Ensure you use enough to create a strong bond but not so much that it oozes out the sides when pressed.
Carefully place one mirror into each of the four designated spots on the frame, pressing down firmly to ensure good contact with the glue. Once all mirrors are in place, leave the entire piece undisturbed to dry for at least 24 hours. This curing time is essential for the ProBond to achieve its maximum strength, ensuring your mirrors are securely fixed.
Displaying Your Magnificent DIY Mirror
Once completely dry, your stunning large wooden mirror is ready for its debut! I love the look of it simply propped against the wall on top of my console table – it adds a relaxed, casual elegance. However, if you prefer to hang it, you can easily attach sturdy picture hanging wire or D-rings to the back of the plywood frame. Always ensure you use appropriate wall anchors or hang it directly into wall studs for maximum safety, especially given its size.
And there you have it! An absolutely gorgeous, super easy, inexpensive, and impressively large DIY wooden mirror. It’s truly a statement piece that adds so much character to any room. We love seeing your creations, so please don’t hesitate to share your finished mirrors with us!
Elevate Your Home with More DIY Mirror Projects!
If you loved this project, you’re in luck! We’ve created many other easy DIY mirror tutorials that cater to various styles and skill levels. Click the images below to explore more fantastic ways to add reflective beauty to your home!
We always appreciate your shares and pins – it helps us continue to bring you amazing DIY content!
Thanks so much for stopping by and happy building!
~Ashley