
Build Your Ultimate Kreg Jig Workbench: A Step-by-Step Guide for Woodworking Beginners
Hello fellow DIY enthusiasts and woodworking adventurers! If you’re anything like me, your garage or workshop can quickly become a battleground of tools, materials, and half-finished projects. Recently, I declared a “project organization” weekend at my house, and let me tell you, one particular project was long, *long* overdue: creating a dedicated workspace for my Kreg Jig.
For those who have a Kreg Jig still sitting in its box, gathering dust, or perhaps you’re on the fence about finally investing in one, this project is your perfect gateway into the world of pocket hole joinery. It’s remarkably simple, incredibly rewarding, and will finally give you a proper spot to work with your Kreg Jig, rather than resorting to the garage floor – not that I’ve ever done that, of course! 😉
Transform Your Woodworking with a Dedicated Kreg Jig Station
I’m thrilled to announce that my beloved Kreg Jig finally has a permanent, organized home, and I’ve gained a fantastic new woodworking station in the process. This isn’t just any workbench; it’s specifically designed to complement the efficiency and precision of the Kreg Jig system. It elevates your work, literally and figuratively, from awkward floor-level bending to comfortable, eye-level crafting. Say goodbye to searching for your jig, clamping to random surfaces, or struggling with uneven work areas. This workbench brings order and functionality to your Kreg Jig projects, making every cut and joint a pleasure.
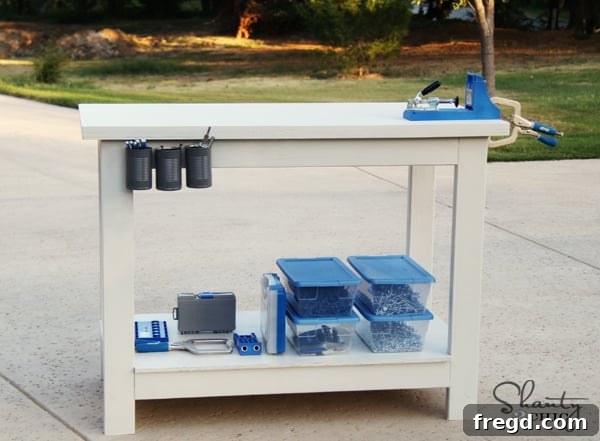
Check out my newly completed Kreg Jig workbench – I absolutely love it!
This is truly a very easy, basic build, making it an excellent woodworking project for beginners. The beauty of this project lies in its simplicity and the clear, detailed guidance available. You can grab the free plans for this Kreg Jig workbench directly from Kreg Jig’s official website! These plans are designed for clarity, ensuring even first-time builders can follow along with confidence and achieve professional-looking results. They walk you through every cut, every pocket hole, and every assembly step, minimizing guesswork and maximizing your success.
Embarking on Your Workbench Build: From Cuts to Assembly
From start to finish, including all the cutting and assembly, this project took me approximately two hours. This timeframe makes it perfect for a weekend project or even a dedicated afternoon session. The key to a smooth build process begins with meticulous preparation and following the plans diligently. I started by making all my necessary cuts, ensuring each piece of lumber was precisely measured and cut according to the specifications provided in the Kreg plans. Accuracy in this initial stage is paramount for a sturdy and square workbench.
The Kreg project plan printout is incredibly user-friendly. It not only provides exact dimensions for each cut but also clearly illustrates where you need to make your pocket holes and what size settings to use on your Kreg Jig. After cutting all my boards, I proceeded to create all the pocket holes. This systematic approach—cutting all pieces first, then drilling all pocket holes—streamlines the process, allowing for efficient workflow and reducing the chances of errors. It’s a method that seasoned woodworkers often employ, and it’s a great habit for beginners to adopt.
For all the structural joints in this workbench, I relied on our absolute favorite wood adhesive: Gorilla Wood Glue. Using a high-quality wood glue in conjunction with pocket screws creates an incredibly strong and durable bond, far superior to screws alone. The glue fills any tiny gaps, preventing movement and ensuring your workbench stands up to years of use and abuse. Apply a thin, even layer to mating surfaces before driving your pocket screws, and clamp the joints while the glue cures for optimal strength. This extra step, though seemingly minor, significantly enhances the integrity and longevity of your finished piece.
Here are a few process pictures to give you a better visual of how the assembly came together. These images capture key moments during the construction, demonstrating the straightforward nature of pocket hole joinery. You’ll see how the pre-drilled pocket holes facilitate quick and accurate fastening, pulling the wood pieces together to form a robust frame. Notice how simple clamps can be your best friend during this stage, holding pieces steady while you drive the screws. This visual walkthrough should inspire confidence and illustrate just how achievable this project is for anyone, regardless of their prior woodworking experience.
When it came to selecting the material for my workbench top, I consciously chose hardwood plywood panels over MDF (Medium-Density Fiberboard). While MDF is often a cheaper alternative and offers a smooth surface, I’ve found that it tends to ding and show wear very quickly in a workshop environment. Hardwood plywood, on the other hand, offers superior durability and resistance to impact. It’s a tougher surface, better suited for the demands of woodworking, and significantly easier to paint, providing a smoother, more resilient finish that holds up well over time. This choice was definitely a win-win for both aesthetics and functionality, ensuring my workbench will endure countless projects.
Here is the underside of my base as I meticulously attached it to the top. This step is crucial for creating a unified and stable working surface. Utilizing pocket holes from the underside allows for a clean, fastener-free top surface, which is ideal for clamping and working without obstructions. I ensured the base was perfectly aligned with the plywood top, then securely fastened them together with pocket screws, again using wood glue for an extra layer of strength and to prevent any potential squeaks or movement. The result is a solid, integrated structure that feels incredibly stable.
Finishing Touches: Painting and Smart Organization
And that’s essentially it for the core build! It truly is that simple. The instructions provided by Kreg Tool are exceptional for beginners, making this an ideal first project for anyone looking to get comfortable with their Kreg Jig. I cannot stress enough how perfect this project would be to kick off your woodworking journey or to finally get that Kreg Jig out of its box. You’ll thank me, I promise you that. 😉 The sense of accomplishment from building something so functional with your own hands, especially as a beginner, is incredibly motivating.
After the construction was complete, it was time to add some personal flair and practical organization. I opted to paint my workbench a light gray. The choice was purely personal – I simply wanted that color, and I thought it looked fantastic paired with the vibrant blue of the Kreg Jig itself. A fresh coat of paint not only protects the wood but also brightens up the workspace, making it a more inviting and inspiring place to create. Don’t underestimate the power of color to transform a functional item into a beloved piece of workshop furniture.
One of my perpetual workshop struggles has always been fumbling around for the right drill bit or driver bit. And let’s not forget the constant need for a readily available pencil! To solve this common organizational headache, I decided on a simple yet effective solution: upcycled cans. I spray-painted some empty cans to match my workbench aesthetic and then securely attached them to the front apron of the bench. This provides convenient, easily accessible storage for all those small, frequently used items. It’s a bit “shanty” in its origin, but oh so chic in its execution, wouldn’t you agree? This simple hack saves so much time and frustration, keeping essential tools right where I need them.
Beyond the bits and pencils, I now have a dedicated and easily accessible place for my pocket hole screws as well. This small detail might seem minor, but having every component of your Kreg Jig system organized and within arm’s reach significantly speeds up your workflow and keeps your workspace tidy. No more scrambling through various boxes or containers to find the right screw length! Everything has its designated spot, making every project more efficient and enjoyable.
And let’s not forget to mention the most important part, the guest of honor, the star of the show… my Kreg Jig, nestled perfectly in its new home on the workbench! It’s such a satisfying feeling to have it securely mounted and ready for action, without needing to clamp it down to an improvised surface. The stability it gains from being integrated into a dedicated bench enhances its precision and ease of use. It really is a game-changer for anyone who regularly uses pocket hole joinery.
Awww, isn’t that so much better than the floor? The difference in comfort, efficiency, and overall woodworking experience is monumental. My only regret after finishing this project was asking myself: why didn’t I tackle this task a year ago?! The benefits of a dedicated, organized, and ergonomic workspace are truly invaluable, transforming the entire process of woodworking from a chore into an even more enjoyable hobby.
For those who prefer visual learning or want an even more in-depth look at the construction process, you can also check out a complete video walkthrough of this project. These videos often provide additional tips and tricks that complement the written plans, making your build even smoother. Follow the links below to watch the step-by-step guides:
Thanks so much for stopping by and taking the time to read about my new Kreg Jig workbench! I hope this detailed guide inspires you to create your own dedicated woodworking space. Don’t forget to download the free plans for the workbench HERE to get started today! Happy building!
~Whitney