
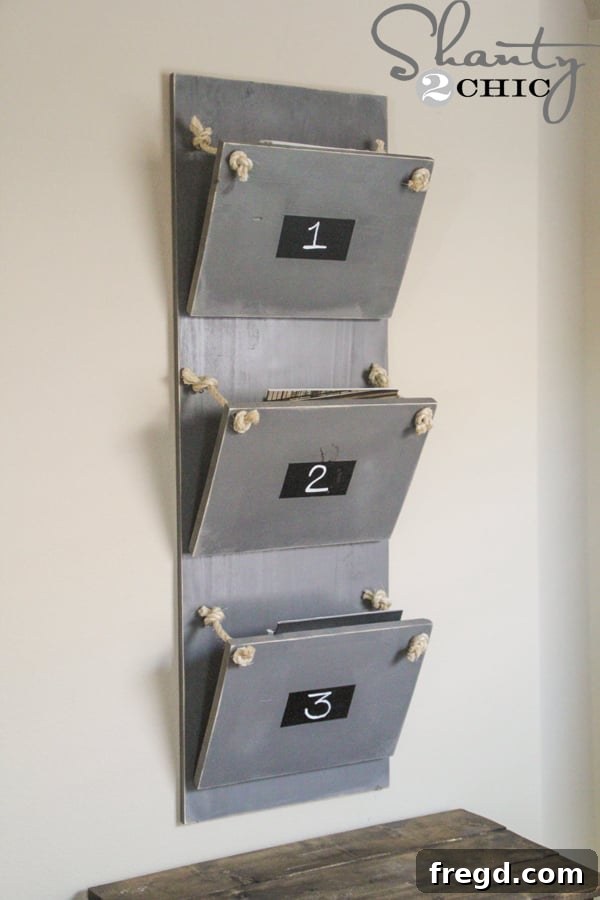
DIY Magazine Rack: Crafting Stylish Fall Decor for Your Family Room
There’s a special charm to autumn, isn’t there? As the leaves turn golden and a crisp coolness fills the air, there’s nothing quite as comforting as snuggling up with a warm cup of coffee and flipping through the pages of a beloved magazine. For those who, like me, find immense joy in the cozy ambiance of fall and the inspiration found within seasonal decor magazines, having a beautiful and organized way to display them is essential. That’s precisely why I embarked on this delightful DIY project to create a custom magazine rack for our family room – a piece that perfectly blends functionality with rustic charm, and best of all, you can build it too!
This DIY magazine holder isn’t just a practical storage solution; it’s a statement piece that embodies some of my favorite decor elements: the sophisticated touch of gray, the natural texture of rope, and the playful versatility of chalkboard paint. What makes this project even more appealing is its incredible simplicity and affordability. Requiring only a handful of basic tools – primarily a drill – and costing less than $20 to construct, it’s an ideal weekend project for anyone looking to add a personalized touch to their home decor without breaking the bank. Get ready to transform your living space with this charming and easy-to-make display!
Embracing the DIY Spirit: Inspiration and Partnership
This particular project was born out of inspiration for the ScotchBlue™ Ready, Set, Paint Blog Hop Party – an exciting event that celebrates creativity and the transformative power of paint. We’re thrilled to be part of this collaborative journey, showcasing how simple materials and a splash of color can lead to stunning results. As an added bonus, and to fuel your own DIY adventures, we’re also hosting a fantastic giveaway for a $200 Home Depot Gift Card! Imagine all the possibilities for your next home improvement venture with that kind of boost. Stay tuned for more details on how you can enter this amazing giveaway later in the post. But first, let’s dive into the step-by-step process of crafting your very own DIY Magazine Holder!
Gather Your Materials: What You’ll Need
Before you begin any DIY project, a well-organized workspace and all your materials at hand are key to a smooth process. For this rustic-chic magazine rack, the material list is refreshingly short and budget-friendly. You’ll primarily be working with common wood panels and a few hardware store essentials. Remember, the beauty of DIY lies in its flexibility, so feel free to adapt these suggestions to your personal style or what’s readily available at your local hardware store. This project is a testament to how humble materials can be transformed into something truly special.
Step 1: Selecting and Cutting Your Wood Panels
To start, head to your local hardware store and purchase two main pieces of wood: a 1×16 project panel measuring 4 feet long and a 1×12 project panel also 4 feet long. These dimensions provide the perfect base for a sturdy and spacious magazine holder. The 1×16 will serve as the back panel of your rack, providing stability and the main display surface, while the 1×12 will be cut into the dividers that hold your magazines in place. If you don’t own a saw, don’t worry! Most hardware stores offer cutting services. Simply ask them to cut the 1×12 board into three equally sized pieces, each measuring 15 inches. This ensures precise cuts and saves you time and effort.
Step 2: Preparing Your Panels with a Base Coat
Once your wood pieces are cut to size, it’s time to add the first layer of character to your magazine rack. For this project, I opted for Rust-Oleum Granite spray paint on both the 1×16 back panel and all three 1×12 divider pieces. This choice provides a sleek, modern, yet subtly textured finish that perfectly complements the rustic aesthetic we’re aiming for. When spray painting, ensure you work in a well-ventilated area and lay down a drop cloth to protect your surroundings. Apply thin, even coats, moving the can steadily from side to side to avoid drips. Make sure to spray the front and back of each 1×12 divider, as they will be visible from different angles. Allow ample drying time between coats and before proceeding to the next step, following the manufacturer’s instructions for best results.
Step 3: Gathering Hardware Essentials
With your wood panels painted and drying, turn your attention to the hardware components that will bring this magazine rack to life. You’ll need a package of 7/8-inch cup hooks. These small but mighty hooks will be crucial for holding the decorative and functional rope elements. Additionally, purchase three sets of 2 1/2-inch hinges. These hinges will allow the divider panels to pivot slightly, making it easier to access and organize your magazines while also adding a subtle industrial touch to the overall design. Selecting good quality hardware will ensure the durability and longevity of your finished magazine holder.
Step 4: Installing the Hinges on Dividers
Now, let’s attach the hinges to the divider boards. This step requires a bit of precision to ensure the dividers hang correctly and are evenly spaced. Take each of your three 1×12 divider boards. On the back of each board, install two hinges. Position each hinge approximately 1 1/2 inches in from each side. This placement ensures that the hinges are securely anchored and provide adequate support for the divider. Use a pencil to mark the screw holes, and pre-drill small pilot holes if necessary to prevent the wood from splitting. This will make driving the screws much easier and create a clean, professional finish. Ensure the hinges are aligned straight for optimal functionality.
Step 5: Attaching Dividers to the Back Panel
With the hinges secured to the divider boards, it’s time to attach them to the main 1×16 back panel. Flip the 1×12 dividers over so the hinges are now facing upwards, ready to be connected to the back panel. A good strategy for even spacing is to start with the middle board. Mark the exact center of your 1×16 back panel, and then align the middle 1×12 divider with this mark. Secure the hinges to the back panel, again pre-drilling pilot holes if desired. Once the middle divider is firmly in place, you can then position the top and bottom boards. While you can “eyeball” their placement for a more organic look, if you prefer precise symmetry, measure the distance between the middle and outer edges to ensure even gaps. This step truly brings the structure of your magazine rack together.
Step 6: Drilling Holes for the Rope Mechanism
The rope detail is a signature element of this magazine rack, adding both aesthetic appeal and practical function by holding magazines in place. To create the attachment points for the rope, you’ll need to drill specific holes. Using a 10mm drill bit, carefully drill one hole in the top corner of each of the three 1×12 divider boards. For consistent placement, I measured 1 inch in from the top edge and 1 inch in from the side edge of each board before drilling. This ensures a uniform look across all your magazine compartments. Take your time with this step, ensuring your drill bit is steady and level to create clean, well-placed holes.
Step 7: Preparing for Cup Hooks
Next, you’ll create pilot holes for the cup hooks. These tiny holes will guide the cup hooks into place without needing excessive force and will prevent the wood from splitting. Using a much smaller 1/16-inch drill bit, drill through the previously made 10mm holes in the 1×12 dividers, continuing just enough to create a small indentation or shallow hole in the 1×16 back board. You don’t need to drive the bit very far into the back board – just a small starter hole is sufficient. This precise alignment ensures that the cup hooks will be perfectly positioned to hold the rope tautly and securely, enhancing both the look and stability of your magazine storage.
Step 8: Installing the Cup Hooks
Now, it’s time to install the cup hooks themselves. Carefully screw one cup hook into each of the small pilot holes you just created in the 1×16 board. The small pre-drilled holes should make this process relatively easy. Twist the cup hooks clockwise until they are firmly seated. As you finalize the twisting, ensure that the open end of each cup hook is facing towards the top of the 1×16 back panel. This orientation is crucial for easily threading and securing the rope in the next step, ensuring the rope stays in place and holds your magazines effectively. This detail, though small, greatly contributes to the functionality and clean finish of your DIY magazine rack.
Step 9: Preparing and Attaching the Sisal Rope
The sisal rope adds a wonderful touch of rustic elegance to this DIY magazine holder, providing both visual interest and the practical function of keeping your magazines neatly contained. I purchased a roll of natural sisal rope for its texture and durability. From this roll, cut six pieces, each measuring 14 inches in length. At one end of each 14-inch piece, tie a simple, secure knot. These knots will prevent the rope from pulling through the holes in the divider boards. The natural fibers of sisal rope can sometimes fray, so you might consider dipping the ends in a little glue or wrapping them with tape before tying the knots for a cleaner finish, although the rustic look also has its charm.
Once your six rope pieces are prepared with a knot on one end, it’s time to integrate them into your magazine rack. Thread each piece of rope through the corresponding 10mm hole in the 1×12 divider board, ensuring the knotted end is on the inside (magazine-holding side) of the divider. Pull the rope through until the knot catches against the wood. Next, on the other end of the rope, tie another knot. I found that placing these knots approximately 5 inches apart created the ideal tension and loop size for holding magazines. Once this second knot is tied, hook the middle of this newly formed loop onto the cup hook that is aligned with that divider board. This creates a functional and visually appealing “sling” for your magazines, completing the core structure of your DIY magazine holder.
Adding Personalization: Chalkboard Labels
Now for the really fun part – adding the personalized touch that makes this magazine rack truly yours! Chalkboard labels are not only incredibly practical for organizing your magazines by category (think “Fall Home,” “Gardening,” “DIY Projects”), but they also add a charming, customizable element to the rustic design. This feature allows you to change labels with the seasons or as your interests evolve, keeping your decor fresh and engaging. It’s a simple addition that makes a huge impact on both the functionality and aesthetic appeal of your new home accessory.
Step 10: Marking Out Your Chalkboard Labels
To ensure neat and uniform chalkboard labels, precise marking is crucial. Decide on the size and placement of your labels. I opted for a 5×3 inch rectangle for each label, which I felt was an ideal size for visibility and balance on the 1×12 divider boards. Using a ruler and a pen or pencil, carefully mark off a 5×3 inch rectangle right in the middle of each of your three divider boards. Take your time to measure accurately and draw clear lines, as these will guide your taping and ensure your chalkboard sections are perfectly aligned and proportionate. This attention to detail will elevate the overall finish of your DIY magazine rack.
Step 11: Taping Off for Clean Edges with ScotchBlue™ Painter’s Tape
Achieving crisp, clean lines for your chalkboard labels is essential, and this is where quality painter’s tape truly shines. I used ScotchBlue™ Painter’s Tape, known for its Edge-Lock technology which helps seal out paint and deliver sharp paint lines. Carefully apply the painter’s tape around the perimeter of each 5×3 inch rectangle you marked on the divider boards. Press down firmly along all the edges of the tape to ensure a tight seal. This step is critical to prevent any paint bleed, giving you those professional-looking, razor-sharp edges that make a DIY project stand out. Don’t rush this part; a few extra minutes spent here will save you touch-up time later.
To further protect your previously painted “granite” finish and prevent any accidental overspray, add more painter’s tape or even some newspaper around the taped-off rectangle. This creates a larger barrier, ensuring that your chalkboard paint only lands where it’s intended. While ScotchBlue™ Painter’s Tape is excellent at preventing bleed, an extra layer of protection against general overspray is always a good idea, especially when using spray paint. This simple precaution will save you from potential cleanup or the need to repaint sections of your magazine rack, ensuring a flawless finish for your custom labels.
Step 12: Applying Chalkboard Paint
With your labels meticulously taped off, it’s time to apply the chalkboard paint! I used Rust-Oleum Chalkboard spray paint, which provides a durable and easily writable surface. Apply two even coats of the chalkboard spray paint within the taped-off rectangle on each divider board. Remember to keep the can moving and maintain a consistent distance for a smooth, even finish. Allow adequate drying time between coats as per the product instructions to ensure proper adhesion and a robust finish. Two coats usually provide excellent coverage, creating a deep, rich black surface that’s perfect for chalk. This step will transform your functional dividers into interactive and charming organizational tools.
Once the final coat of chalkboard paint has been applied, allow it to dry completely. Patience here is key! Rushing this step can lead to smudges or an uneven finish. Refer to the paint can for recommended drying times, which can vary based on humidity and temperature. After the paint is thoroughly dry to the touch and cured, it’s the moment of truth: carefully peel away the ScotchBlue™ Painter’s Tape. You’ll be delighted to reveal perfectly crisp, clean chalkboard rectangles, ready for your personalized labels. This satisfying reveal marks a significant milestone in your DIY magazine rack project, bringing your vision to life with precision and style.
Step 13: Optional Distressing for an Aged Look
As a final touch to enhance the rustic aesthetic of the magazine rack, I decided to distress the edges. This step is entirely optional but can add a beautiful aged, worn look that complements the granite paint and sisal rope perfectly. While I did this as an afterthought, ideally, distressing is best done before you attach the rope and hardware. If you plan to distress, consider doing it immediately after painting the panels, before any assembly or hardware installation, for easier access to all edges. I used my Ryobi Corner Cat sander to gently distress every edge, revealing hints of the natural wood underneath and creating a charming, vintage feel. If you don’t have a power sander, sandpaper by hand works just as well to achieve this effect. This subtle detail truly completes the farmhouse-chic look of the DIY magazine holder.
Your Finished DIY Magazine Rack!
And just like that, your beautiful, custom-made DIY magazine rack is complete! It’s a testament to how straightforward materials and a touch of creativity can transform a simple concept into a practical and stylish piece of home decor. This project not only provides an organized spot for your favorite periodicals but also adds a unique character to any room, especially your family room where comfort and accessibility are key. The combination of the sophisticated gray finish, the organic texture of the sisal rope, and the customizable chalkboard labels creates a harmonious blend that is both functional and aesthetically pleasing.
This quick, easy, and undeniably cute way to display all of your magazines is perfect for the fall season, inviting you to relax and enjoy your favorite reads. I truly believe that your guests will not only admire its craftsmanship but also appreciate the thoughtful organization it brings to your living space. Imagine all your favorite autumn-themed magazines, home decor guides, or even children’s books neatly arranged and easily accessible. It’s more than just a holder; it’s an invitation to curl up and enjoy the simple pleasures of home. Beyond its immediate use, this magazine rack is versatile enough to hold craft supplies, catalogs, or even small art prints, making it a truly adaptable piece for any home.
This post was brought to you in partnership with The Home Depot and ScotchBlue™ Painter’s Tape. Their support helps us bring these inspiring DIY projects to life for our readers.
Enter Our Exciting Giveaway!
Now for the moment you’ve been waiting for – the giveaway details! To celebrate this creative collaboration and encourage more DIY passion, we are giving one lucky winner a $200 Home Depot Gift Card! That’s an incredible amount of funds to put towards your next big (or small) home improvement project, new tools, or materials for another fabulous DIY creation. Don’t miss this opportunity to fuel your crafting dreams and tackle those projects you’ve been dreaming about. Entering is simple, so make sure you throw your hat in the ring for a chance to win this fantastic prize!
a Rafflecopter giveaway
After you have entered the giveaway, don’t forget to explore the incredible array of projects from other talented bloggers participating in the Ready, Set, Paint Blog Hop! You’ll find a wealth of inspiration and creative ideas, all featuring the versatility and quality of ScotchBlue™ Painter’s Tape and various other fantastic products. It’s a treasure trove of DIY brilliance, guaranteed to spark your next project.
Check out these amazing transformations and ideas from fellow bloggers:
Centsational Girl – Textured Panel Dresser Makeover,
Thrifty and Chic Framed Stencil Wall,
The Design Confidential DIY Concrete Color Block Painted Tables,
Sand & Sisal Faux Etched Glass,
The Girl Creative Summer Chalkboard,
PB & J Stories Dipped Effect Outdoor Bench and Front Patio Makeover,
In My Own Style How to Paint Outdoor Furniture,
Making this Home Embellish with a Paint Border,
Rustic Bench Gets Modern Moroccan-Inspired Makeover,
DIY Game Table,
Fun with Fireworks,
Charles & Hudson – Wood Block Planter,
Love of Family and Home – DIY Striped Curtain,
LollyJane – Mailbox Makeover,
Nesting Place – Painting with Chalk,
Thistlewood Farms: How to Paint Stripes,
Live Laugh Rowe: DIY Drop Cloth Table Runner,
SawdustGirl – Spray-Painted-Striped Lemonade Stand Canopy,
Make It: Painted Horseshoes,
DIY Pet Food Station,
Spearmint Color Blocked Vintage Wicker Headboard,
DIY Mason Jar Dining Caddy,
Build a Large Wall Frame for a Chalkboard or Mirror