
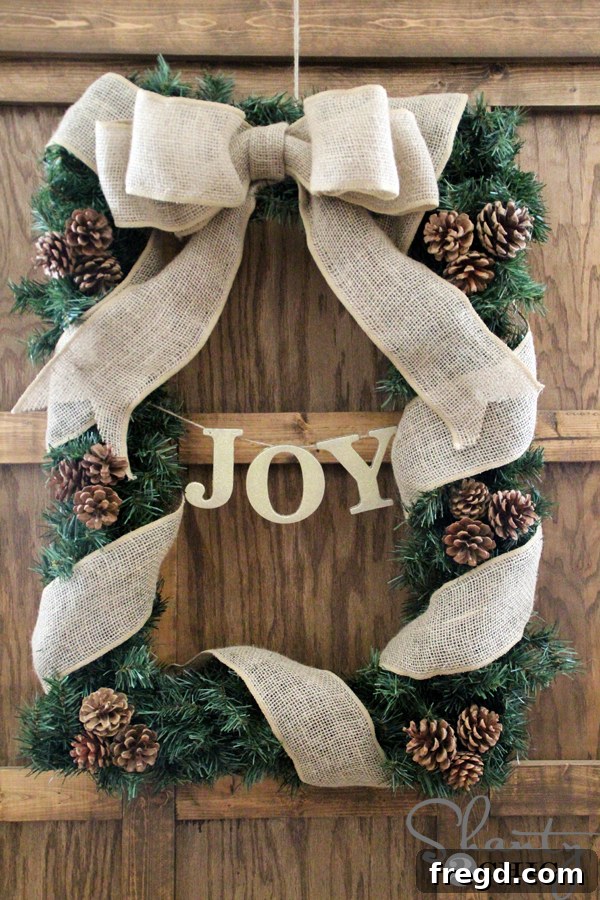
Craft Your Own Stunning DIY Rectangle Wreath: A Step-by-Step Guide to Chic Home Decor
Are you searching for that perfect, unique piece of home decor to elevate your space? Look no further! This comprehensive guide will walk you through creating a beautiful and trendy rectangular wreath that rivals those found in high-end catalogs, all while saving you a significant amount of money. Imagine a stylish, custom-made accent for your front door, entryway, or mantelpiece, reflecting your personal touch and creativity. My journey to craft this elegant rectangular wreath was a mission, and I’m thrilled to share my successful solution with you. The result is truly captivating, and the best part? It cost me around $15 and took only about an hour of my time!
This DIY rectangle wreath isn’t just a craft project; it’s an opportunity to infuse your home with warmth and character. Whether you’re decorating for a specific season or simply want a charming year-round accent, this tutorial offers an accessible path to achieving a designer look on a budget. Let’s dive into how you can create your very own!
Isn’t it absolutely adorable? The charm of a rectangular shape offers a modern twist on the traditional circular wreath, providing a fresh aesthetic that complements various interior styles, from farmhouse to contemporary. Plus, the satisfaction of creating something this beautiful with your own hands is truly priceless.
Essential Materials for Your Custom Rectangle Wreath
Gathering your materials is the first exciting step in bringing your DIY rectangle wreath to life. The beauty of this project lies in its flexibility and affordability. Here’s what you’ll need:
- Wood for the Frame: 1 – 1×4 @ 8 feet. This common lumber size is ideal for creating a sturdy yet lightweight frame. If you have wood scraps lying around from previous projects, this is a fantastic opportunity to put them to good use, further reducing your costs. Alternatively, a furring strip can be a more budget-friendly option if you’re buying new wood. The exact dimensions for cutting will be detailed below, but remember, the finished size of your wreath is entirely customizable.
- Evergreen Garland: 2 – 9-foot strands. Faux evergreen garland provides a lush, natural base for your wreath that will last for years. You can choose different types of garland depending on the look you desire – from traditional pine to frosted spruce or even berry-adorned varieties.
- Burlap Garland/Ribbon: A roll of burlap ribbon or garland. This adds a rustic texture and serves as a lovely backdrop for your embellishments. Choose a width that you find appealing for wrapping your frame.
- Small Decorative Pinecones: Approximately 6-8 pinecones, depending on the size of your wreath and desired fullness. These natural elements add an organic touch. Look for them at craft stores, especially during seasonal sales, or even collect them from nature!
- Chipboard Letters: Choose letters that spell out a word or phrase you love, such as “HOME,” “JOY,” “GATHER,” or “WELCOME.” Craft stores often have these available in various fonts and sizes. Keep an eye out for sales to snag them for as little as 50 cents each.
- 3-Ply Twine: A small spool for hanging your letters.
- Hot Glue Sticks: Plenty of them! A hot glue gun is your best friend for securing many elements of this wreath.
- 1 1/4″ Pocket Hole Screws (if using a Kreg Jig): These specialized screws provide strong, concealed joints.
Tools You’ll Need
Having the right tools makes any DIY project smoother and more enjoyable. Here’s a list of the tools that will help you craft your rectangle wreath with ease:
- Saw: A miter saw or a hand saw with a miter box. Precision cuts are key to a well-assembled frame. If you’re new to woodworking, an inexpensive miter saw is an excellent entry-level tool for projects like this, making straight and accurate cuts simple and safe.
- Kreg Jig (Optional but Recommended): This ingenious tool simplifies creating strong pocket-hole joints, making frame assembly incredibly easy and clean. If you’re building furniture or more complex projects, a Kreg Jig is a worthwhile investment.
- Drill/Driver: Essential for using pocket hole screws or general assembly.
- Staple Gun: A heavy-duty staple gun (manual or electric) is crucial for attaching the garland and burlap securely to the wooden frame.
- Hot Glue Gun: For attaching pinecones, securing the bow, and fixing other small decorative elements.
- Measuring Tape and Pencil: For accurate measurements and markings.
- Wire Snips or Scissors: For trimming garland, burlap, and twine.
- Safety Glasses: Always protect your eyes when working with saws and power tools.
Step-by-Step Guide: Crafting Your DIY Rectangle Wreath
Step 1: Building the Sturdy Wooden Frame
The foundation of your rectangular wreath is a well-constructed wooden frame. I purchased a single 1×4 piece of wood, 8 feet long, which provided ample material for the project. For my wreath, I opted for specific dimensions that felt just right: two cuts at 22 3/4 inches and two cuts at 18 3/4 inches. These four pieces will form the perimeter of your rectangle. Remember, these measurements are a guideline; feel free to adjust them to create a wreath that perfectly fits your desired space. Always measure twice and cut once for accuracy.
If you don’t own a saw, consider investing in a simple miter saw. They are incredibly user-friendly and perfect for beginners, making tasks like this straightforward and safe. Alternatively, many hardware stores offer wood cutting services, so you can have your pieces cut to size right at the store!
Once your pieces are cut, it’s time to assemble the frame. I highly recommend using a Kreg Jig for this step. It creates incredibly strong and neat pocket-hole joints, ensuring your frame is robust and visually appealing. As you can see in the image, I drilled two pocket holes at both ends of each shorter 1×4 piece. Then, I secured these joints using 1 1/4-inch pocket-hole screws, creating a seamless and secure connection.
If you don’t have a Kreg Jig, don’t worry! There are alternative methods. You can use wood glue combined with a staple gun or even small nails. If opting for glue and staples, apply a generous amount of wood glue to the end grains of your pieces, then reinforce the joint with staples on both the front and back of the frame for added stability. Be sure to allow adequate time for the wood glue to dry completely before moving on to the next step, as this will ensure the structural integrity of your wreath frame.
Step 2: Adding the Lush Evergreen Garland
With your sturdy frame complete, it’s time to add the greenery that gives the wreath its traditional, festive, or natural appeal. I purchased two 9-foot strands of evergreen garland to ensure ample coverage and a full, luxurious look. The key here is to create volume and conceal the wooden frame entirely.
Starting at one point on the frame, begin bunching up the garland and securing it firmly with your staple gun. There’s no single “right” way to do this; the goal is to cover the wood thoroughly. I found that bunching the garland in a zig-zag pattern, working my way around the frame, yielded a wonderfully full effect. As you go, you can gently adjust the individual branches of the garland to fill any gaps and create an even, dense appearance. Don’t be afraid to use plenty of staples to ensure the garland stays put, especially if your wreath will be exposed to outdoor elements.
Step 3: Wrapping with Rustic Burlap Garland
Once your evergreen garland is securely attached and looking full, it’s time to introduce the rustic charm of burlap. Burlap adds a beautiful textural contrast and a natural, farmhouse-inspired aesthetic that perfectly complements the greenery. I used burlap garland, but a wide burlap ribbon would work just as well.
Begin by stapling one end of the burlap to the top of the back of the frame. This ensures a clean starting point. Then, tightly wrap the burlap around the entire frame, working your way around the rectangle. As you wrap, periodically staple the burlap to the back of the frame to keep it taut and prevent it from shifting. This creates a secure and neat finish. Continue wrapping until you reach the top of the frame again, ensuring the burlap is evenly spaced. Once you’ve completed a full wrap, staple the end piece to the back of the frame and trim any excess burlap. The burlap wrap not only adds visual interest but also provides a lovely base for additional embellishments.
Step 4: Adding Charming Pinecone Accents
To further enhance the natural beauty of your rectangular wreath, I incorporated some adorable small pinecones. These are often available at craft stores for a very reasonable price, sometimes as low as 50 cents each when on sale. They add texture and a rustic, outdoorsy feel.
Before attaching the pinecones, it’s a good idea to snip off any protruding stems or excess wire if they come pre-wired. This allows them to sit flush against the wreath. Using strong wire cutters or even heavy-duty scissors can make this task easy.
Once trimmed, use a hot glue gun to securely attach the pinecones to the frame. I positioned them strategically, placing one between each wrap of burlap. This creates a pleasing visual rhythm and distributes the pinecones evenly around the wreath, adding depth and organic detail. Be generous with the hot glue to ensure they are firmly attached and won’t fall off.
Step 5: Crafting and Attaching the Burlap Bow
A beautiful bow adds a classic finishing touch and can serve as a charming focal point for your wreath. I crafted a burlap bow similar to one I made for a Christmas tree topper, which you can find a detailed tutorial for HERE. Burlap is an excellent choice for a bow as it complements the rustic theme perfectly, but you could also opt for a festive plaid, a simple solid color, or a patterned ribbon that matches your decor.
Once your bow is complete, position it at the top of your rectangular wreath frame. Secure it firmly with a generous amount of hot glue. Don’t hesitate to use dabs of hot glue and even a few discreet staples to ensure the bow lies exactly how you want it, with its tails gracefully flowing down the sides. This extra step is especially helpful if your wreath will be hanging on a front door, as it will help the bow withstand windy conditions and maintain its shape. I even hot-glued the tails of the bow to the wrapped burlap to keep them neat and prevent them from flapping. This attention to detail ensures a polished and durable finish.
Here she is at this stage – already looking fantastic and ready for that special personal touch.
Step 6: Adding Personalized Glitter Letters
Now for the truly customizable finishing touch – adding a personalized message to your wreath!
I discovered these delightful chipboard letters at Hobby Lobby. They are a fantastic blank canvas for customization and, as mentioned, can be incredibly affordable if you catch them during a sale. Choose letters that spell out a word or phrase that resonates with you and your home, such as “WELCOME,” “LOVE,” “JOY,” or “GRATEFUL.”
To give them a glamorous and eye-catching finish, I applied two coats of Rust-Oleum Gold Glitter spray paint. This instantly transforms simple chipboard into dazzling accents. Make sure to spray in a well-ventilated area and allow adequate drying time between coats for the best glitter coverage. You could also choose other colors, metallic finishes, or even distress them for a more rustic look.
Once the letters are dry, carefully attach each one to a strand of 3-ply twine. I used a staple gun, stapling through the back of each letter to secure it to the twine. This method provides a very clean look from the front. Ensure that your letters are evenly spaced along the twine, and consider the total length you’ll need for your word to hang appropriately on the wreath.
Finally, attach the entire strand of twine, with your personalized letters, to the top of your wreath using the staple gun. I chose to hide the twine attachments behind the bow tails, making the letters appear to float effortlessly across the center of the wreath. This creates a very polished and professional finish, truly bringing the entire design together.
Your Completed DIY Rectangle Wreath!
That’s it! Your stunning, personalized DIY rectangle wreath is now complete and ready to adorn your home. This charming piece of decor offers endless possibilities for placement.
Whether you choose to hang it on your front door to welcome guests, display it over your mantelpiece as a cozy focal point, or feature it on a wall in your entryway, it’s sure to draw compliments. Its unique rectangular shape and personalized message make it a standout piece of home decor.
Here she is, looking absolutely fantastic hanging on my Hall Tree Bench! This demonstrates just how versatile this DIY project is. It can instantly elevate any space with its rustic elegance and personal flair.
I absolutely adore this little cutie! One of the fantastic advantages of this design is its adaptability. You can easily change out the word in the middle to suit different seasons or holidays. Imagine “FALL” for autumn, “GATHER” for Thanksgiving, “MERRY” for Christmas, or even “BLOOM” for spring. This allows your wreath to remain a relevant and cherished piece of decor throughout the year, making it a truly versatile and cost-effective home accent.
Share Your DIY Success!
I truly hope you love creating this DIY rectangle wreath as much as I enjoyed designing and sharing it! This project is a testament to how simple materials and a little creativity can produce stunning results that bring joy and personality into your home. It’s an empowering feeling to craft something beautiful and functional with your own hands.
If you embark on this project and make one for yourself, please don’t hesitate to share your version with us! We absolutely adore seeing your projects and the unique twists you add to them. Email us photos, tag us on social media, or leave a comment below. Your creativity inspires us and our community!
Remember, sharing is caring! If you found this tutorial helpful, we always appreciate your social shares. Pin it to your Pinterest boards, share it with friends on Facebook, or tweet about it. Spreading the word helps us continue to bring you more exciting DIY home decor ideas and inspiration.
Thank you so much for stopping by and being a part of our creative journey!
~Ashley