
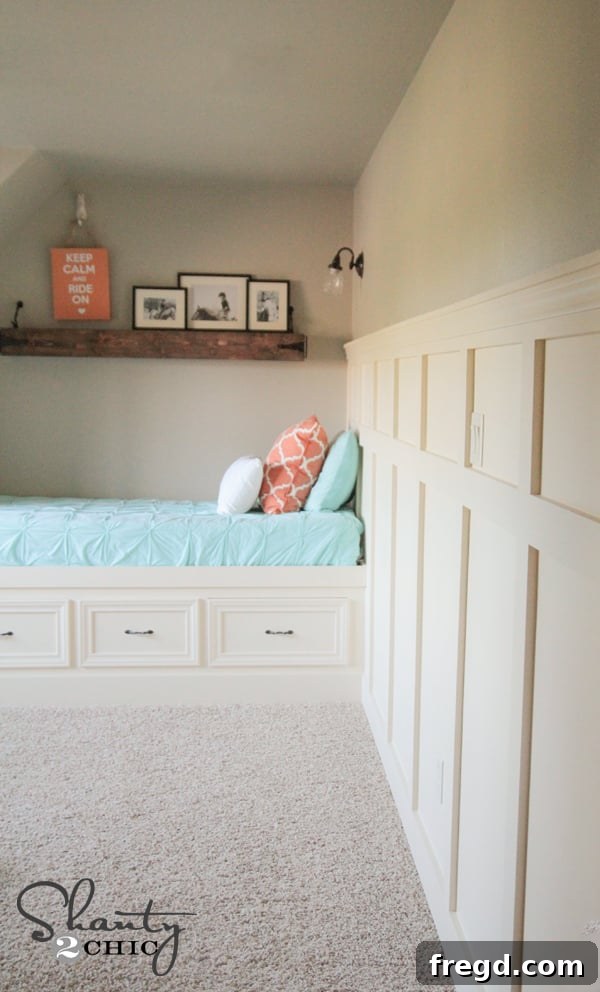
Transforming an ordinary space into something extraordinary is one of the most rewarding aspects of homeownership. Recently, I embarked on a personal mission to convert an open loft upstairs into a cozy and personalized room for one of my daughters. This project has quickly blossomed into one of my absolute favorite spots in our entire home!
The room presented a unique design challenge. Unlike other standard rectangular rooms, this space is long and narrow, featuring one particularly expansive, flat wall that immediately greets you upon entry. I instantly knew this prominent wall required a distinctive treatment to break up its monotony and infuse character. After much contemplation, I decided to tackle a DIY wall paneling project, combining plywood and individual boards to create a stunning board and batten effect. This approach promised both a beautiful aesthetic and a manageable DIY process for an impressive room makeover.
The Stunning Transformation: My DIY Board and Batten Wall
The results have been nothing short of amazing! The finished board and batten wall paneling has completely redefined the room, adding architectural interest and a bespoke feel that perfectly complements my daughter’s style. This comprehensive DIY wainscoting tutorial will guide you through each step of how I achieved this beautiful transformation, proving that a dramatic home improvement project doesn’t always require professional help. Get ready to add character and charm to your living space!
I simply LOVE the finished results and the dramatic impact it has made on the entire room’s aesthetic!
Gathering Your Materials: The Foundation of Your Project
Every successful DIY project starts with the right materials. For the base panels of my board and batten wall, I opted for PureBond plywood in Birch. This specific plywood is an excellent choice for interior projects due to its formaldehyde-free composition, making it a healthier option for your home, especially in a child’s room. Its smooth birch veneer provides a beautiful, clean surface ready for painting, offering a premium look without the premium price tag. This material choice is key for creating durable and attractive DIY wall paneling.
I purchased 4×8 sheets of 1/4-inch birch plywood from The Home Depot. To make transportation easier and cuts more manageable, I had a helpful associate at the store cut each full sheet down into more portable 2-foot by 4-foot pieces. This simple step saved me significant time and effort, ensuring I could get them home safely in my car without needing specialized equipment. Planning these initial cuts can streamline your entire project.
To securely attach these plywood panels to the wall, you’ll need a reliable panel adhesive. This isn’t just any glue; it’s formulated for strong, long-lasting bonds on various wall surfaces. I found mine conveniently located in the wood section of the hardware store, right alongside the wall paneling options. Ensure you select an adhesive specifically designed for paneling to guarantee a robust, lasting bond that will keep your wainscoting securely in place for years to come. Investing in good adhesive is crucial for the longevity of your wall treatment.
Essential Tools for Your Board and Batten Project
Having the right tools can make all the difference in the efficiency, precision, and overall quality of your DIY endeavor. Investing in good tools, especially cordless ones, can significantly simplify the process and improve your results. Here’s a comprehensive list of what I highly recommend for a smooth board and batten installation:
- **Cordless Stapler (e.g., Ryobi AirStrike):** A true game-changer! This tool makes attaching panels incredibly fast and easy, eliminating the need for a cumbersome air compressor and hoses. Its portability and power are unmatched for this type of project.
- **Cordless Drill:** Essential for drilling pilot holes, fastening, and various other drilling tasks that come up during home improvement.
- **Jigsaw:** Crucial for precise and intricate cuts, especially around obstacles like electrical outlets and windows. A cordless jigsaw offers maximum maneuverability.
- **Measuring Tape:** Accurate measurements are the absolute key to a professional-looking finish. Measure twice, cut once!
- **Pencil:** For marking cuts, outlines, and reference points directly onto your materials.
- **48-inch Level:** Ensures your boards are perfectly straight and plumb. A longer level provides greater accuracy across larger sections of the wall.
- **Caulk Gun:** For applying caulk smoothly and evenly along seams and joints, essential for a seamless finish.
- **Plastic Scraper:** Ideal for applying wood filler and ensuring a smooth, flush surface over nail holes.
- **Safety Glasses & Work Gloves:** Always prioritize personal safety when working with power tools and materials. Protect your eyes and hands!
- **Utility Knife:** Handy for scoring, trimming, and opening packages.
- **Baby Wipes:** (My secret weapon!) Perfect for quickly cleaning caulk off your hands, making the finishing steps much less messy.
Step-by-Step Installation: Creating Your Plywood Base
With your carefully chosen materials and essential tools at the ready, let’s dive into the hands-on installation process for the base plywood panels that will form the canvas for your stunning board and batten wall. This initial stage sets the groundwork for the entire project, so attention to detail here is paramount.
Applying Panel Adhesive for a Strong Hold
Before attaching any plywood piece to the wall, I applied a generous and consistent amount of panel adhesive to its back surface. You don’t need to be overly neat at this point, but ensure good coverage, especially around the edges and in the center of the panel, to maximize adhesion. Think of it as laying a strong foundation – the more contact points, the better the bond. This adhesive works in conjunction with staples to create a permanent installation.
Attaching the Base Plywood Panels Securely
I recommend starting your installation from the most visible corner of the room and meticulously working your way towards a more concealed or less prominent corner. This strategic approach helps ensure that any minor imperfections in cutting or spacing, which are almost inevitable in DIY projects, end up in less noticeable areas. In my specific project, I had to custom-cut the height of the first two pieces of plywood to accommodate a new built-in bed I had recently constructed for my daughter’s room. Knowing that the majority of my other panels would be a standard 48 inches tall, I measured down from the top of the bed frame to determine the exact custom height required for those initial pieces, ensuring a perfect fit around the furniture.
To secure each plywood panel firmly to the wall, I utilized my fantastic cordless stapler. Seriously, this tool is an absolute game-changer for projects like this! My old stapler required a bulky air compressor, which was always a hassle to drag around the house, creating noise and clutter. This new cordless version uses the same powerful battery as my drill, making it incredibly convenient, efficient, and quiet. It looks almost identical to my AirStrike Brad nailer, but it’s specifically designed for stapling applications, providing a strong hold with minimal effort. I strategically placed most of my staples towards the outer edges of the plywood panels, confident that these points would later be completely hidden and covered by the decorative battens, resulting in a clean and unblemished surface.
Intelligent Spacing for Plywood Panels
As I progressed with the installation, I intentionally left approximately an inch of space between each plywood panel. This deliberate spacing served a dual and very practical purpose: firstly, it allowed me to cover a slightly larger wall area with fewer plywood sheets, optimizing material usage. More importantly, I knew that these gaps would be perfectly concealed once the vertical battens were installed later in the project. This method not only simplifies the initial panel placement but also contributes to a cleaner, more professional look for the finished product, as any minor inconsistencies are hidden by the overlaying trim.
Navigating Obstacles: Working Around Electrical Outlets
Encountering an electrical outlet or wall switch on your wall might initially seem like a daunting challenge, potentially halting your DIY progress. However, with the right technique and a couple of essential tools, integrating these necessary features into your wall paneling is actually a very straightforward and manageable process. Don’t let these common obstacles deter your DIY enthusiasm; careful planning makes it easy!
Step 1: Precisely Marking the Outlet Position
Begin by holding the plywood panel you intend to attach up against the wall, positioning it precisely where it will ultimately be installed. Using a sharp pencil, carefully and accurately mark the exact outline of the electrical outlet onto the back surface of the plywood. Double-check your measurements and alignment to ensure the cutout will be perfectly centered over the electrical box. Accuracy at this stage is absolutely critical for achieving a clean and professional-looking fit.
Step 2: Drilling a Pilot Hole for Jigsaw Access
Once the outlet outline is clearly marked, remove the plywood piece from the wall. Grab your trusty Ryobi drill (or any reliable cordless drill) and select a drill bit that is slightly larger than the width of your jigsaw blade. Carefully drill a pilot hole directly in the middle of the marked outline, ensuring it’s well within the area to be removed. This pilot hole serves a crucial purpose: it provides a convenient and safe starting point for inserting your jigsaw blade, making it significantly easier and safer to initiate your cut without damaging the surrounding wood.
Step 3: Precise Cutting with a Jigsaw
Now, insert your jigsaw blade into the pilot hole you just drilled. With a steady hand, carefully cut along the pencil lines you drew in Step 1. Take your time to ensure a clean, precise cut. The cordless nature of my jigsaw made this step particularly convenient, allowing for complete freedom of movement and easy maneuvering around the cut lines without being tethered by a power cord. Always wear appropriate safety glasses when operating power tools.
Step 4: Final Attachment and Safety Reminders
With the cutout meticulously completed, apply panel adhesive to the back of the plywood piece as you did with the other panels, and then staple it securely to the wall. Ensure the cutout aligns perfectly and snugly with the electrical box. Before you begin any work involving electrical outlets, it is paramount to always turn off the power to that circuit at your home’s main breaker panel. Safety first, always! This simple precaution prevents accidents and ensures a safe working environment.
Adding the Upper Plywood Sections and Horizontal Boards
Once the lower plywood panels were firmly in place, establishing the base of our wainscoting, I moved on to installing the upper sections. These panels, also crafted from 1/4-inch plywood, were cut to precise dimensions of 24 inches wide by 14 inches tall. I attached them using the identical method as the lower panels – a combination of panel adhesive for enduring strength and my trusty cordless stapler for immediate securement – ensuring a consistent small gap between each piece. It’s worth noting that you might occasionally encounter slight variations in the accuracy of cuts made at the hardware store; however, don’t worry too much about absolute perfection at this preliminary stage, as all these edges and minor inconsistencies will be perfectly concealed once the vertical battens are installed later on, providing a seamless and polished finish.
Installing the Horizontal Battens (Borders) for Structure and Style
Next came the pivotal step of installing the horizontal boards that meticulously define the upper and lower boundaries of the board and batten pattern. For this crucial part, I purposefully chose primed MDF (Medium-Density Fiberboard) boards. MDF is an outstanding material choice for any painted trim work because it boasts incredible straightness, a remarkably smooth surface, and is exceptionally easy to work with, guaranteeing a very professional and refined finish once painted. Since I knew from the outset that I would be painting the entire wall treatment to achieve a cohesive look, using primed MDF was both a cost-effective and highly efficient material solution.
This step demands a high degree of precision, so make it a priority to use a good quality 48-inch level to ensure all your horizontal lines are impeccably straight. Any deviation here will be noticeable in the final product. I applied a generous bead of panel adhesive to the back of each MDF board before firmly attaching them to the wall with my reliable cordless stapler. For the baseboards, which anchor the entire design, I used substantial 5.5-inch wide boards, creating an elegant and robust foundation. The center and top horizontal boards, which frame the upper sections, were 3.5 inches wide, maintaining a perfectly balanced and aesthetically pleasing proportion throughout the wainscoting design.
Precise placement is absolutely crucial for the visual appeal and overall success of your board and batten wall. I carefully positioned my middle horizontal board exactly 45.25 inches from the ground. This specific height is not arbitrary; it’s a thoughtful measurement that helps define the ideal proportion of the wainscoting and typically aligns very well with common furniture heights, ensuring a harmonious look within the room. Consistent and accurate measurements contribute significantly to a polished, professional outcome.
Furthermore, the top and middle horizontal boards were meticulously spaced 11 inches apart. This consistent spacing is not just about symmetry; it plays a vital role in creating a pleasing geometric pattern and a refined, upscale look that is characteristic of classic wainscoting. Taking the extra time to measure and level carefully at this stage will undoubtedly pay off immensely in the final, breathtaking appearance of your wall treatment, elevating it from a simple DIY project to a true feature of your home.
At this juncture of the project, you can clearly see the underlying structure of the board and batten wall beginning to take its definitive shape. The slight gaps where the panels meet and the visible staple holes are present, but rest assured, these minor imperfections will all be meticulously addressed and smoothed out in the finishing stages before painting, ensuring a truly flawless and professional-grade look that will impress everyone.
Adding the Vertical Battens: Defining the Grid
Now for the exciting part that truly defines the “board and batten” style and brings the entire design to life: adding the vertical battens! These crucial pieces bridge the horizontal boards, creating the classic grid pattern that gives this wall treatment its distinctive charm and elegance. I continued to use 3.5-inch wide primed MDF boards for these vertical elements, ensuring perfect consistency and a cohesive look with the horizontal framing already in place.
Installing the Bottom Vertical Battens for Uniformity
I precisely cut each of my bottom vertical battens to 39.75 inches long. This specific measurement ensures that each batten fits perfectly and uniformly between the established baseboard and the middle horizontal board, thereby creating consistent and balanced rectangular sections across the lower part of the wall. Just like with the plywood panels, I applied a generous and even bead of panel adhesive to the back of each batten. Precision is paramount here: use your level meticulously to ensure each piece is perfectly plumb (vertically straight) before firmly attaching it with your Ryobi AirStrike stapler. Securing them quickly with staples allows the adhesive ample time to cure properly, establishing a strong, long-lasting hold that will withstand the test of time.
Installing the Top Vertical Battens to Complete the Grid
Once all the bottom battens were meticulously in place, creating a solid lower grid, I moved on to installing the upper sections of the vertical battens. Each of these top vertical battens was precisely cut at 11 inches, fitting perfectly and snugly between the middle and top horizontal boards. I followed the exact same attachment process: first, apply a sufficient amount of panel adhesive to the back, then carefully position the batten and ensure it’s perfectly level using your long level, and finally, secure it firmly with staples from the cordless stapler. The remarkable efficiency and ease of use of the cordless stapler truly shone during this repetitive task, making the entire process of adding these numerous battens much faster and considerably less cumbersome than traditional nailing methods, saving both time and effort.
At this stage, the intricate grid pattern of the board and batten is fully formed and truly starts to showcase the immense potential and aesthetic beauty of the room. The precise alignment and consistent spacing of these boards create a cohesive and visually appealing design that dramatically adds depth, texture, and architectural interest to the formerly plain wall, turning it into a focal point.
I diligently finished up the remaining sections of the wall using the exact same proven process for the vertical battens. The cordless stapler, as I’ve mentioned, was an absolute lifesaver throughout this entire project. The ability to work without wrestling with cumbersome air hoses or dragging a noisy compressor through the house was a monumental advantage, making the entire installation process so much more enjoyable and manageable. It’s a definite win for any DIY enthusiast looking to streamline their home improvement efforts, allowing for greater focus on precision and less on logistical challenges.
Adding the Finishing Trim Details for a Polished Look
To give the board and batten wall a truly polished, custom, and professional-grade finish, adding the final trim pieces is an absolutely essential step. These seemingly small details are what elevate the entire project from merely “good” to truly exceptional, providing a sophisticated edge and completing the architectural statement you’ve created.
The Elegant Top Shelf Board
First, I meticulously attached a 1×2 MDF board along the very top edge of the entire paneling structure. This specific piece serves a dual purpose: it acts as a subtle, elegant shelf, adding both decorative appeal and a functional ledge where small decor items, photos, or even books can be displayed. I secured it using a combination of high-quality wood glue for a strong, lasting bond and my trusty cordless stapler for immediate hold and stability while the glue cured. This provides a crisp, clean, and definitive top border to the wainscoting, giving it a built-in cabinetry feel.
The Decorative Casing Piece for Added Detail
Just underneath this newly installed top shelf, I added a simple, yet impactful, inexpensive casing piece. This decorative strip introduces another layer of fine detail and visual interest, further enhancing the traditional, intricate wainscoting feel. Once again, a combination of wood glue for permanent adhesion and staples for temporary fastening ensured it was firmly attached and perfectly flush with the surrounding trim. These smaller trim pieces, while sometimes overlooked in the grand scheme of a DIY project, contribute significantly to the overall aesthetic quality and perceived craftsmanship of the board and batten wall, truly setting it apart.
At this exciting stage, all the primary wood elements of the board and batten wall are fully installed and structurally complete. The wall is now ready for the absolutely crucial finishing touches: caulking and filling. Even with the most careful and precise installation, there will always be tiny gaps, minor imperfections in the wood, and visible staple or nail holes that need meticulous addressing to achieve a truly professional, built-in, and flawlessly smooth look that makes all the effort worthwhile.
The Art of Finishing: Caulking and Filling for a Flawless Look
These final preparation steps, caulking and filling, are arguably the most important for achieving a truly seamless, high-end, and professionally installed appearance for your DIY wall paneling. Skimping on these details will detract from all your hard work, while proper execution will make your project look custom-built and truly exceptional.
Meticulously Caulking All Seams for a Seamless Finish
I meticulously applied caulk to every single seam where the newly installed wood elements meet the existing wall, as well as where different wood pieces join together. This crucial step serves multiple vital functions: it effectively seals any tiny gaps that might exist, prevents unsightly dust accumulation in crevices, and most importantly, creates a smooth, continuous surface that is absolutely ideal for painting. My personal, invaluable trick for this stage? Always keep baby wipes handy! My process involves running a smooth bead of caulk along each seam using a caulk gun, and then immediately smoothing it out with my finger to achieve a perfectly blended finish. The baby wipes are then absolutely perfect for quickly and efficiently cleaning my hand, making the entire caulking process much less messy and far more enjoyable, especially for this busy mom!
Efficiently Filling Nail and Staple Holes
Next up, it’s time to diligently address all those small staple and nail holes left over from the installation process. For this, I used a fantastic and very user-friendly “pink stuff” wood filler. What I absolutely love about this particular product is its innovative color-changing feature: it applies pink, making it incredibly easy to see exactly where you’ve applied it and ensuring no hole is missed. Then, it conveniently dries to a crisp white color, visually indicating that it’s fully cured and ready for sanding and subsequent painting. This visual cue is exceptionally helpful for ensuring every single hole is properly filled and smoothed.
I simply use a flexible plastic scraper to apply the wood filler, pressing it firmly into each hole to ensure it’s completely filled, and then smoothing the surface flush with the wood. Once dry, a light sanding with fine-grit sandpaper will ensure the entire wall treatment is perfectly smooth, seamless, and completely ready for primer and paint. This meticulous attention to detail at the finishing stage is what truly gives you that coveted, high-quality, built-in furniture look that transforms your room.
The Grand Finale: Painting and Enjoying Your New Wall
Phew! That was quite the journey, involving many steps and a good amount of effort, but I promise you, the dedication is truly worth it. The final and arguably most transformative step in this comprehensive DIY board and batten project is the application of paint. While I’ll provide more detailed insights into the specific paint choices and techniques in a future post, the profound importance of this stage cannot be overstated. A fresh, uniform coat of paint will brilliantly unify all the individual installed elements – the plywood panels, the MDF battens, and the decorative trim – transforming them from disparate pieces of wood into a cohesive, stunning architectural feature. It’s at this point where your hard work truly shines, bringing the entire vision to life and adding a crisp, clean finish that effortlessly complements any decor style you desire, creating a truly inviting and personalized space.
Here it is, all finished up and absolutely ready to be admired! I absolutely LOVE how this DIY board and batten wall totally changes the entire look and feel of the room, instantly creating an elegant, charming, and significantly more inviting space for my daughter. It’s incredible what a profound difference a thoughtful and well-executed wall treatment can make to the ambiance and character of any interior.
I sincerely hope you find this comprehensive tutorial as inspiring and helpful as I found the entire process rewarding. Creating a DIY board and batten wall is a fantastic way to add character, charm, and significant value to any room in your home, making it feel more custom, inviting, and truly unique. Whether you’re looking to enhance a child’s bedroom, a cozy living area, a welcoming entryway, or a long hallway, this project offers a relatively affordable yet high-impact solution for elevating your interior design and achieving that coveted modern farmhouse or classic elegant look.
I would absolutely LOVE for you to share this tutorial with your friends and family on social media, helping others discover the joy of DIY home improvement, and don’t forget to PIN it to your favorite home decor boards for future reference! Spreading the word about achievable DIY home improvements empowers everyone to create beautiful spaces they adore and are proud of.
Be sure to explore the other related projects I’ve shared that perfectly complement this room makeover. These additional DIYs were part of creating a truly cohesive and personalized space for my daughter, offering even more inspiration for your next home project:
DIY Built-In Bed Free Plans
DIY Rustic Floating Shelf or Mantle