
Unlock Your Inner DIYer: Build the Ultimate Storage Bench with Free Plans!
Hello, fellow DIY enthusiasts! We’re absolutely thrilled to have you join us today as we embark on another exciting woodworking adventure. For those who love keeping up with our latest creations and behind-the-scenes glimpses, don’t forget to follow us on Instagram!
Before we dive into the details of this fantastic project, we want to send a huge congratulations to our dear friend, Miss Ana White, on the arrival of her new baby boy! We are incredibly happy for her and her growing family.
Introducing Your Next Project: The Charming DIY Storage Bench
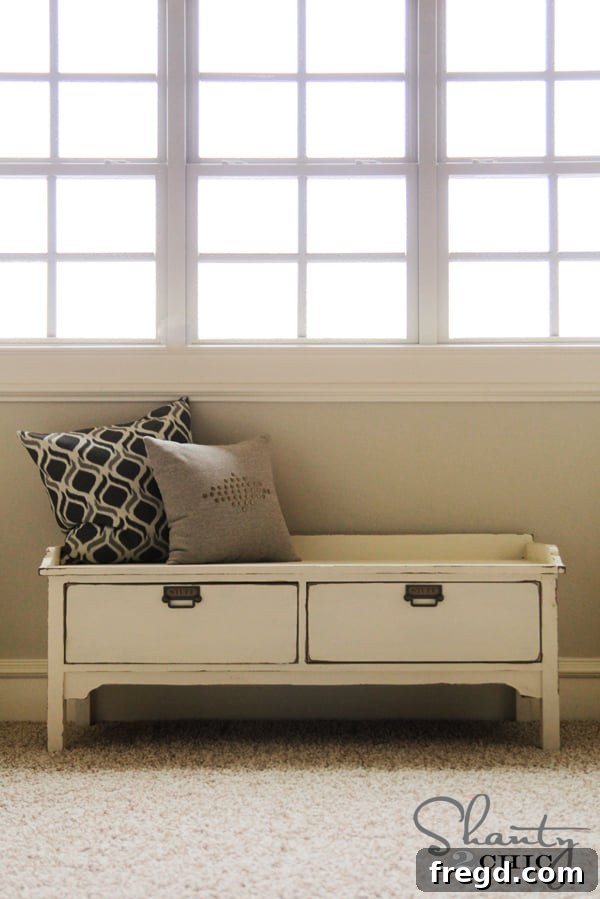
Today, we’re ecstatic to share with you one of Ana White’s latest and most adorable plans: a DIY storage bench that’s as functional as it is beautiful. The moment we saw a similar design on Pottery Barn’s site, we knew it had to be brought to life as a DIY project. This bench is more than just a piece of furniture; it’s a versatile storage solution that adds warmth and character to any room in your home. Whether you need extra seating in your entryway, a clever spot for toys in a child’s bedroom, or an elegant storage option in a living area, this bench truly fits the bill.
Imagine decluttering your space while adding a stylish, handcrafted touch. This DIY storage bench offers ample room for blankets, books, shoes, or anything else you need to tuck away neatly. It’s a project that combines form and function seamlessly, proving that practical pieces can also be incredibly charming.
Isn’t it just the cutest? We’re absolutely smitten with the final look! Now, a quick heads-up: we’ve captured a comprehensive collection of photos throughout this build. Our goal was to meticulously break down each step, making the entire process feel less intimidating, especially if you’re new to working with drawers or utilizing a jigsaw. This is an excellent project to hone your skills and gain confidence in furniture building.
As is our tradition, we’ll guide you through our specific how-to tips and provide detailed photos right here. However, for the complete set of free, printable plans, including cut lists and precise measurements, head over to Ana White’s website. She provides all the foundational blueprints, and we’ll show you exactly how we tackled it!
Essential Tools for Your DIY Storage Bench Project
Let’s talk tools! Having the right equipment can make all the difference in the success and enjoyment of your DIY projects. For this particular build, and frankly, for almost any woodworking endeavor involving solid, strong joints, we wholeheartedly recommend a Kreg Jig. If you’re unfamiliar with this incredible tool, it’s designed to create pocket holes – angled holes that allow you to join wood pieces with screws, creating incredibly strong and stable connections without visible fasteners. We even have a dedicated video tutorial (though not linked directly in this text, search our site!) where we break down how to use it in our own words, demystifying the process for beginners.
We frequently get asked which Kreg Jig model we personally use and recommend. If you’re considering investing in one, we strongly suggest the newest K5 model. It has quickly become our new best friend in the workshop! The K5 boasts numerous enhancements, making it even more user-friendly and incredibly efficient, saving you valuable time during assembly. Its improved clamping mechanism and storage features are game-changers for any DIY enthusiast.
Step-by-Step Construction: Building Your Storage Bench
Assembling the Bench Frame
We kicked off the build by assembling the sides of the bench first. Precision is key here, and we made sure to take plenty of photos to clearly illustrate where each pocket hole was placed. For the entire bench frame, we utilized 3/4″ pocket holes, ensuring robust connections. You can see our Kreg Jig K5 in action, making quick and accurate pocket holes.
Once the pocket holes were ready, the next step was attaching the side pieces to the bench legs. We used 1 1/4″ pocket hole screws for strong mechanical fastening, complemented by Gorilla Wood glue for an even more secure bond. The combination of screws and glue creates a joint that is virtually indestructible, vital for a piece of furniture that will see regular use. Here’s a visual guide to how these critical components came together.
The back section of the bench was constructed in the exact same manner, using the same pocket hole technique for consistent strength and seamless integration. You can observe the back piece securely attached to the side frames, bringing the main structure of the bench together.
For this part of the assembly, we found our Kreg Right Angle Clamp to be an absolute lifesaver. This tool is akin to having an extra set of hands, making it incredibly easy to hold pieces flush at a 90-degree angle while you drive in your pocket screws. Its clever design allows the end to slide directly into a pocket hole, securing the joint perfectly as you work on other connections. It’s a small investment that dramatically improves accuracy and efficiency.
Adding the Front Support and Decorative Elements
Next, we focused on the front 1×2 pieces, which provide essential support and define the bench’s aesthetic. We strategically placed the pocket holes on the bottom side of each piece. This thoughtful placement ensures that all fasteners are completely hidden from view once the bench is complete, contributing to a clean, professional finish.
Now for one of the charming details: the decorative front piece. For this intricate cut, we turned to our trusty Ryobi Jig Saw. For those new to power tools, don’t be intimidated by a jigsaw – they are remarkably simple to operate! You essentially just guide the blade along your marked lines, allowing for precise and artistic cuts, like the elegant curve on this piece. It’s an ideal tool for adding custom decorative elements to your DIY furniture.
Once the decorative piece was perfectly cut, we added pocket holes to its back side. This allows for a strong, concealed attachment to the main bench frame, ensuring the decorative element is securely fastened without any visible hardware marring its beautiful design.
And here it is, gracefully attached to the front of the bench, starting to truly define the bench’s character and elegance. The hidden pocket holes ensure a flawless appearance.
Building and Installing the Drawers
Now for the storage component that makes this bench so incredibly practical: the drawers! We even had some enthusiastic little helpers join us for this fun part of the build, proving that DIY can be a fantastic family activity.
Let’s break down the drawer construction process in a bit more detail. For an even deeper dive into how we attach drawer slides, you can always check out this dedicated post where we go into extensive detail on that specific technique.
First, we installed the drawer slide pieces directly onto the bench frame. This involves careful measuring and alignment to ensure the drawers will glide smoothly. We positioned each slide 3/4″ back from the front edge of the bench. This crucial spacing accounts for the thickness of the eventual drawer face, ensuring a perfectly flush and finished look once the drawer faces are attached.
With the bench-side slides in place, we then measured the precise distance between them. These exact measurements are critical for building the drawer boxes. Each drawer box was carefully constructed using wood glue for robust joints and our cordless brad nailer for quick and secure assembly. The brad nailer makes speedy work of holding pieces together while the glue dries, ensuring square and sturdy drawer boxes.
To attach the 1/4″ plywood bottom to the drawer boxes, while a nail gun can work, a stapler is even more effective at securely holding this thinner material in place. We’re incredibly excited that Ryobi recently released a cordless staple gun – woohoo! This new tool looks and functions much like their nail gun but fires staples instead, making it perfect for tasks like this. It’s a fantastic addition to any DIYer’s toolkit for efficiency and precise fastening of thinner materials.
Once your drawer boxes are fully constructed and solid, the next step is to attach the other half of the drawer slides directly to them. Again, careful alignment here ensures smooth operation and a professional feel for your finished drawers.
That’s it! With both parts of the drawer slides installed and perfectly aligned, your newly built drawers will now effortlessly slide into place within the bench frame, ready for their faces.
We then moved on to attaching the drawer faces. This step truly transforms the simple drawer boxes into elegant, finished storage units. We used wood glue for a strong bond and our nailer, carefully nailing from the inside of the drawers to keep any fasteners completely hidden from the exterior. With the drawer faces in place, the bench was now just one step away from its crowning glory: the top!
Adding the Bench Top and Finishing Trim
For the bench top, we decided to use our Kreg Jig to join the individual boards together. Our primary concern was that the middle board might sag or bow over time, especially with regular use. By creating pocket holes and joining the boards with screws, we ensured that the entire top would be incredibly sturdy, flat, and durable for years to come. Here’s a look at where all our pocket holes were placed. Once assembled, the entire top was securely glued and nailed into place on the bench frame.
Our final structural step was to add the top trim. This small detail provides a finished edge and enhances the overall craftsman aesthetic of the bench. We secured this trim piece with both glue and nails, ensuring it was firmly in place and contributed to the bench’s solid construction.
The Finishing Touches: Painting and Styling Your Bench
Finished! With the construction complete, it was time to bring this beautiful bench to life with some paint. We applied one of our favorite painting methods to achieve a beautifully distressed look, which adds character and a sense of age to the piece. If you’re curious about this technique, you can check out our detailed tutorial HERE! For this bench, our base coat was Rust-Oleum Carrington wood stain, providing a rich, dark undertone. The top coat was Rust-Oleum Heirloom White spray paint, which created a soft, inviting finish that perfectly highlights the distressed areas.
We temporarily set this gorgeous storage bench upstairs for these photos, but we haven’t quite decided on its permanent home yet. Its versatility means it could work in so many different spaces! What do you think? Where would you place a bench like this? Oh, and for the final touch, we found the super cute drawer hardware at Target, adding a pop of charm to the drawers.
Conclusion and Your Next Steps
Thank you so much for stopping by and following along with this exciting DIY storage bench build! We hope this detailed guide has inspired you and provided the confidence to tackle your own furniture projects. Remember, the full set of free woodworking plans can be downloaded directly from Ana White’s website, giving you everything you need to get started.
If you have any questions at all about the build process, the tools we used, or the finishing techniques, please don’t hesitate to ask in the comments below. We’d absolutely LOVE for you to share this project with your friends and family and pin it to your favorite DIY boards on Pinterest! Your shares help us reach more aspiring builders and spread the joy of DIY.
We wish you an absolutely awesome and productive weekend!
Happy Building!
~Whitney