
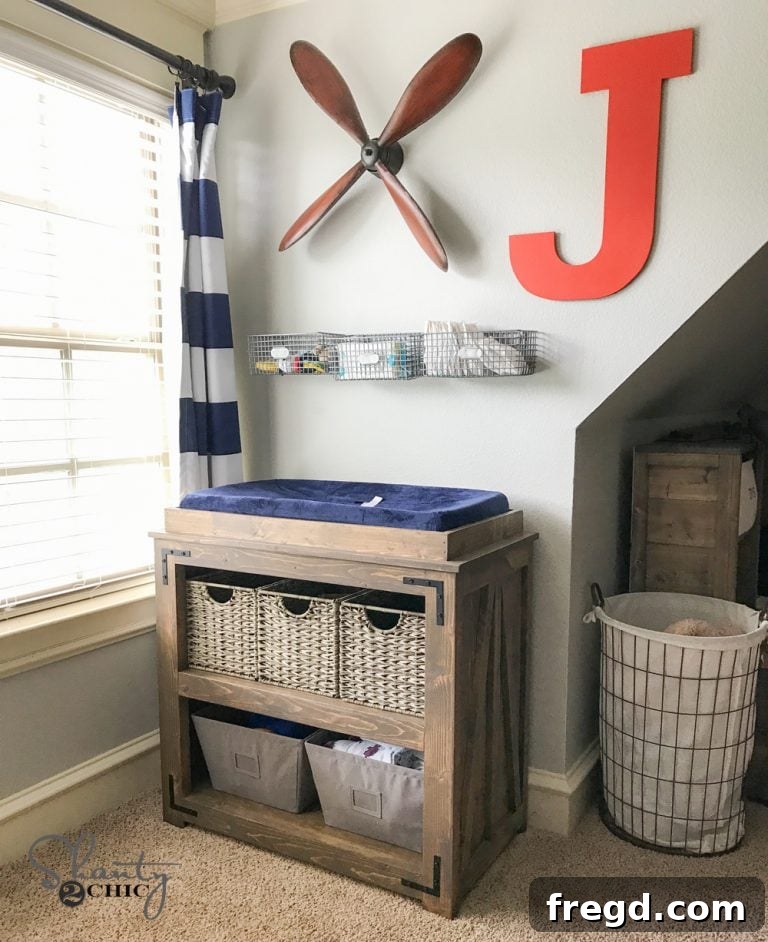
Welcome, fellow DIY enthusiasts and soon-to-be parents! With just a few weeks left until my new little one arrives, the excitement is palpable – not just for cuddles, but also for finally being done with pregnancy! I know many of you can relate to that feeling. As we prepare for his arrival, one of the key projects on my list has been creating a comfortable and functional shared room for him and his older brother. A major part of this endeavor involved tackling the changing table. My vision was clear: I wanted a changing table that didn’t scream “baby furniture” and, crucially, could easily transform into a versatile piece of furniture long after the diaper days are over. And so, after much planning and sawdust, I’m thrilled to share the result: my very own DIY Farmhouse Changing Table!
Isn’t it fantastic? What truly excites me about this design is its inherent adaptability. The removable topper means you can effortlessly transition this piece from a dedicated changing station to a stylish side table, an elegant console table, or even a charming coffee bar. This multi-functional aspect makes it a smart investment of time and effort, ensuring it remains a valuable part of your home for years to come. Before diving into the detailed construction steps, I highly recommend watching our comprehensive how-to video on YouTube, which guides you through every stage of building this changing table. You can find it HERE or simply click the video link below!
DIY Farmhouse Changing Table: Free Step-by-Step Plans
To ensure a smooth building process, your next essential step is to download and print the FREE PLANS by clicking HERE! These detailed plans provide all the measurements and diagrams you’ll need to construct this beautiful piece of furniture with confidence. Having the plans handy will be invaluable as you follow along with the tutorial.
Preparation and Cutting Your Lumber
The journey begins with preparing your lumber and making all the necessary cuts. A crucial decision I made for this project was to rip the rounded edges off my 2x boards. You might wonder, what’s the purpose of this? By removing the factory-rounded edges, the 2x lumber takes on a straighter, cleaner appearance, which significantly contributes to a more polished and professional final product. While this step can sometimes alter dimensions in complex builds, for this changing table, it primarily impacts the top dimensions. If you opt not to remove the rounded edges, it’s advisable to hold off cutting the top board until the main base is assembled. This allows you to accurately measure and determine the exact length needed for a perfect fit. For efficiency and precision, I utilized my Ridgid miter saw for all the shorter cross-cuts and my Ridgid table saw for ripping those edges, as previously mentioned.
Mastering Your Miter Saw: A Quick Tutorial
If you’re new to using a miter saw or simply want to refresh your skills, we have a fantastic resource for you. Check out our HOW TO USE A MITER SAW Video HERE! This tutorial will help you achieve clean, accurate cuts essential for any woodworking project, including this changing table.
Assembling the Changing Table Frame: Step-by-Step
The initial assembly phase involves constructing one side of the changing table. To create strong and secure joints, I employed 1.5-inch pocket holes paired with 2.5-inch pocket hole screws. For this task, my Kreg K5 pocket hole jig was indispensable. If you’re unfamiliar with pocket hole joinery, it’s a game-changer for DIY furniture projects. You can learn more by watching our HOW TO USE A KREG JIG video here!
When preparing your boards, ensure that the two bottom horizontal runners are drilled with pocket holes on each end. These will be crucial for connecting them to the vertical legs, forming a sturdy base for the side panel.
Similarly, the top runner will also feature pocket holes drilled along its length. These strategically placed holes will be utilized in a later step to securely attach the changing table’s main base to its top panel, ensuring a robust and stable connection.
Initial Frame Assembly: Building One Side
With your runners prepped, it’s time to assemble the initial frame. Attach these runners to the legs using your pocket hole screws and wood glue. At this stage, focus on building just one of the side frames. Upon completion, it should distinctly resemble the image provided, forming a solid and square panel ready for the next steps.
Connecting the Side Frames and Adding Planks
Next, you’ll incorporate the runners that span the short ends of the changing table. These connectors will join your first assembled side frame to the subsequent components. Secure these boards using a combination of wood glue for extra strength and 1.5-inch pocket hole screws. It’s vital to ensure the pocket holes are facing inward, out of sight, and that these runners align perfectly flush with the edges of the legs. Precision here contributes to a seamless and professional finish.
Now, attach the remaining two legs. These will also be secured with wood glue and pocket hole screws driven through the pocket holes in the runners and into the new legs. This creates the full rectangular framework of the changing table base.
Once the main frame is standing, it’s time to add the 1×6 plank pieces. These planks are attached with wood glue and nails to the inside of the runners, effectively joining the side assemblies to the second set of legs. A quick note and a lesson learned from my own build: **It is critical to add 3/4-inch pocket holes at the top of each of these six planks *before* attaching them.** I mistakenly forgot this step and had to go back with a smaller Kreg R3 jig to add them, which was a considerably more difficult task. The plans clearly illustrate this step, so please follow them closely to avoid this hassle!
Installing the Shelves for Storage
Once both sides are fully planked, you are ready to install the shelf boards. For my shelves, I chose 3/4-inch Purebond Birch Plywood. I often have the helpful staff at Home Depot cut the large sheets down to the approximate width (or slightly wider), which makes them much easier to transport and handle at home. I then make the more precise, smaller cuts on my table and miter saw. For attaching the shelves, I drilled 3/4-inch pocket holes around the bottom perimeter of both shelf boards. These pocket holes will allow me to securely attach the shelves to the runners and planks below. While I used my Kreg Foreman for this part, which is an amazing time-saver – essentially a Kreg Jig on steroids – any model of Kreg Jig you own will work perfectly!
Achieving a snug fit for these shelves is important. Sometimes, a gentle tap with a mallet can help ease them perfectly into place. In woodworking, a tight fit is always a good sign of accurate cuts! I used 1.25-inch pocket hole screws to attach both shelves, driving them through the pocket holes on the bottom of the shelf and into the supporting runners and planks. The goal is for these shelves to sit flush with the top edge of the runners, creating a level and integrated surface.
Completing the Frame with Final Runners and Trim
With both shelves now securely in place, the core structure of the changing table is really taking shape. You’re now ready to add the remaining runners, which further reinforce the stability and provide additional attachment points for the overall design.
Before attaching these final runners, always remember to apply wood glue between the joints. This crucial step significantly enhances the strength and longevity of your build, creating a bond that is often stronger than the wood itself and helping to hold everything rigidly in place.
Once the runners are securely attached to the legs, ensure you also attach the shelves to these newly installed runners. This is done by driving screws through the pocket holes located on the bottom of the shelves, further integrating them into the robust frame.
Next up is the side trim, which is key to achieving that desirable farmhouse aesthetic. After cutting your trim pieces to size, attach them using wood glue and 1.25-inch brad or finish nails. The glue provides a permanent bond, while the nails hold the trim in place as the glue dries, resulting in a clean and finished look.
Crafting and Attaching the Table Top
The top of this versatile changing table is crafted from a pine project panel. These panels are readily available in various sizes at most hardware stores, making them a convenient choice for a smooth, solid surface. I carefully cut mine to the exact dimensions specified in the plans and then meticulously sanded down all the edges to ensure they were perfectly smooth and free of splinters, ready for finishing.
To attach the base to the top, carefully flip the entire table base upside down and center it precisely on your prepared project panel. Once aligned, secure the base to the top using 1.25-inch pocket hole screws. These screws will pass through the pre-drilled pocket holes on both the side planks and the long runners, ensuring a firm and stable connection between the base and the tabletop.
The Convertible Changing Topper: Design and Safety
At this stage, you have a fully functional and stylish console or side table. If you intend to use this piece purely as decorative furniture, you can stop here. However, for those aiming for its primary purpose as a changing table, the next step is to create and attach the removable topper. The pieces for the topper are cut with 45-degree angles at each corner, creating a clean, mitered frame.
I added two 3/4-inch pocket holes to each of the longer topper boards. These allowed me to securely attach the changing table topper frame to the main tabletop using 1.25-inch pocket hole screws. I acknowledge that this method will leave visible screw holes when the topper is eventually removed. However, these can be easily filled later. I prioritized this attachment method as I believe it offers the safest and most secure way to keep the topper firmly in place, minimizing any risk during use. With this final piece attached, your DIY changing table is complete!
Accessorizing Your DIY Changing Station
To truly complete your changing station, the right accessories make all the difference. I found the perfect changing table pad on Amazon, offering comfort and safety for your little one. Paired with a soft and stylish cover, it’s both practical and aesthetically pleasing.
For organizational bliss, the baskets I discovered at The Container Store are an absolute perfect fit and an excellent find. They slide effortlessly into the shelves, providing discreet and accessible storage for diapers, wipes, and other baby essentials.
Medium Wicker Baskets
Medium Grey Fabric Baskets
The Perfect Finish: Varathane Briarsmoke Stain
To achieve its stunning aesthetic, this changing table received a generous coat of Varathane Stain in Briarsmoke. The rich, deep tone of this stain perfectly complements the farmhouse style, adding warmth and character. I couldn’t be happier with the final result – it truly transformed the raw wood into a piece of art that will anchor the nursery’s decor.
Here it is, fully prepped and ready for action – ready to welcome countless diaper changes and eventually transition into a beautiful, lasting piece of furniture. I can hardly wait to see our little guy’s sweet face (and, yes, his little booty!) gracing this handmade creation.
This changing table is just one piece of our evolving nursery. You can explore some of the other DIY projects I’ve crafted for their room, such as the impressive DIY Turnbuckle Shelves, designed for both storage and visual appeal:
And don’t forget to check out his beautiful DIY Farmhouse Crib… another piece built with love and designed to last.
Stay tuned for more inspiration and plans! I’ve shared some sneak peeks of the room’s progress on Instagram, and detailed plans for other projects are on their way:
Instagram Sneak Peek 1
Instagram Sneak Peek 2
Instagram Sneak Peek 3
Thank you so much for joining me on this woodworking journey! I hope this detailed tutorial empowers you to create your own beautiful and functional DIY Farmhouse Changing Table. Feel free to reach out with any questions you might have in the comments below – I’m always happy to help!