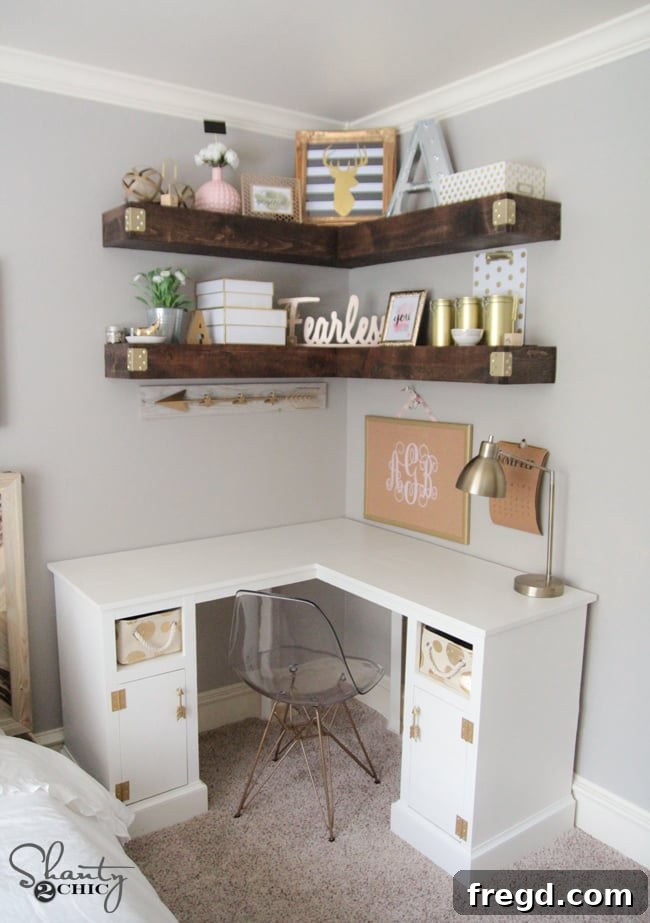
Unlock the hidden potential of your home with these simple, stylish, and incredibly affordable DIY floating corner shelves! If you’ve been looking for clever ways to maximize storage or add a decorative touch to an underutilized space, then custom floating shelves are your answer. I’ve built various floating shelves throughout my home, from bathrooms to living rooms, and they consistently prove to be a fantastic solution. When my daughter expressed a desire for open shelving in her room, I immediately knew these corner shelves would be the perfect fit. Crafting floating shelves has become one of my absolute favorite woodworking projects, offering immense satisfaction and incredible utility!
I’m genuinely thrilled with how these DIY Floating Corner Shelves turned out. The seamless integration into the corner creates a sophisticated look while providing practical storage. Honestly, I now find myself wanting a set of these elegant shelves in every room of my house! Currently, I’m in the exciting process of revamping my daughter’s room, and completing this significant corner with these shelves has already made a huge difference. Let’s dive into building these!
This tutorial offers a fantastic variation of our original DIY floating shelves, designed specifically for corner spaces. The best part? Each shelf costs under $40 in lumber, making it an incredibly budget-friendly home improvement project. Below, you’ll find a full tutorial with step-by-step instructions that are easy to follow, even for those new to woodworking.
Table of Contents
Introduction to Floating Corner Shelves
Floating shelves offer a sleek, minimalist aesthetic that can instantly elevate any room. They provide a perfect blend of form and function, decluttering your space while displaying your favorite items. Corner floating shelves take this concept a step further by ingeniously utilizing those often-overlooked and underutilized corner areas. Instead of letting corners become dead space, you can transform them into charming display nooks or efficient storage zones. Whether you’re aiming for a rustic farmhouse look, modern minimalist style, or something in between, these shelves can be customized to match your existing decor, adding character and warmth to your home.
Why Choose DIY Floating Corner Shelves?
Opting for a DIY approach to building your floating corner shelves comes with a multitude of benefits. Firstly, it’s incredibly cost-effective. Pre-made floating shelves, especially those designed for corners, can be surprisingly expensive. By building them yourself, you save significantly on labor and material markups, often achieving a higher quality product for a fraction of the price. Secondly, customization is key. You’re not limited by standard sizes or finishes; you can tailor the dimensions, wood type, stain, or paint to perfectly match your specific corner and interior design vision. This project also offers a deep sense of accomplishment. There’s immense satisfaction in knowing you’ve created a beautiful and functional piece of furniture with your own hands. Plus, it’s an excellent way to learn new woodworking skills or hone existing ones. These shelves provide versatile storage for books, plants, decor, or even serving as a small corner desk area, making them an ideal solution for any room that needs a little extra love and organization.
Essential Tools and Materials
Before you begin your woodworking adventure, gather all the necessary supplies and tools. Having everything on hand will ensure a smooth and efficient building process.
Supply List
- 2x4x8 Pine or Whitewood (2 pieces): These will form the sturdy internal frame (cleats) that supports the shelves.
- 1/4” X 24” X 48” Plywood (1 piece): Used for the bottom panels of your shelves, providing a clean, finished look.
- 1” x 10” x 8’ Board (1 piece): This common board will serve as the top surface of your floating shelves.
- 1” x 6” x 8’ Board (1 piece): Essential for the side and front trim pieces, giving your shelves their seamless floating appearance.
- 1-1/2” Pocket Screws: For creating strong, hidden joints in your cleat assembly.
- 1-1/4” Brad Nails: Used with a nail gun for attaching the plywood and trim pieces, providing a secure hold with minimal visible fasteners.
- 3” Spax Screws (or similar self-tapping wood screws): Crucial for securely mounting the heavy-duty cleats to your wall studs.
- Wood Glue (Titebond recommended): Provides an incredibly strong bond, reinforcing all your screwed and nailed joints.
- Varathane Kona Stain (or desired finish): To protect and beautify your shelves, giving them a rich, custom appearance.
- Simpson Strong-Tie Metal Corners (optional): For an added decorative and industrial-chic touch.
- Gold Furniture Tacks (optional): To attach the metal corners and add a touch of elegance.
Tools You’ll Need
- Miter Saw: For making precise, accurate cuts on your lumber. Absolutely essential for square cuts.
- Kreg Jig (K5 or similar): A pocket hole jig is vital for drilling angled pilot holes, creating incredibly strong and discreet joints for your cleats.
- Ryobi 18V Drill and Impact Driver: Your drill will be used for driving pocket screws, while the impact driver offers more torque for driving long screws into wall studs.
- Ryobi AirStrike Nailer (or similar brad nailer): Speeds up the process of attaching trim and plywood with precision.
- Table Saw (optional, for ripping plywood/trim): While Home Depot can rip plywood for you, a table saw offers more control and convenience for custom widths.
- Stud Finder: Non-negotiable for locating wall studs, ensuring your shelves are mounted securely.
- Level: Crucial for ensuring your shelves are perfectly straight and even. Don’t skip this!
- Tape Measure & Pencil: For accurate measurements and marking cuts.
- Safety Glasses: Always protect your eyes when working with power tools.
The Cut List for Your Shelves
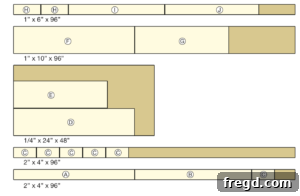
The success of your floating corner shelves hinges on precise cuts. Before making any cuts, it’s highly recommended to measure your specific corner and decide on your desired shelf depth and width. The dimensions provided here are a general guide; adjust them to fit your unique space. Remember the golden rule of woodworking: “Measure twice, cut once!”
- From 2x4s (for the internal cleat frame):
- Longer Wall Cleats: 2 pieces per shelf (e.g., 20-30 inches, depending on desired depth). These run along the main wall.
- Shorter Wall Cleats: 2 pieces per shelf (e.g., 18.5-28.5 inches). These run along the adjacent wall, allowing for the thickness of the first cleat.
- Support Braces: Approximately 6-8 pieces per shelf, each around 7 inches long. These connect the wall cleats and provide the floating support structure.
- From 1/4″ Plywood (for the bottom panels):
- Cut two pieces per shelf to precisely fit the dimensions of your assembled cleat frames. One will be the longer bottom piece, and the other the shorter, ensuring they meet cleanly at the corner.
- From 1×10 Board (for the top panels):
- Cut two pieces per shelf, similar to the plywood bottom, but allow for a slight overhang on the front and sides if desired for a more robust look.
- From 1×6 Board (for the trim and facing):
- Side Trim: Rip the 1×6 down to 4.5 inches wide, then cut two pieces per shelf to match the depth of your shelf.
- Front Trim: Cut two pieces per shelf to fit the front opening of your assembled shelf frame (one longer, one shorter). These pieces will effectively hide the internal cleat structure.
**Pro Tip:** For a slightly simpler build and to eliminate the need for ripping the 1×6 board, consider using 2×3 material instead of 2x4s for your internal cleats. If you use 2x3s, a standard 1×4 board (which is actually 3.5 inches wide) can be used for your trim pieces without any ripping, simplifying your cuts and saving time. Just remember to adjust all your brace and panel measurements accordingly if you choose this option.
Step 1: Preparing the Cleats and Pocket Holes
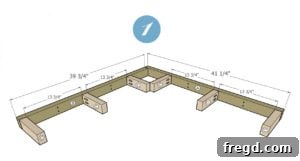
The foundation of a strong floating shelf is a well-built cleat system. Start by cutting your 2×4 lumber (or 2x3s if you chose that option) according to your cut list using your miter saw. You’ll have longer wall cleats, shorter wall cleats, and several smaller support braces. Precision here is crucial for a professional-looking result.
Next, it’s time to introduce the magic of pocket holes. Using your K5 Kreg Jig, drill 1.5-inch pocket holes into each of your smaller support braces. These angled holes will allow you to create incredibly strong, hidden joints when you connect the braces to the wall cleats. Typically, each short brace piece will require two pocket holes, strategically placed for maximum stability.
Ensure your pocket holes are clean and consistent. The Kreg Jig makes this process incredibly straightforward, even for beginners. These holes are essential for building a robust and durable internal frame that can bear the weight of your shelf’s contents.
Step 2: Assembling the Floating Shelf Braces
With your pocket holes drilled, it’s time to assemble the internal frames (cleats) for your floating shelves. This step forms the sturdy skeleton that will be mounted to your wall. Begin by applying a generous line of Titebond wood glue to the end of each small support brace piece where it will connect to the longer wall cleat. Wood glue provides an exceptional bond that makes the joint even stronger than screws alone, preventing any future wobbling or separation.
Next, using your Ryobi 18V drill, connect the small support braces to the longer wall cleats with 2.5-inch pocket hole screws. Drive the screws firmly, ensuring a tight connection. Repeat this process for all your support braces, typically aiming for three small braces connected to each wall cleat, depending on the length of your shelf. This creates a strong, ladder-like structure that will protrude from the wall, forming the internal support for your floating shelf.
Each cleat will typically have three small boards connected in this fashion, creating a robust framework. Once all your braces are built, you’ll have two L-shaped cleat assemblies per shelf, ready for wall mounting. Ensure they are square and sturdy before proceeding.
Step 3: Mounting the Cleats to the Wall
Attaching the cleat frames securely to the wall is arguably the most critical step for ensuring your floating shelves are stable and can hold significant weight. While every wall can be different, the method described here is a reliable approach I’ve successfully used for every floating shelf in my home.
First, mark the exact lines on the wall where you want your shelves to sit. Use a stud finder to locate and mark the wooden studs behind your drywall. These 2×4 studs are the structural supports of your wall, and screwing into them is essential for maximum stability. Anytime you’re mounting anything substantial to a wall, always aim to hit these studs. For this project, I used 3-inch Spax screws, which are fantastic self-tapping screws that drive easily and hold firmly. 3.5-inch screws are also an excellent choice for even more grip.
Align your first cleat frame with your marked lines. Use your trusty level to ensure it’s perfectly horizontal. Then, using your Ryobi Impact driver, drive the Spax screws through the cleat and deeply into the wall studs. Drill pilot holes if necessary to prevent wood splitting. Double-check for level after each screw is driven to ensure your shelf doesn’t end up looking “wonky.” This is the level I use – it’s inexpensive and works like a charm!
Once the first (longer) cleat piece is securely attached, position the shorter cleat piece, making sure it starts 1.5 inches out from the corner to compensate for the thickness of the first cleat. Attach it to the wall studs using the same method, ensuring it is also perfectly level. I found it easiest to attach the top shelf’s cleats first, then measure down to install the lower shelves. The image below shows what your first two attached braces will look like. I measured 13 inches up from the top of one brace to the next for consistent spacing, but you can adjust this based on your preference.
This image provides another perspective of the mounted cleats, highlighting how they form the underlying support for your corner shelves.
Continue this process for all desired shelf levels. As mentioned, I measured 13 inches up from the top of the previous brace to attach my next set of cleats using the exact same robust method. Consistency in spacing and levelness will yield the best visual outcome.
Step 4: Wrapping the Cleats with Plywood
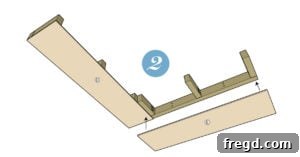
Once your cleat frames are securely mounted to the wall, the next step is to “wrap” them to create the solid shell of your floating shelves. Start with the bottom pieces, using your 1/4-inch plywood. If you don’t have a table saw to rip down the plywood to your exact specifications, many hardware stores like Home Depot offer cutting services that can prepare your wood for you.
Apply a line of wood glue along the bottom edges of your cleat frame. Then, carefully position your cut 1/4-inch plywood pieces. Begin with the longer bottom panel first, ensuring it is flush with the outside edges of your cleat. Secure it in place using your Ryobi AirStrike nailer (or similar brad nailer) with 1.25-inch finish nails. A heavy-duty stapler can also work well for this part. The combination of wood glue and brad nails creates a very strong and lasting bond, preventing any sagging or separation over time.
Ensure the plywood fits snugly and covers the bottom of your entire cleat structure. The brad nailer makes quick work of this step, providing fast and secure fastening. The image shows the process of attaching the bottom panel with the nail gun.
Step 5: Attaching the Top and Side Panels
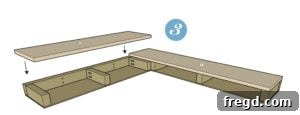
With the bottom panels secured, it’s time to install the top surfaces and side trim of your floating shelves, which truly begin to define their shape. First, take your 3/4-inch thick 1×10 common boards. I found these readily available at Home Depot. Cut them to size using your miter saw, ensuring they fit perfectly over your cleat frames, allowing for a slight overhang if desired. Apply wood glue generously to the top surfaces of your cleats and then carefully place your top board. Secure it using 1.25-inch finish nails with your nailer, making sure the outside edges are flush or have your desired overhang.
The wood glue is crucial here, creating a strong, lasting bond between the top panel and the cleat frame, which will prevent any movement or creaking. Apply it thoroughly before positioning your top piece.
This image illustrates the secure attachment of both the top and bottom panels, creating a hollow box-like structure around the cleat. This is where your shelf truly starts to take shape.
Next, I added the side pieces using the same method. These are 1×4 common pine boards from Home Depot. If you followed the pro tip and used 2x3s for your cleats, your 1×4 boards will fit perfectly without needing to be ripped. Apply wood glue to the sides of the cleats and secure the side trim pieces with 1.25-inch finish nails. Ensure the ends are flush with the front edge of the cleat structure.
A side view after attaching the side panels gives you a clear idea of how the wooden box is forming around the internal cleat structure, making the shelf appear to magically float.
Step 6: Adding the Front Trim for a Seamless Look
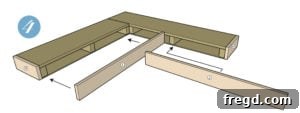
The final pieces of wood to attach are the front trim boards. These are crucial for completing the “floating” illusion, as they hide the internal cleat structure entirely. As with previous steps, it’s always best to measure and cut these remaining pieces to fit precisely, as slight variations can occur during assembly.
Apply a generous bead of wood glue along the front face of your cleat frame, where the trim piece will attach. Then, carefully align your cut front trim board (from the 1×6 material, possibly ripped down or used as a 1×4 if you opted for 2×3 cleats). Secure it in place using 1.25-inch finish nails with your brad nailer. Ensure the trim is flush with the top, bottom, and side panels, creating a seamless, box-like appearance that completely conceals the internal supports.
The wood glue is particularly important on the front trim as it helps achieve that solid, continuous look, preventing any gaps or movement. Apply the glue evenly before attaching the board.
Once the glue is applied, carefully nail the front board to the shelf brace. Take your time to ensure a perfect fit and a clean finish. Now, with all the panels and trim in place, your floating corner shelf structure is complete and ready for its finishing touches!
Step 7: Finishing and Personalizing Your Shelves
My absolute favorite part of any woodworking project is adding the finish! This is where your shelves truly come to life and reflect your personal style. For these particular shelves, I opted for Varathane Kona stain, which imparts a rich, deep hue that instantly adds warmth and sophistication. You can find it on Amazon HERE or at most hardware stores.
Before staining, ensure all nail holes are filled with wood putty and sanded smooth, and the entire shelf surface is clean and free of dust. Apply the stain according to the manufacturer’s instructions, usually with a brush or rag, wiping off excess. For added durability and protection, consider applying a coat or two of polyurethane after the stain has fully dried.
To further dress up each shelf, I also found some Simpson Strong-Tie metal corners. I spray-painted these a beautiful gold color to add a touch of glamour and attached them to each corner using gold furniture tacks. This small detail made a huge difference, giving the shelves a custom, high-end look that I absolutely love!
Once your shelves are finished and fully cured, the most enjoyable part begins: adding all the accessories and home decor! This is your chance to infuse personality and functionality into your new storage solution. Arrange books, display cherished keepsakes, add some greenery with potted plants, or showcase decorative objects. The possibilities are endless, and seeing your vision come to life is incredibly rewarding.
Your New DIY Floating Corner Shelves
And there you have it! Your very own custom-built DIY floating corner shelves, ready to enhance your living space. The transformation is remarkable, turning an empty corner into a stylish focal point or a highly functional storage area. The satisfaction of building something beautiful and practical with your own hands is truly unmatched.
Speaking of transformation, how cute is this feature wall that perfectly complements the shelves? I absolutely love how these elements come together to create a cohesive and charming room design!
I hope this comprehensive guide covers every detail you need to successfully build your own set of DIY floating corner shelves.
FAQs About Building Floating Corner Shelves
- How much do these DIY floating corner shelves cost?
- The lumber for each shelf can cost under $40, making this a very affordable DIY project compared to purchasing pre-made shelves.
- What tools are essential for this project?
- A miter saw, Kreg Jig, drill/impact driver, brad nailer, stud finder, and a good level are essential. A table saw is helpful but optional for ripping wood.
- How do I ensure my shelves are level and secure?
- Always use a stud finder to mount your cleats directly into wall studs. Use 3-inch or 3.5-inch self-tapping screws (like Spax screws) for a strong hold, and constantly check with a level throughout the mounting process.
- Can I customize the size and finish of these shelves?
- Absolutely! This is one of the biggest advantages of DIY. You can adjust the dimensions to fit your space perfectly and choose any stain, paint, or decorative elements to match your decor.
- Is this project suitable for beginners?
- Yes, while it involves power tools, the steps are straightforward and well-documented. Using a Kreg Jig simplifies joinery, and patience combined with careful measuring will lead to a successful outcome for DIY enthusiasts of all levels.
Conclusion: Enhance Your Home with Custom Shelving
Building your own DIY floating corner shelves is a rewarding project that combines practicality with aesthetic appeal. You’ll not only gain valuable storage and display space but also add a personalized touch to your home that reflects your craftsmanship and style. From utilizing wasted corner areas to saving money and enjoying the process of creating something beautiful, these shelves are an excellent investment of your time and effort. We hope this detailed guide empowers you to tackle this project with confidence. Happy building!
DIY Corner Floating Shelves – Project Overview
DIY, Floating Shelves, Corner Shelves, Woodworking, Home Decor, Free Plans, Storage Solution
Detailed Supply List
- 2 2x4x8 pine or whitewood boards (for cleats)
- 1 1/4” X 24” X 48” plywood sheet (for bottom panels)
- 1 1” x 10” x 8’ common board (for top panels)
- 1 1” x 6” x 8’ common board (for trim/facing)
- 1-1/2” pocket hole screws
- 1-1/4” brad nails
- 3” Spax screws (or similar self-tapping wood screws)
- Wood Glue (e.g., Titebond)
- Stain or paint of your choice (e.g., Varathane Kona stain)
- Optional: Simpson Strong-Tie metal corners, gold spray paint, gold furniture tacks
Instructions Summary
-
Prepare Your Cut List: Carefully review and cut all your wood pieces according to your desired shelf dimensions. Remember to adjust lengths for longer and shorter wall cleats and support braces.

-
Construct Wall Cleats: Drill 1.5-inch pocket holes into the smaller support brace pieces. Attach these braces to your longer and shorter wall cleats using wood glue and 2.5-inch pocket hole screws, forming an L-shaped internal frame for each shelf. Ensure the assembly is square and sturdy.
-
Mount Cleats to Wall: Locate wall studs using a stud finder and mark your desired shelf heights. Hold the longer cleat against the wall, check for level, and secure it into the studs with 3-inch Spax screws. Repeat with the shorter cleat, ensuring it’s 1.5 inches out from the corner and also perfectly level.
-
Wrap with Plywood: Apply wood glue to the bottom edges of the mounted cleat frame. Attach the 1/4-inch plywood bottom panels using 1.25-inch brad nails, starting with the longer panel and ensuring outside edges are flush.
-
Add Top and Side Panels: Next, attach the 1×10 top panels with wood glue and 1.25-inch brad nails, making sure outside edges are flush or have a consistent overhang. Then, add the 1×4 side trim pieces, again using wood glue and brad nails. Measure the exact height from the bottom of the plywood to the top of the 1×10 (approx. 4-1/2”) and rip your 1×6 material to this width for the trim.
NOTE: If you used 2×3 material for the cleats, you can use 1×4 wood for the trim without needing to rip it down.
-
Install Front Trim: Finally, add the front trim pieces, cutting them to fit precisely. Attach them with wood glue and 1.25-inch brad nails to conceal the cleat structure. Tape off the walls and apply your chosen finish (stain or paint) to complete your DIY floating corner shelves.
-
For a printable version of these detailed plans, click HERE.