
Welcome, DIY enthusiasts and holiday gift seekers! To ensure you don’t miss any of our exciting Christmas projects and inspiring home transformations, make sure to FOLLOW us on Instagram!
DIY $3 Photo Display Gift: Day 1 of 12 Days of Christmas & Free Printables
The holiday season is officially upon us, and we’re thrilled to kick off our annual 12 Days of Christmas Event! For Day 1, we’re bringing you a project that truly embodies the spirit of giving: a thoughtful, personalized, and incredibly budget-friendly photo display. If you’re searching for unique Christmas gift ideas that won’t break the bank, you’ve found your perfect DIY. This handmade photo display is not only charming but also comes with a set of beautiful free printables to make your gifting even easier.
Crafting Heartfelt Gifts Without Breaking the Bank
As a family with five children and an extensive list of loved ones, we deeply understand the constant quest for awesome gift ideas that are both meaningful and affordable. This is precisely why we adore photo gifts! They capture precious memories, resonate with personal sentiment, and don’t require a hefty investment. Our DIY photo display is an excellent example of this philosophy—it’s super simple to create, incredibly cheap, and undeniably cute. It’s the kind of project that brings a smile to both the giver and the receiver, making it an ideal choice for friends, family, or even as a special treat for your own home decor.
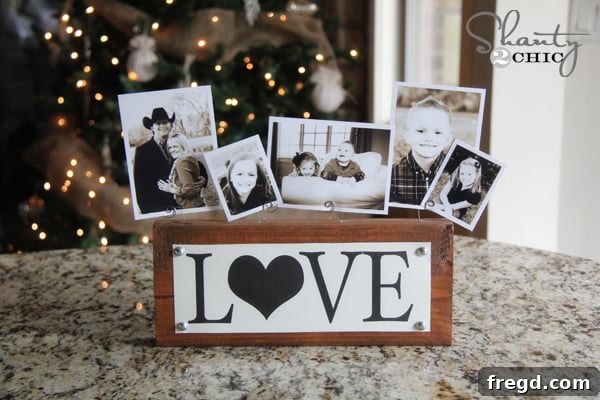
Curious about how such a charming piece turned out? Take a look at our finished project…
The most exciting part? The astonishingly low cost to create this beautiful keepsake!
Yes, you read that right – just $3! This project proves that you don’t need to spend a fortune to create something truly special and memorable. It makes a fantastic, personalized gift for anyone on your Christmas list, spreading joy without straining your holiday budget.
Step-by-Step Guide: Creating Your $3 Photo Display Gift with Free Printables
Ready to dive into this fun and rewarding DIY project? Here’s a detailed breakdown of how we brought this charming photo display to life. We’ve made sure to include tips and alternatives so that everyone, regardless of their crafting experience or tool collection, can successfully create this gift.
Essential Tools & Materials:
- A piece of wood (reclaimed wood or a simple pine board works great)
- Hand Saw (or access to a hardware store cutting service)
- Wood Stain (Rust-Oleum is a favorite)
- Drill with a small bit (or hammer and small nail)
- Upholstery Tacks
- Photos
- Cream-colored 8.5×11 cardstock
- Printer
Step 1: Preparing Your Wood Piece
First, you’ll need a piece of wood for your display base. You can use reclaimed wood for a rustic look or a simple, inexpensive pine board from your local hardware store. The size is entirely up to you, depending on how many photos you wish to display. For those who might not have a full workshop, we have a fantastic recommendation: a simple craft saw. This compact, affordable tool is incredibly versatile and perfect for easily cutting projects like this and many others you’ll find on our site. It’s a game-changer for beginner DIYers and makes an excellent stocking stuffer. You’d be surprised at the array of projects you can tackle with it!
DIY Tip: If you don’t own a saw, don’t fret! Most hardware stores, like Home Depot, offer wood cutting services. They often have a handsaw similar to the one we recommend in their wood section and can cut your board to size for you, sometimes even for free or a minimal charge.
Step 2: Staining Your Wood for a Perfect Finish
Once your wood is cut to size, it’s time to add some character with a beautiful stain. We highly recommend Rust-Oleum wood stain for its quality and ease of use. Apply the stain evenly across all surfaces of your wood piece. Allow it to penetrate for a few minutes before wiping off any excess with a clean rag. The longer you let the stain sit before wiping, the deeper and richer the color will be. Make sure to follow the manufacturer’s instructions for drying times. This step not only protects the wood but also enhances its natural grain, giving your display a professional, finished look.
Step 3: Drilling Holes for Your Photo Clips
Next, you’ll need to drill small holes along the top edge of your stained wood piece. These holes will accommodate the wires or string from which your photos will hang. Plan out the spacing for your holes beforehand to ensure an even and aesthetically pleasing arrangement. Use a small drill bit, appropriate for the size of your chosen clips or string. If you don’t have a drill, an old-school hammer and a small nail will work just as well! Simply tap the nail into the desired spots to create pilot holes, then carefully remove the nail using the claw end of your hammer. Voila! You’ll have perfect holes ready for the next step. This manual method is surprisingly effective and ensures everyone can complete this project.
That’s it for the fundamental building part of your photo display! Now for the fun and personalization elements.
Personalize with FREE Printables!
To add an extra layer of charm and customization to your photo display, we’re excited to offer a selection of FREE printables! We’ve designed four unique options, ensuring you have the perfect sentiment, whether this display is a heartfelt gift for someone special or a delightful addition to your own home decor. From inspiring quotes to family-focused messages, there’s a design to suit every taste and occasion. These printables are designed to fit perfectly into your display, enhancing its visual appeal and personal touch.
To access and print these beautiful designs, simply click on each image below. Once the printable opens in a new window or tab, you can easily select “Print” from your browser’s top bar. We recommend printing them on cream-colored 8.5×11 cardstock. The weight and texture of cardstock paper give the printables a high-quality feel, making your finished gift look even more professional and durable. You can find cardstock at incredibly affordable prices at any craft store, making this a cost-effective choice.
Once printed, your chosen design will be the backdrop for your cherished photos.
Step 4: Securing Your Printable
To elegantly hold your chosen printable in place, we opted for upholstery tacks. These small, decorative tacks are not only really cheap but also add a lovely, refined touch to your finished display. You can easily find them at any craft or hardware store. If you prefer the convenience of online shopping, you can also find a wide selection of upholstery tacks on Amazon. A great benefit of using these tacks is their ease of removal. Should you ever wish to refresh your display with a new printable, a small screwdriver can effortlessly pry them out from under the head of the nail, making seasonal or thematic changes a breeze!
Step 5: Adding Your Cherished Photos
The final and most heartwarming step is adding your photos! We love printing our photos at home on photo paper. This method saves a considerable amount of money and, for a busy mom with five energetic kiddos, it certainly saves a trip to the store. Simply print your favorite family snapshots, vacation memories, or candid moments right from the comfort of your home. Once printed, carefully cut out your photos to fit the display, arrange them as you like, and attach them using small clothespins or adhesive dots. And just like that, your personalized photo display is complete! It’s such a quick, cheap, and undeniably cute project—truly our kind of DIY. And did we mention the entire project cost just…
Just making sure you didn’t miss that incredible value!
Share the Holiday Cheer!
Thank you so much for stopping by and joining us for Day 1 of our 12 Days of Christmas Event! We hope you’re inspired to create your very own $3 photo display gift. This project is a wonderful way to add a personal touch to your holiday gifting, offering heartfelt sentiment without the high price tag. We would absolutely love for you to share this incredible $3 gift idea with your friends and, of course, PIN it to your favorite holiday boards for future reference and inspiration!
Don’t forget, we’ve teamed up with some truly fabulous bloggers to bring you this entire 12 Days of Christmas series! Make sure to check out all their amazing contributions and keep an eye out for today’s special giveaway. There’s so much holiday creativity and inspiration to explore!



Meet The Shanty Sisters: DIY on a Budget!
We are Ashley and Whitney, two sisters passionate about transforming our homes beautifully and affordably. With eight wonderful children between us, we’ve mastered the art of making every naptime and quiet moment count, turning them into opportunities for creative DIY projects. Our mission at Shanty2Chic is to inspire you to create the home of your dreams without the hefty price tag, proving that stunning results are achievable on a budget.
From ambitious building projects that yield incredible results, like our famous $65 Farmhouse Dining Table, which brings rustic elegance to any dining space…
…to ingeniously transforming everyday items, such as our stunning $15 DIY Mirror crafted from a humble Walmart mirror, proving that high-end looks don’t require high-end spending…
…and even providing charming, complimentary resources like our popular Free Printable Alphabet Banner, perfect for nurseries, classrooms, or festive party decor!
We’re always busy creating, building, and sharing fresh ideas. Stay connected with us and never miss a project by following our adventures! You can also keep up with all our latest posts and connect with our vibrant community by following us on Facebook and exploring our inspiring boards on Pinterest!
Happy crafting and a very Merry Christmas from Shanty2Chic!