
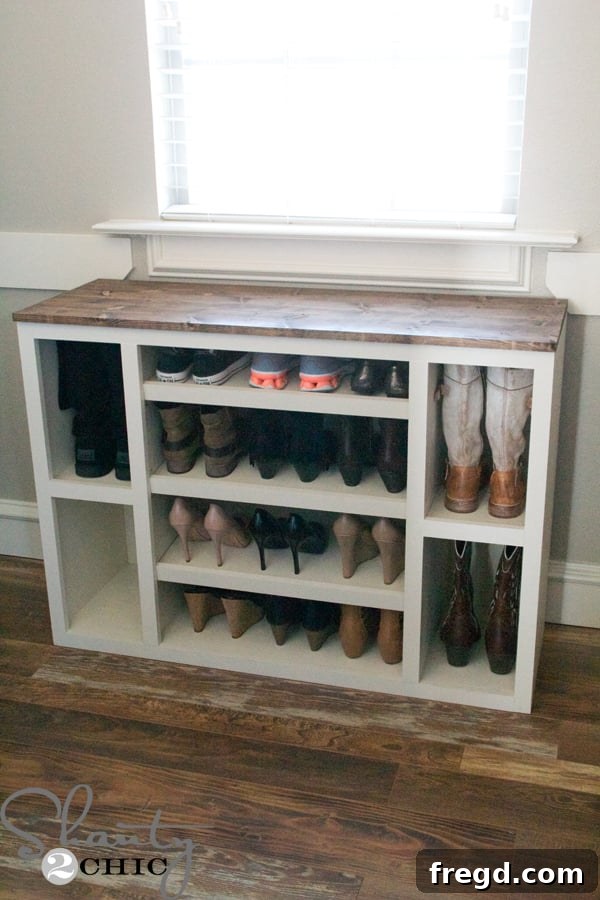
Build Your Dream DIY Shoe Storage Cabinet: Free Plans for a Custom Closet System
Tired of tangled shoes, cluttered closet floors, and a constant search for the right pair? This incredible DIY shoe storage cabinet is your ultimate solution! More than just a simple organizer, it’s the foundational piece in what can become an entire modular closet storage system, designed to bring order, efficiency, and elegance to your space.
When I had the opportunity to design the closet in my new home, I was faced with an overwhelming number of choices. Rather than rushing into a generic, pre-made system, I made the deliberate decision to hold off. I knew that by taking my time and building a modular system myself, not only would I create something truly customized to my needs, but I could also share the detailed, step-by-step free plans with all of you. This way, fellow DIY enthusiasts can benefit from a thoughtful, practical, and beautiful storage solution.
This shoe cabinet offers ample space, smart design features, and the immense satisfaction of a handmade piece tailored precisely to your footwear collection. Ready to transform your closet from chaotic to chic? You can easily download the comprehensive, printable plans absolutely FREE!
Simply click the image below or download HERE to get your complimentary plans and embark on building your custom shoe storage cabinet today!
A huge thank you and appreciation go out to our incredibly talented friend, Jay from Jay’s Custom Creations, who masterfully created these easy-to-follow printable plans. We highly recommend visiting his site for a wealth of additional amazing woodworking plans and endless inspiration!
Essential Materials & Tools for Your DIY Shoe Cabinet Project
This project is designed to be straightforward and accessible, even for those who are relatively new to woodworking. To simplify the process even further, remember that many large home improvement retailers, such as Home Depot, offer convenient services where they can rip down larger boards for you, significantly reducing your cutting time and effort. Here’s a detailed look at the specific materials and key tools I utilized to construct this robust, stylish, and highly functional shoe storage cabinet.
Selecting Your Plywood: A Commitment to Quality and Health
For the primary body and internal shelves of this cabinet, I chose high-quality birch Purebond Plywood. Our unwavering commitment to creating healthy living spaces means we exclusively use Purebond plywood for our projects. Why is this so important? Purebond plywood is entirely formaldehyde-free, guaranteeing that you are not introducing harmful airborne chemicals into your home environment. This dedication to healthier building practices is a core value for us, and you can explore more about why we took the Purebond Pledge here. This material choice not only contributes to a healthier home but also provides a durable, smooth, and aesthetically pleasing foundation for all your custom closet solutions.
The overall dimensions of this specific custom shoe cabinet are 46″W x 33″H x 16 1/2″ D. These measurements are carefully selected to provide generous storage capacity for a substantial shoe collection while maintaining a practical footprint suitable for most walk-in or reach-in closet spaces. One of the greatest advantages of a modular system like this is its inherent flexibility: you can easily build multiple units, customize their sizing, or adapt the design to perfectly fit your unique storage requirements and available space.
Key Woodworking Tools for a Seamless Building Experience
Equipping yourself with the right tools can significantly enhance the efficiency and enjoyment of any DIY project. For constructing this shoe storage cabinet, a few specialized tools proved to be invaluable, streamlining the entire building process:
- Kreg Rip Cut: This essential jig is a game-changer for anyone working with sheet goods. It attaches securely to your circular saw, transforming it into a precise rip saw that delivers perfectly straight, factory-like cuts on large panels of plywood. It eliminates the frustration and inaccuracy often associated with freehand cutting large boards to size.
- Kreg R3 Pocket Hole Jig: Pocket holes are a revolutionary technique in furniture building, creating incredibly strong, discrete, and easily assembled joints. The R3 is a portable and user-friendly jig that makes drilling accurate pocket holes simple and consistent. Always consult the free plans for the exact placement and number of pocket holes required for each component to ensure maximum structural integrity and a clean, professional finish.
- Kreg Shelf Pin Jig: If your vision includes adjustable shelving – and ours certainly does for maximum versatility – this tool is an absolute must-have. It ensures perfectly spaced and precisely aligned shelf pin holes, taking all the guesswork, tedious measuring, and potential for error out of the process. The result is professional-looking, highly functional shelves that can be customized to accommodate various shoe heights.
- Ryobi 18-volt Airstrike Nailer / Stapler: A cordless brad nailer or stapler is an incredible time-saver and convenience booster. It makes quick work of attaching components like vertical dividers, base pieces, or the cabinet backing, providing strong, fast fastenings without the hassle of air hoses or traditional hammers.
- Wood Glue: High-quality wood glue, such as Gorilla Wood Glue, is an indispensable component for creating robust, long-lasting joints. When combined with screws or nails, glue dramatically increases the strength and durability of your cabinet.
- Measuring Tape, Pencil, Safety Glasses, Ear Protection: These are standard safety and measurement essentials for any woodworking endeavor.
For those looking to invest in a comprehensive set of woodworking essentials, Kreg offers an amazing DIY Kit that thoughtfully bundles the Rip Cut, the R3 Pocket Hole Jig, and the Shelf Pin Jig. This kit represents exceptional value and often includes additional free building plans with purchase, making it a fantastic investment for anyone serious about elevating their woodworking skills and tackling home improvement projects with confidence.
Step-by-Step Construction: Building Your Custom Shoe Cabinet
1. Precise Plywood Preparation and Cutting
The initial and critical step is accurately cutting all your plywood pieces according to the precise dimensions provided in the free plans. For this task, I relied heavily on my Kreg Rip Cut paired with a circular saw to achieve perfectly straight, clean, and exact cuts. This method is paramount for ensuring that all your cabinet components fit together seamlessly and squarely. If you prefer to expedite this stage or simply don’t have access to the necessary cutting tools, remember that most major home improvement stores like Home Depot readily offer cutting services to rip your large boards down to the exact sizes you require.
2. Drilling Strategic Pocket Holes for Strong Joins
Following the cutting phase, the next step involves using your Kreg R3 Pocket Hole Jig to strategically drill pocket holes into the designated plywood pieces. Pocket holes represent an ingenious woodworking technique that allows for the creation of incredibly strong, yet discreet, joints. These are ideal for furniture construction, providing robust connections that are hidden from view. Always consult the detailed plans for the precise placement and the recommended number of pocket holes for each component. Adhering to these guidelines is crucial for ensuring maximum structural integrity and achieving the clean, finished look desired for your custom shoe storage solution.
3. Assembling the Main Cabinet Frame with Precision
With all your pieces accurately cut and the necessary pocket holes meticulously drilled, it’s time for the exciting assembly of the main cabinet body frame. I used 1 1/4″ pocket hole screws to securely fasten the foundational pieces together, forming the core structure. During this stage, it is absolutely essential to ensure that all your corners are perfectly square. Using a framing square or speed square will help prevent any future wobbling and guarantee that your finished cabinet stands perfectly straight and stable. For an added layer of durability, a good quality wood glue can be applied to all mating surfaces before fastening with screws, creating exceptionally strong and lasting joints.
4. Drilling Shelf Pin Holes for Optimal Flexibility
One of the most valuable and versatile features of this custom shoe cabinet is its adjustable shelving system. To achieve this flexibility with professional precision, I utilized my Kreg Shelf Pin Jig to drill all the necessary shelf pin holes into the vertical dividers. This remarkable tool is an absolute lifesaver for any shelving project; it perfectly spaces, aligns, and drills the holes with incredible accuracy, eliminating all the tedious measuring, marking, and potential for error. If you’ve ever struggled with the frustration of uneven shelf pin holes when drilling by hand, you will deeply appreciate the simplicity, speed, and precision this jig provides. This crucial step ensures you can effortlessly customize the shelf heights to accommodate a wide variety of footwear, from delicate flats and elegant heels to taller boots and everyday sneakers.
The image above showcases one of the vertical dividers, perfectly prepped with its array of precisely drilled shelf pin holes, poised and ready for flexible shelf placement within the cabinet.
5. Attaching Vertical Dividers and Dedicated Boot Shelves
With the main frame of the cabinet firmly established, the next crucial step is to add the internal structure by attaching the vertical dividers. I used my reliable Ryobi 18-volt Airstrike nailer in conjunction with a generous application of high-quality wood glue to securely fasten these dividers into place. This combination of both glue and nails provides exceptional strength and rigidity, effectively preventing any movement or wobbling of the internal compartments over time. As each vertical divider is added, the cabinet truly begins to take its final, functional shape, clearly defining the individual storage sections for your footwear and preparing it for the subsequent assembly steps.
Here, you can see the cabinet fully structured with all its vertical dividers securely attached, creating the perfectly organized individual compartments for various types of shoes.
Following the installation of the vertical dividers, I proceeded to attach the dedicated boot shelves to the base section of the cabinet. These shelves are strategically designed and placed to comfortably accommodate taller footwear, such as boots, ensuring that every type of shoe, regardless of its height, has a properly designated and organized spot. For a solid and lasting attachment, my trusty nailer and wood glue were again employed.
6. Constructing and Attaching the Decorative Face Frame
The face frame serves as a crucial element, adding both refined aesthetics and significant structural integrity to your custom shoe storage cabinet. It’s always considered best practice to fully build your main cabinet body first, and only then measure and precisely cut your face frame pieces to ensure a perfect, custom fit. After carefully cutting all the components, I performed a preliminary dry fit of the entire face frame directly onto the cabinet. This critical step allows you to thoroughly check for accuracy, alignment, and make any minor adjustments before committing to permanent attachment, ultimately ensuring a flawless and seamless look for your finished piece.
I began the face frame assembly by attaching the outer perimeter pieces. These were joined using 1 1/4″ pocket hole screws, combined with a strong wood glue, such as Gorilla Wood Glue. This meticulous approach creates a robust and stable outer structure for the entire face frame, providing a solid foundation for the subsequent internal components.
Here’s a clear and detailed view of the outer frame of the face frame, fully assembled and ready for the integration of its internal dividers.
To guarantee perfect alignment and seamless integration, I carefully laid the assembled outer face frame directly onto the cabinet body. I then meticulously marked the exact positions where the other, internal pieces of the face frame needed to be placed. This crucial step ensures that the face frame’s internal structure precisely corresponds with the cabinet’s internal divisions, resulting in a cohesive and professionally finished appearance.
Finally, I proceeded to attach those internal face frame pieces, utilizing the same robust pocket hole method and strong wood glue. This completed the entire face frame assembly, securely integrating it with the main cabinet body and providing a beautiful, finished aesthetic.
7. Installing the Decorative Backing Panel
For the backing of the cabinet, I was keen to achieve a charming, planked aesthetic that would add character to the piece. I discovered a lovely V-groove panel that perfectly matched my vision. Using my trusty Kreg Rip Cut and my Ryobi 18-volt circular saw, I meticulously ripped the panel to the exact required size. While it’s certainly convenient to have Home Depot cut this material for you, I often prefer to cut the backing once the main cabinet structure is fully constructed. This “measure as you go” approach ensures a flawless, custom fit, even accounting for any minute discrepancies that might have occurred during the initial cabinet assembly, thereby preventing frustrating gaps.
To securely attach the V-groove paneling to the back of the cabinet, I employed my Airstrike Stapler. While a traditional nailer or finish nails can also be used for this step, I find staples to be particularly effective for thinner backing materials. Staples provide a wider surface area of hold, significantly reducing the chance of the material slipping over the fastener and popping off, which can happen with nails on thin panels. This ensures a flush, stable, and aesthetically pleasing back panel that enhances the cabinet’s overall quality.
8. Adding the Top Planks and Final Shelf Assembly
With the backing firmly and neatly in place, the next step involved adding the decorative and highly functional 1×6 planks to the top surface of the cabinet. These planks are not merely aesthetic; they provide a sturdy and usable surface, while also contributing significantly to the overall rustic-chic aesthetic of the piece. I attached them using a robust combination of wood glue and my nailer, ensuring they were securely fastened, perfectly aligned, and flush with the cabinet’s edges. At this point, the entire cabinet structure is fully assembled and robust, standing ready for the exciting transformation that comes with paint and stain!
Finally, it was time to construct the individual adjustable shelves themselves. For these, I adopted a meticulous approach, measuring and cutting each piece precisely as I progressed, which guarantees a perfect and snug fit for every single shelf. I attached the 1×2 trim pieces to the plywood shelf bases using wood glue and my nailer, creating a clean, finished edge that elevates the look of each shelf. During this stage, I also found my new Kreg Bar Clamps to be incredibly useful. While not strictly mandatory for this part, clamps truly act like an extra set of hands, holding pieces firmly in place while the glue dries and fasteners are added, making the entire assembly process much smoother, more precise, and ultimately more enjoyable.
Finishing Your Custom Shoe Storage Cabinet: The Final Flourish
The finishing stage is where your meticulously crafted cabinet truly comes to life, transitioning from a functional structure to a beautiful piece of furniture! I chose a striking two-tone finish: staining the rustic top planks and painting the main cabinet body. This combination creates a lovely contrast and adds significant character and depth to the overall design. To prepare for the staining process, I carefully and precisely taped off the perimeter around the top planks. This diligent taping ensures crisp, clean lines and prevents any bleed-through between the stained and painted sections, resulting in a professional-quality finish.
Staining the Elegant Top Planks
For the beautiful top surface, I applied a single, even coat of Varathane Carrington stain. Using a clean, lint-free cloth, I carefully wiped the stain onto the wood, ensuring thorough and consistent coverage. After allowing the stain to penetrate the wood for approximately five minutes – adhering to the manufacturer’s recommended drying time – I then used another clean, dry cloth to gently wipe off any excess and meticulously blend the stain. This technique allows the natural grain and texture of the wood to shine through beautifully, while simultaneously imparting a rich, warm, and inviting tone that perfectly complements the overall design.
The beautifully stained top planks provide a striking contrast and perfectly complement the overall aesthetic of the design, adding a touch of rustic elegance and warmth.
Painting the Cabinet Body and Shelves for a Crisp Finish
Once the stain on the top planks was completely dry and thoroughly cured, I carefully moved on to painting the main cabinet body and all the individual adjustable shelves. I selected Behr Cozy Cottage paint for its beautiful hue and durable finish, applying two even coats to achieve full, opaque coverage and a smooth, professional-looking surface. After the paint was completely dry and no longer tacky, I meticulously removed the protective tape from around the top planks, revealing the perfectly crisp and clean line between the richly stained and freshly painted sections.
Installing Adjustable Shelves for Optimal Shoe Display
The final, satisfying step was to insert the shelf pins and position the adjustable shelves. A truly unique and highly effective feature incorporated into this design is the ability to angle the shelves slightly upwards towards the back. To achieve this clever incline, simply set the back shelf pins one notch higher than the front pins. This subtle angle is incredibly beneficial: it not only provides a superior and more appealing display for your shoes, making them more visible and accessible, but it also cleverly prevents them from sliding forward off the shelf. It’s a small, thoughtful detail in the design that makes a significant difference in both the functionality and the overall aesthetic appeal of your custom shoe storage cabinet.
Your Organized Closet Awaits: Enjoy Your Custom DIY Shoe Storage!
And just like that, you have created a truly custom, impeccably organized, and stylish home for all your beloved footwear! Giving my shoes a dedicated and beautiful new home was an incredibly satisfying accomplishment, transforming a previously cluttered and chaotic space into a highly functional, elegant, and harmonious part of my closet. This DIY shoe storage cabinet is a genuine game-changer for anyone aspiring to bring order, beauty, and efficiency to their home organization efforts.
I am absolutely thrilled with how this piece turned out – it’s not only incredibly functional but also visually stunning! While I originally intended to share this fantastic shoe storage solution with my husband, its success has made it clear: it looks like I’ll soon be embarking on another exciting build to create his very own custom shoe organizer! This modular design truly offers endless possibilities to expand and adapt to your specific storage needs, making it a truly versatile addition to any home. Many of you frequently inquire about the stylish boots displayed in the top right cubby – they are genuinely my absolute favorite pair, exceptionally comfortable, and a versatile staple in my wardrobe.
Tips for Expanding Your Modular Closet System
Remember, this custom shoe cabinet is designed to be just the beginning! If you find yourself needing even more shoe storage as your collection grows, the modular design offers incredibly easy and adaptable solutions. You can effortlessly build multiple cabinets and stack them to create increased vertical storage. When stacking, always be sure to securely fasten them together for optimal stability and safety, preventing any tipping hazards. Alternatively, if your preference leans towards more traditional open shelving without the decorative top planks, you can simply omit them from your design. This allows for seamless stacking or a different aesthetic that fits your style. The inherent flexibility of these free plans means you have the power to truly customize and grow your modular closet system to perfectly evolve with your changing organizational needs.
For those curious about other elements of my home renovation journey, you can also find more details and insights on how to install the durable and stylish laminate flooring in my closet here. Happy building, and enjoy your beautifully organized space!