
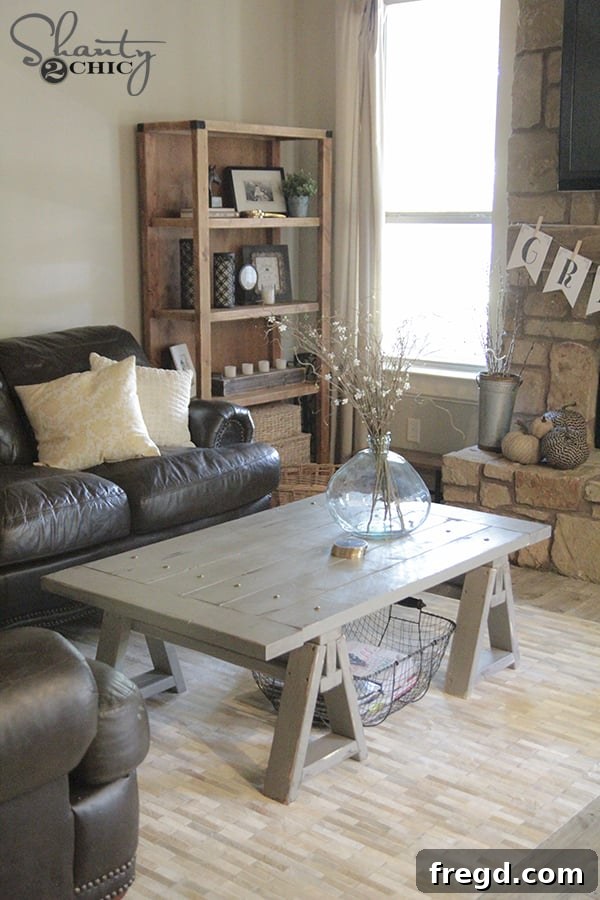
Hello fellow DIY enthusiasts and home decor lovers! I am absolutely thrilled to unveil my latest woodworking triumph: a beautiful and incredibly sturdy DIY Sawhorse Coffee Table. What makes this project truly special isn’t just its charming rustic-chic aesthetic or robust construction, but its astonishing affordability. Can you believe the entire table, built from scratch, utilizes just 7 readily available lumber boards, costing approximately $35? Yes, you read that right—only $35! This isn’t just a piece of furniture; it’s a testament to the power of creative budgeting and hands-on craftsmanship. Get ready to transform your living space with a custom coffee table that looks like a high-end designer piece, but without the hefty price tag. Let’s dive into how you can build your very own!
DIY Sawhorse Coffee Table – Comprehensive Tutorial & Free Plans
Isn’t she an absolute showstopper? This DIY Sawhorse Coffee Table project is designed to be incredibly straightforward, making it perfect for both seasoned woodworkers and enthusiastic beginners looking to tackle a rewarding home improvement task. You’ll be amazed at how quickly this elegant piece comes together, even if you’re new to building furniture. As always, I’m here to guide you through every single step of the construction process with clear, easy-to-follow instructions. To make things even simpler, you can easily download and print the complete, FREE plans by clicking RIGHT HERE or by clicking on the image below. These plans provide precise measurements and detailed diagrams to ensure your build is a success.
Why Choose a DIY Sawhorse Coffee Table?
There’s an undeniable charm to a piece of furniture you’ve crafted with your own hands. Beyond the immense satisfaction, building your own sawhorse coffee table offers several fantastic benefits:
- Unbeatable Value: At just $35 for materials, you’re getting a high-quality, custom piece for a fraction of retail prices.
- Customization: From the choice of wood to the finish and decorative accents, every element can be tailored to perfectly match your existing decor.
- Durability: DIY projects often result in more robust furniture, as you control the quality of materials and joinery. This table is built to last!
- Skill Development: It’s a fantastic opportunity to hone your woodworking skills, learning about cutting, joining, and finishing techniques.
- Unique Style: The sawhorse design offers a timeless, versatile look that can lean rustic, industrial, or even modern chic depending on your finishing choices.
Gathering Your Essentials: Tools and Materials
Before we begin, let’s ensure you have all the necessary tools and materials. This project primarily uses common 2×4 lumber, making it accessible and cost-effective. You’ll need:
- Lumber: Seven 2×4 boards (check the free plans for exact lengths and cuts).
- Cutting Tool: A miter saw is ideal for precise, angled cuts.
- Drill: Essential for pre-drilling and driving screws.
- Kreg Jig K5: Our top recommendation for creating strong, hidden pocket holes.
- Wood Glue: High-quality wood glue for strong, lasting joints. We swear by this wood glue – it’s a game-changer!
- Screws: 3-inch Spax screws and 2.5-inch pocket hole screws. Spax screws are known for their strong grip and ease of use.
- Measuring Tape & Pencil: For accurate measurements and marking.
- Clamps: To hold pieces securely while glue dries and screws are driven.
- Safety Gear: Eye protection and hearing protection are always recommended.
- Sander & Sandpaper: For smoothing surfaces before finishing.
- Finishing Supplies: Paint, stain, brushes, rags, and any decorative elements like the brass nails.
Step 1: Crafting the Robust Sawhorse Bases (The I-Beam Design)
The foundation of our DIY sawhorse coffee table lies in its incredibly strong and stable I-beam bases. You’ll start by cutting your 2×4 lumber to the specified sizes for the vertical and horizontal pieces of the I-beam, as detailed in the free plans. I utilized my trusty miter saw for these cuts, ensuring clean and precise edges. Once your wood pieces are cut, it’s time to assemble. Apply a generous, even line of our favorite wood glue to one end of your vertical piece. This glue creates an incredibly strong bond, enhancing the overall stability of your base.
Carefully place a horizontal board on top of the glued end of the vertical piece, ensuring it is perfectly centered. This attention to detail will contribute to both the structural integrity and aesthetic appeal of your coffee table. Next, secure these boards together using 3-inch Spax screws. We recommend using 3-4 screws per joint for maximum strength. The self-tapping nature of Spax screws makes them excellent for woodworking projects like this, reducing the chance of splitting and providing a firm hold.
Once one horizontal side is securely attached, repeat the process for the other side, creating the classic I-beam profile. Remember to use both wood glue and 3-4 Spax screws per board for a connection that will withstand years of use. This methodical approach ensures each base is incredibly sturdy and perfectly aligned.
At this stage, your I-beam structure should look precisely like the image below – a testament to solid woodworking and careful assembly. You’re well on your way to building a beautiful and functional coffee table!
Step 2: Attaching the Angled Legs for Stability and Style
Now it’s time to add the defining feature of the sawhorse design: the angled legs! You will need to cut eight identical leg pieces. The free plans provide the precise angle and length you’ll need. For this project, I cut my legs to an 18-degree angle, which provides the perfect balance of stability and aesthetic appeal. This slight angle gives the table its distinctive sawhorse look, adding character and visual interest.
Before attaching the legs, it is absolutely crucial to pre-drill pilot holes. This step is vital to prevent the wood from splitting, especially since your screws will be relatively close to the edges of the boards. Take the time to measure and mark your pilot holes, ensuring they are evenly spaced and consistent for each leg. This not only makes the attachment process smoother but also results in a cleaner, more professional finish. Using a drill bit slightly smaller than your screw shank will create the ideal pilot hole.
With your pilot holes drilled, attach each leg securely to the I-beam base using four 3-inch Spax screws. Make sure the legs are oriented correctly, with the angled cuts facing outwards, creating the splayed sawhorse appearance. Tighten the screws firmly, but be careful not to overtighten and strip the wood. Repeat this process for all eight legs, ensuring a sturdy and symmetrical base for your coffee table.
DIY Sawhorse Coffee Table – Reinforcing with Structural Supports (The Pocket Hole Advantage)
To further enhance the stability and rigidity of your sawhorse coffee table, we will now add support braces under each set of legs. These supports play a crucial role in preventing any lateral movement and ensuring your table remains rock-solid for years to come. I cut these support pieces to the precise size indicated in the plans and then added 1.5-inch pocket holes to each end. For this step, I highly recommend using my trusted K5 Kreg Jig. Many of you frequently ask which Kreg Jig is the best investment, and without a doubt, the K5 remains our number one pick for its ease of use, versatility, and reliability in creating strong, hidden joints. If you’re serious about DIY woodworking, this tool is an absolute must-have.
Once your pocket holes are drilled, apply a small amount of wood glue to each end of the support brace where it will meet the legs. This combination of glue and screws creates an incredibly strong joint. Then, attach the braces using 2.5-inch pocket hole screws, driving them through the pocket holes and into the legs. The beauty of pocket holes is that they create incredibly strong joints without visible fasteners from the outside, resulting in a cleaner, more professional finish. Ensure the braces are flush and square with the legs for optimal stability.
Step 4: Constructing the Elegant Planked Tabletop
We’re almost there! The tabletop is where your coffee table truly takes shape and becomes a functional centerpiece. For this project, we’ve opted for a planked design, which adds a beautiful rustic texture and visual appeal. You will cut your tabletop planks to size according to the free plans. To join these planks seamlessly and securely, you’ll again utilize pocket holes. I recommend creating 1.5-inch pocket holes along the edges of the planks, where they will join. These hidden fasteners ensure a strong bond without unsightly screws on the top surface. Use 2.5-inch pocket hole screws to draw the planks tightly together, creating a flat and sturdy surface. Always use wood glue between the plank edges before screwing them together for maximum durability and to eliminate any gaps. You can clearly see the placement of my pocket holes in all the accompanying pictures, demonstrating a clean and effective joinery method.
Step 5: Final Assembly – Marrying Top and Bases
With both the sturdy bases and the beautiful planked top complete, it’s time for the final assembly! Carefully position your sawhorse bases on the underside of the tabletop, ensuring they are evenly spaced and centered. For the strongest possible connection, I attached the bases to the tabletop using a combination of wood glue and 3-inch Spax screws. Drive these screws up from underneath the horizontal beams of the I-beam bases directly into the tabletop. This method creates a robust, invisible connection that will hold your table together firmly. Once all the screws are in place and the glue has dried, your DIY Sawhorse Coffee Table is officially complete! Here she is, all finished and ready to be enjoyed!
Personalizing Your Coffee Table: Finishing Touches
Sanding for a Flawless Finish
Before applying any paint or stain, a crucial step that often gets overlooked is sanding. Proper sanding is key to achieving a professional-looking finish and ensuring paint or stain adheres beautifully. Start with a coarser grit sandpaper (e.g., 80 or 100 grit) to smooth out any major imperfections, glue squeeze-out, or rough edges. Then, move to a finer grit (e.g., 150 or 220 grit) to create a silky-smooth surface. Pay extra attention to the tabletop and any areas that will be frequently touched. A well-sanded piece will absorb finish more evenly and feel much more pleasant to the touch.
Painting, Staining, and Distressing Techniques
The finishing stage is where your DIY Sawhorse Coffee Table truly comes to life and reflects your personal style. For this particular build, I painted the entire table using a gorgeous color called “Seine” by Sherwin-Williams. This shade offers a sophisticated yet inviting feel. To add a touch of vintage charm and character, I applied a Vaseline distressing method. This technique involves lightly applying Vaseline to areas where natural wear would occur (edges, corners) before painting. Once the paint is dry, you simply wipe away the Vaseline, taking the paint with it and revealing the wood underneath, creating a beautifully aged and distressed look. You can see a short video tutorial of this distressing method HERE. Feel free to choose any paint color that complements your home decor, or opt for a beautiful wood stain to highlight the natural grain of the lumber.
Adding Character with Decorative Hardware
To elevate the look of the coffee table and add a refined, custom detail, I incorporated some large brass nail heads to the top. I found these at Hobby Lobby, and they instantly added a touch of elegance and visual interest, tying into the rustic-chic aesthetic. These decorative nails are an easy way to give your DIY project a high-end, finished appearance. Consider exploring different types of hardware – from antique bronze to industrial steel – to find what best suits your vision for this versatile piece.
Styling Your New Sawhorse Coffee Table
Now for the truly fun part – styling your newly built coffee table and integrating it into your living space! A coffee table isn’t just a functional piece; it’s a focal point that can tie a room together. I’m absolutely delighted with how this coffee table fits into my room, especially with some carefully selected decor pieces.
I discovered the most incredible rug ever at rugsusa.com! This particular rug perfectly complements the rustic elegance of the sawhorse coffee table and adds a cozy texture underfoot. You can see the specific rug I chose HERE! I absolutely adore how it sits under the table and provides a soft contrast against my wood tile flooring. The right rug can truly anchor a space and define its aesthetic.
The elegant vase gracing the top of the coffee table is a lovely find from World Market. Its texture and shape add a touch of sophistication without overwhelming the table’s simple lines.
For those curious about the foundation of the room, my flooring consists of beautiful Cottage wood tile from The Tile Shop. It provides a warm and durable base that perfectly suits the farmhouse-inspired aesthetic. I previously shared a detailed post about updating the floors HERE, if you’d like to learn more about that transformation.
Adding seasonal touches is a wonderful way to keep your home feeling fresh and inviting. The charming pumpkins displayed on the hearth, along with the festive wreath adorning my pallet, were all sourced from Target, proving that stylish decor doesn’t have to break the bank.
The delightful metal vase, another small detail that adds significant character, is from Save on Crafts. It’s these little accents that personalize a space and make it feel uniquely yours.
Keep an eye out! I’ll be sharing the FREE printable banner for my mantel very soon this week, perfect for adding more personalized flair to your seasonal decor.
I believe that covers all the delightful details of this project and how I styled it within my home. Here are a few more inspiring shots of the finished DIY Sawhorse Coffee Table in its natural habitat – my living room!
I sincerely hope this detailed tutorial and the free plans inspire you to embark on your own DIY Sawhorse Coffee Table adventure. This project is incredibly rewarding, offering a stylish, sturdy, and budget-friendly addition to your home. Please don’t hesitate to reach out if you have any questions at all about the build process or finishing techniques. I would absolutely LOVE for you to share your finished project with me and your friends, and don’t forget to pin this project to your favorite DIY boards to inspire others! Happy building!
Thanks so much for joining me on this creative journey, and happy building!
~Whitney
Looking for more innovative coffee table ideas? Be sure to check out this video tutorial on how to build a versatile DIY Rolling Storage Coffee Table – another fantastic project for maximizing space and style in your home!
If you’re still exploring options, you can find the perfect coffee table to fit your unique style, skill level, and size requirements from our complete list of over 15 free DIY Coffee Table Plans! There’s a project for everyone, from beginners to advanced woodworkers, to create a stunning centerpiece for their living room.