
Creating a Dream Nursery: DIY Furniture & Design Ideas on a Budget
Hello, fellow creators and nesting parents-to-be! The air is buzzing with excitement around here as we prepare for the arrival of our newest little family member. This joyous anticipation has me firmly rooted in “nesting mode,” a wonderful whirlwind of preparing our home, especially the nursery. There’s something incredibly fulfilling about pouring love and effort into creating a special space for a baby, and this week, my focus has been entirely on crafting the perfect nursery environment.
The journey of designing a nursery begins with inspiration, and for me, a key element was the choice of fabric for the baby’s bedding. I absolutely adore handmade touches, and crafting the bedding myself felt like a truly personal way to welcome our little one. After much searching, I stumbled upon a design that instantly captured my heart and set the entire tone for the room:
This charming pattern, known as “Pooches and Pickups,” is designed by Laurie Wisburn for Robert Kaufman. The whimsical dogs and classic pickup trucks offered the perfect blend of playful sophistication I envisioned for a baby boy’s room. Finding this fabric online was a moment of pure joy; it truly sparked the creativity for the entire nursery design. While the bedding itself is still a project in progress, this fabric choice, combined with the decision to go with a sleek black crib, laid the foundation for all subsequent furniture and decor decisions. The black crib offered a modern, grounding element, allowing the fabric’s vibrant personality to truly shine and providing a striking contrast that keeps the room feeling fresh and contemporary.
Transforming the Nursery: A Versatile DIY Storage Solution
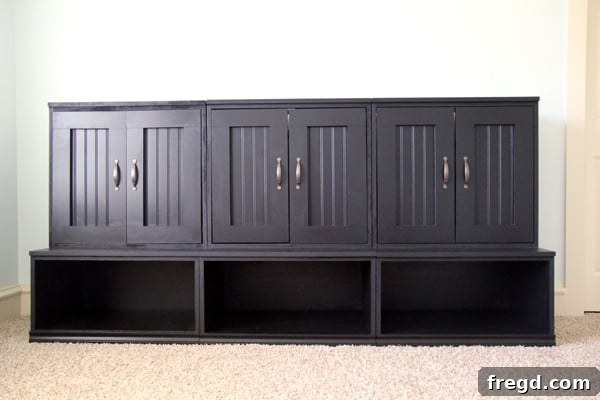
Creating a functional and aesthetically pleasing nursery often involves smart storage solutions that can grow with your child. Last week, I shared my PB Knockoff Storage System, which I originally built for our playroom. Its robust design, ample storage capacity, and versatile appeal made it an ideal candidate for the nursery as well. I love how beautifully it turned out for the playroom, and I knew its practical elegance would be a perfect fit for organizing baby essentials, from diapers and wipes to tiny clothes and beloved toys, keeping the nursery tidy and functional.
Building Smarter, Not Harder: Following Ana White’s Plans
For this substantial storage system, I once again leveraged the fantastic, user-friendly plans available on Ana White’s site. Ana White’s woodworking plans are a true game-changer for anyone looking to dive into DIY furniture building, regardless of their experience level. Her detailed instructions, comprehensive materials lists, and clear diagrams make even seemingly complex projects approachable and enjoyable. By following her step-by-step guidance, I was able to construct this impressive piece with confidence, proving that building your own high-quality furniture can be far less intimidating and much more rewarding than tackling flat-pack alternatives.
Materials & Sourcing: Smart Choices for a Sturdy Build
To construct this durable storage unit, I opted for 3/4″ MDF (Medium-Density Fiberboard) for the primary structure. MDF is an excellent choice for painted furniture projects due to its incredibly smooth surface, which provides a flawless, professional-looking finish, and its remarkable stability, resisting warping or cracking over time. For the door panels, I incorporated beadboard, adding a classic, textural element that beautifully complements the overall design and enhances its custom, built-in feel.
Sourcing the materials efficiently is key to any successful DIY project, especially when working with larger sheets of wood. While I love the hands-on aspect of building, sometimes it’s wise to delegate certain initial tasks. I often rely on the convenient cutting services offered at my local Lowe’s. For this project, my incredibly supportive husband and stepdad handled the trip to Lowe’s, ensuring all my MDF and beadboard were precisely cut to the dimensions specified in Ana’s plans. This service is invaluable, saving significant time, effort, and guaranteeing accurate cuts, which is crucial for a professional-looking and properly fitting finished piece. We used three sheets of 3/4″ MDF, each costing approximately $30, and one sheet of beadboard for the door panels, priced around $20. This brought my total lumber cost to an impressive $110, an incredibly budget-friendly figure for such a substantial, custom-built piece of nursery furniture.
Assembly & Finishing: Crafting a Lasting Impression
With all the pieces precisely cut and ready, assembly was the next exciting step. For robust and lasting construction, I used Gorilla Wood Glue for all joints, reinforcing them securely with 1 1/4″ brad nails. The combination of high-quality wood glue and strategically placed brad nails creates an incredibly strong, durable bond, ensuring the unit can withstand years of active use, even in a busy nursery environment where furniture often endures bumps and knocks. Once fully assembled, the entire piece received a generous coat of Valspar Black satin paint. The satin finish provides a sophisticated, subtle sheen that is remarkably easy to clean – a definite plus for nursery furniture! – and adds a touch of modern sophistication, perfectly complementing the black crib and the overall design scheme. While I haven’t applied it yet, a final coat of satin polycrylic will be added. This protective topcoat is essential for enhancing durability, offering superior resistance to scratches, scuffs, and moisture – crucial for nursery furniture that sees a lot of action and needs to maintain its beauty over time.
After assembly and painting, I eagerly brought the unit into the nursery to get a real feel for its presence and functionality within the space. It instantly transformed the room, adding both practical storage and a stylish focal point that ties the whole design together. Here are a few glimpses of the assembled piece in its new home, ready to welcome our little one:
The Finishing Touch: Hardware Selection
No piece of furniture is truly complete without the right hardware to complement its style and enhance its functionality. For the doors on this storage unit, I utilized some stylish pulls I had leftover from a previous home-building project. These particular pulls, which I originally sourced from Lowe’s, provided the perfect blend of functionality and aesthetic appeal. Their timeless design ties in beautifully with the black paint and beadboard, contributing to the overall modern-meets-classic nursery theme. The right hardware can elevate a DIY piece, giving it a polished and custom look that rivals high-end store-bought options.
Future Plans & Enhancements: Maximizing Nursery Organization
While the main storage unit is complete and proudly stands in the nursery, the nesting journey is far from over! My next exciting project for the nursery will involve crafting custom storage boxes for the bottom shelves, similar to the ones I made for the playroom. These tailor-made boxes will provide easily accessible and contained storage for toys, blankets, extra diapers, and other baby essentials, keeping the nursery impeccably tidy and organized. The beauty of DIY is that you can continually adapt and add to your creations as needs evolve, ensuring your space remains perfectly suited to your family’s changing requirements. However, with nesting, you never quite know which direction inspiration will take you next! Rest assured, I’ll keep you all updated on the progress and any new creative endeavors that sprout up along the way.
The Unbeatable Value and Joy of DIY Furniture for Your Home
I cannot emphasize enough the immense satisfaction and incredible benefits of building your own furniture, even with just a few basic tools. It truly is a simpler process than wrestling with those cumbersome, instruction-heavy, store-bought boxed furniture kits, and the rewards are exponentially greater. Beyond the profound sense of accomplishment and the pride of creation, the financial savings are astounding. This substantial storage piece, custom-built to my specifications, cost me less than $140 in materials. Compare that to a similar-sized, quality piece from a high-end retailer like Pottery Barn, which could easily set you back $1,000 – and that’s before factoring in sales tax and exorbitant shipping fees! The difference is staggering and highlights the incredible value of investing a little time and effort into building it yourself.
DIY empowers you to create custom pieces that perfectly fit your unique style, specific space dimensions, and precise budget. It allows for a level of personalization and customization that mass-produced items simply cannot offer. Furthermore, the quality and durability of a handmade piece, built with care with chosen materials, often surpass that of many commercially available options, ensuring your furniture stands the test of time. It’s not just about saving money; it’s about creating something meaningful, lasting, and perfectly suited for your home and family, infused with your own personal touch.
Exciting News & A Quick Farewell!
Before I dash off, I’m thrilled to share a little teaser: tomorrow, we have an absolutely fantastic giveaway lined up! I genuinely can’t wait to introduce you all to this product; I know you’re going to love it as much as I do. Make sure to check back in for all the details!
For now, I’m off to tackle what feels like 73 loads of laundry that have mysteriously accumulated over the past few days. Don’t be too jealous of my glamorous afternoon!
Warmly,
Whitney