
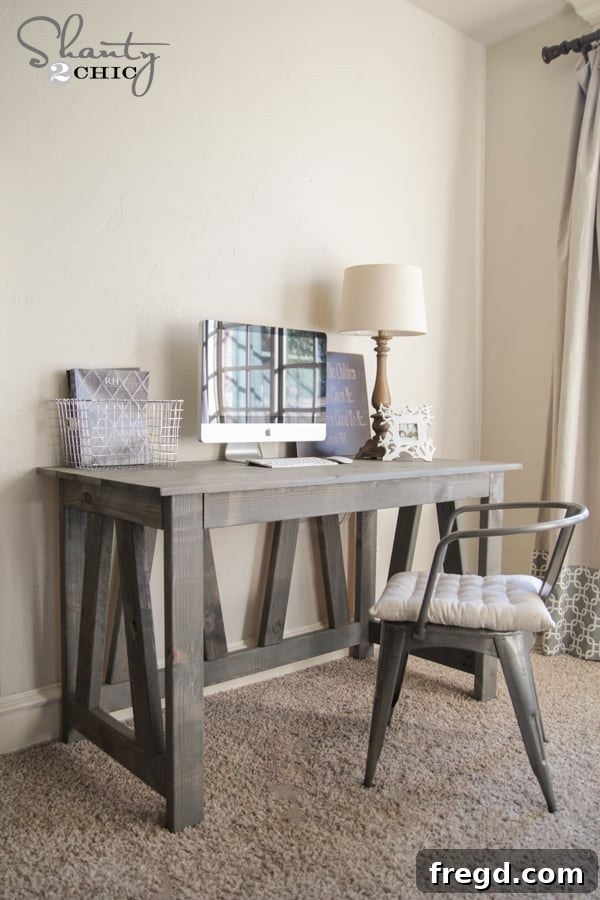
Welcome, fellow DIY enthusiasts and woodworking adventurers! We are absolutely thrilled to unveil our latest project, crafted with passion and designed to transform your living space. As I embark on a complete bedroom makeover – the last room in my home awaiting a custom furniture touch – this stunning piece marks the beginning of an exciting journey. While I eagerly anticipate sharing the plans for an upcoming king-sized bed, today, we’re diving deep into the creation of the first essential element for a truly functional and beautiful bedroom: a versatile and stylish DIY desk. Prepare to be inspired as we showcase the initial phase of this incredible build!
Craft Your Own Rustic Truss DIY Desk: Free Woodworking Plans Revealed
Are you searching for the perfect blend of rustic charm and modern functionality for your home office or creative workspace? Look no further! Our latest offering brings you comprehensive, free woodworking plans for a gorgeous Rustic Truss DIY Desk. This isn’t just a desk; it’s a statement piece, designed to bring warmth, character, and an abundance of utility to any room. Whether you’re a seasoned woodworker or just starting your journey, these plans are crafted to guide you every step of the way, ensuring a rewarding building experience.
Below, you’ll find a glimpse of the finished desk, showcasing its robust design and the potential it holds for your home. This desk is part of a larger, modular collection, offering expandable storage solutions that can grow with your needs. Get ready to elevate your DIY game and create a piece of furniture that truly reflects your style and craftsmanship!
Here is the desk finished with the additional pieces, illustrating its versatile nature and how it seamlessly integrates with complementary storage solutions. The beauty of this Truss Desk collection lies in its modularity. You can choose to build the desk as a standalone unit, a compact and stylish workstation perfect for smaller spaces, or expand its functionality by adding custom-built side cabinets and bookcases. This adaptability ensures that your workspace perfectly fits your unique requirements and aesthetic preferences, making it an ideal choice for any home office, craft room, or bedroom setup.
For those eager to expand their Truss Desk system, we’ve made it incredibly easy to access the plans for the accompanying furniture. Enhance your desk with ample storage and display space by building these beautiful additions:
For the free plans for the sturdy and stylish side cabinets, perfect for tucking away essentials and keeping your workspace clutter-free, click HERE!
And to complete your ultimate home office setup, don’t miss the free plans for the elegant bookcases that sit atop the cabinets, providing vertical storage for books, décor, and supplies. Click HERE!
Observe the detailed craftsmanship in these additional views of the completed DIY desk. The “Truss” design, characterized by its distinctive structural elements, lends an air of architectural strength and rustic elegance. This design choice not only provides exceptional stability but also creates a visually interesting focal point in any room. The desk’s spacious top offers ample surface area for work, study, or creative projects, while the robust construction promises durability and longevity.
As mentioned earlier, this desk is the heart of a comprehensive Truss Desk collection. My personal need for a desk space with significantly more storage spurred the creation of this entire range. While the standalone desk offers fantastic utility, the complete collection, which includes the side cabinets and bookcases, provides an unparalleled organizational solution. I’ll be sharing the full scope of these additional pieces and their integration very soon, so stay tuned for more exciting reveals!
Access Your Free Rustic Truss Desk Plans Here!
We believe that everyone should have access to high-quality woodworking plans to bring their creative visions to life. That’s why we’ve partnered with our incredibly talented friend, Jay of Jay’s Custom Creations. Jay is a master at transforming our initial ideas and rough sketches into beautifully detailed, printable woodworking plans that our readers can easily follow. We highly recommend exploring his website; Jay offers a wealth of fantastic tips, innovative ideas, and an extensive collection of his own unique plans, making his site an invaluable resource for any woodworker.
To empower you to build this magnificent Rustic Truss Desk, we’ve made the plans readily available. You can download and print the free, step-by-step woodworking plans for this DIY desk by clicking HEREor by simply clicking on the convenient download button image below. These plans contain all the measurements and diagrams you’ll need to construct your very own custom desk with confidence.
Gathering Your Materials and Tools
Ready to roll up your sleeves and get started on this rewarding DIY project? Fantastic! Before we dive into the construction, let’s talk about what you’ll need. One of the most appealing aspects of this Rustic Truss Desk is its economical and straightforward material list. You’ll be delighted to know that you only need a handful of readily available lumber pieces to bring this robust desk to life.
Essential Lumber: Simple and Cost-Effective
For the entire desk structure, you will require just **six 2×4 boards** and **three 1×6 boards**. That’s it! This minimal lumber requirement makes this project incredibly budget-friendly and accessible. These common dimensional lumber sizes are widely available at any home improvement store, making material sourcing a breeze. The choice of these particular board sizes contributes to the desk’s sturdy, “truss” aesthetic, while also ensuring a solid and durable final product. We adore projects that prove you don’t need exotic materials to create something truly beautiful and functional!
Our Secret Weapon: The Kreg Jig K5
For the entirety of this desk build, I relied heavily on my trusty **K5 Kreg Jig**. If you’re a regular follower, you’ll know that Ashley and I share an undeniable affection for this tool. It’s truly a game-changer for DIY furniture projects, especially when it comes to creating strong, hidden joints. The Kreg Jig allows you to drill angled “pocket holes” into one piece of wood, which then get securely fastened to another piece using specialized screws. This method creates incredibly strong joints without visible fasteners, resulting in a clean and professional finish.
We both currently use the K5 model, which offers enhanced clamping mechanisms and other user-friendly features that make woodworking more efficient and enjoyable. You can find this essential tool and embark on your own pocket-hole joinery adventures on **Amazon HERE!** For those of you who are new to the world of pocket holes and are wondering what exactly a Kreg Jig does, we’ve prepared a concise explanation. You can check out our quick video HERE where we break down its functionality and showcase its undeniable awesomeness, helping you understand why it’s a staple in our workshop.
Step-by-Step Construction Guide for Your DIY Desk
With your materials gathered and your tools ready, it’s time to bring this beautiful Rustic Truss Desk to life. Follow these detailed steps to ensure a smooth and successful build. Remember to always prioritize safety when working with power tools, wearing appropriate protective gear like safety glasses and hearing protection.
Building the Robust Desk Base: Precision Cuts and Pocket Holes
The foundation of this desk is its incredibly sturdy base, which incorporates several precise 10-degree angled cuts. These angles are crucial for achieving the signature “truss” aesthetic and structural integrity. I made all these angled cuts using my reliable Ridgid Miter Saw, ensuring accuracy and clean edges. If you’re new to miter saw usage, take your time and make test cuts on scrap wood to get comfortable with the angles.
Once your pieces are cut, they’re ready for pocket holes. The angled pieces are then clamped into the Kreg Jig, allowing you to drill pocket holes at the exact points where they will join. For the base structure, I consistently used **1.5-inch pocket hole settings** on the Kreg Jig, which is ideal for the thickness of the 2×4 lumber. All connections within the base were secured using **2.5-inch pocket hole screws**, providing a strong and lasting bond.
Strategically Placing Pocket Holes for a Clean Finish
One of the advantages of pocket hole joinery is the ability to hide fasteners, creating a clean, professional appearance. When constructing the back of the desk, pay careful attention to the placement of your pocket holes. As illustrated in the photo below, I positioned the pocket holes for the back of the desk to face inwards or towards the back. This strategic placement means that if your desk is positioned against a wall, as most often are, these pocket holes will be completely concealed, eliminating the need for wood filler or plugs and ensuring a smooth, seamless exterior.
Next, focus on the sides of the desk. You will need to build two identical side panels that mirror the design shown in the image below. Similar to the back panel, I carefully considered the visibility of the pocket holes when placing them. Knowing that I intended to add other pieces of furniture from the Truss Desk collection around this central desk, I positioned the pocket holes in areas that would be naturally covered or less visible. This attention to detail ensures that the exposed surfaces of your desk maintain a pristine, finished look. Feel free to adopt this same approach, placing your pocket holes where they are least likely to be seen based on your intended desk arrangement.
Assembling the Desk Frame: The Kreg Right Angle Clamp Advantage
Once both side panels and the back section of the desk base are individually constructed, you’re ready for the exciting step of joining them together to form the main frame. This is where a reliable clamping tool becomes an invaluable asset. I found my **Kreg Right Angle Clamp** to be exceptionally helpful during this assembly phase.
As you can see in the photo, this ingenious clamp fits perfectly into a pocket hole, holding the pieces firmly together at a precise 90-degree angle. This eliminates any shifting or misalignment while you drive in the remaining pocket hole screws, ensuring square and strong joints. It truly acts like an extra set of hands, making the assembly process much smoother and more manageable, especially when working alone. Having this tool on hand is definitely a smart investment for any serious DIYer. You can acquire this incredibly useful clamp **HERE on Amazon!**
Here’s an internal view of the desk once all the base components have been securely joined together. Notice the clean lines and the strength of the pocket hole joints, which are largely hidden from view, contributing to the overall refined aesthetic of the desk’s interior. This demonstrates the quality and integrity of the construction, even in areas that might not be immediately visible.
And another shot, this time focusing on the rear of the desk. This angle further illustrates how the carefully placed pocket holes minimize their visibility, particularly if the desk is positioned against a wall. The robust construction is evident from every angle, promising a durable piece of furniture that will stand the test of time.
As previously mentioned, some of my pocket holes were intentionally placed on the inside surfaces of the desk. This design choice was made to ensure that the exterior of the desk remained as smooth and unblemished as possible. The beauty of pocket hole joinery is its versatility, allowing you to strategically place fasteners for both strength and aesthetics. These interior pocket holes provide robust connections without compromising the desk’s visible surfaces.
At this stage, the robust base of your DIY desk is fully constructed and ready to receive its top. The image below shows my completed base, positioned upside-down and perfectly poised for the attachment of the desktop. Taking a moment to admire the solid framework you’ve built reinforces the satisfaction of your woodworking efforts before moving on to the final structural components.
Crafting the Planked Desk Top: Kreg Jig Versatility
The desk top, constructed from 1×6 boards, creates a beautiful planked surface that enhances the rustic appeal of the Truss Desk. For this section, I once again utilized my indispensable Kreg Jig, but with adjusted settings to accommodate the thinner material. It’s crucial to change the Kreg Jig settings when moving between different wood thicknesses to ensure proper pocket hole depth and joint strength. Because the 1×6 boards are significantly thinner than the 2x4s used for the base, I set the Kreg Jig to drill **3/4-inch pocket holes**.
These 3/4-inch pocket holes were drilled along one edge of four out of the five 1×6 boards. This setup allows for each plank to be seamlessly joined to its neighbor, creating a wide, solid desktop. The precision of the Kreg Jig ensures consistently strong and flush joints across the entire surface. This technique not only looks fantastic but also provides a durable and stable work surface.
Here you can see the 1×6 boards laid out, prepped for assembly into the desk top. Notice the even spacing and the clean cuts, ready to be joined using the pocket hole method. Taking the time to select good quality lumber, free from warps or significant knots, will ensure the best possible outcome for your desktop, both aesthetically and structurally.
I then proceeded to attach these planked pieces together. Using the 3/4-inch pocket holes that were just drilled, I secured each board to its adjacent piece with **1.25-inch pocket hole screws**. This process involves applying a bead of wood glue along the edges of the planks before joining them, then clamping them firmly together, and finally driving the screws. The combination of glue and screws creates an incredibly strong and seamless joint, resulting in a solid, unified desk top. This method ensures that your desk top will be both beautiful and capable of withstanding daily use for years to come.
Final Assembly: Attaching the Top to the Base
With your beautiful planked desk top fully assembled, the final structural step is to attach it securely to the desk base. This process is surprisingly simple and swift, bringing your DIY desk project to its grand conclusion. I carefully inverted the desk base and laid it directly on top of the finished desk top, ensuring proper alignment. This orientation allows for easy access to the apron boards of the base, where the final connections will be made.
To secure the desk top to the base, I utilized **1.25-inch pocket hole screws**, driving them through pre-drilled pocket holes on the apron boards of the base and into the underside of the desk top. This method creates a robust and invisible connection, firmly integrating the top and base into a single, cohesive unit. Once these final screws were in place, the structural build of the desk was complete – so remarkably easy and satisfying! You now have a fully constructed, sturdy, and elegant desk ready for its finishing touches.
Adding the Finishing Touches: Rustic Charm with Stain and Glaze
The finishing process is where your DIY desk truly comes to life, allowing you to impart a personalized aesthetic that complements your home decor. For this Rustic Truss Desk, I opted for one of my current favorite stain and glaze combinations, which yields a beautiful, weathered, and subtly distressed look. This finish enhances the natural wood grain while adding depth and character.
Weathered Grey Wood Stain: Fast and Fabulous
I began by applying Varathane wood stain in the stunning **Weathered Grey** shade to the entire desk. This particular stain is a dream to work with! Its formula requires only a single coat to achieve full color saturation, saving you time and effort. Even better, it dries completely in just about an hour, allowing you to move swiftly to the next step of your finishing process. The Weathered Grey provides a sophisticated, muted base that perfectly captures that desirable rustic farmhouse aesthetic. You can easily find this fantastic stain at your local Home Depot, making it readily accessible for your project.
Achieving a Distressed Look with Decorative Glaze
To achieve a slightly more distressed and aged appearance, I layered Rust-Oleum decorative glaze over the dried Weathered Grey stain. This glaze technique adds subtle darker tones into the wood grain and recessed areas, creating a beautiful antiqued effect. Applying the glaze is straightforward: simply brush the product onto the stained surface, and then use a clean cloth to wipe off the excess. This process allows the glaze to settle into the wood’s texture, highlighting its natural character and enhancing the distressed feel.
It’s important to work on one section of the desk at a time, as this decorative glaze tends to dry relatively quickly. This methodical approach ensures you have enough time to manipulate the glaze and wipe away the excess before it sets, preventing any unwanted streaks or uneven application. Like the stain, this Rust-Oleum decorative glaze is conveniently available at Home Depot, making it easy to pick up everything you need for this beautiful finish in one trip.
Your Finished Rustic Truss DIY Desk
Behold, the culmination of your efforts! Your brand new Rustic Truss DIY Desk, beautifully stained and glazed, is now complete and ready to take center stage in your home. The combination of the sturdy truss design and the weathered finish creates a piece that is both timeless and trendy, perfect for a farmhouse, industrial, or modern rustic aesthetic.
Take a moment to appreciate the details – the robust legs, the beautifully planked top, and the subtle distressed finish that adds character and warmth. This desk isn’t just a functional item; it’s a piece of art that you created with your own hands. It serves as a testament to the power of DIY and the satisfaction of building something truly unique for your space.
Imagine this stunning piece in your own home office, serving as a dedicated workspace, or perhaps as a stylish craft table where creativity can flourish. Its generous surface provides ample room for a computer, books, and decorative accents, making it both practical and visually appealing. The inherent strength of the truss design ensures it can handle all your daily tasks with ease.
We are incredibly excited to share the remaining components of this Truss Desk collection, as well as the complete bedroom reveal, with all of you very soon! The full setup offers an unparalleled combination of style and functionality, truly maximizing your space.
We hope this detailed guide and the free plans inspire you to embark on your own woodworking adventure. If you have any questions at all about the build process, materials, tools, or finishing techniques, please don’t hesitate to ask in the comments below! We are always here to help and love hearing about your projects.
Your support means the world to us! We would absolutely LOVE for you to share this project and PIN it with all your friends and fellow DIY enthusiasts. Spreading the word helps us continue to provide free, high-quality woodworking plans and inspiration to our amazing community.
Thank you so much for stopping by and joining us on this creative journey. Happy Building, and may your sawdust be plentiful!
~Whitney