
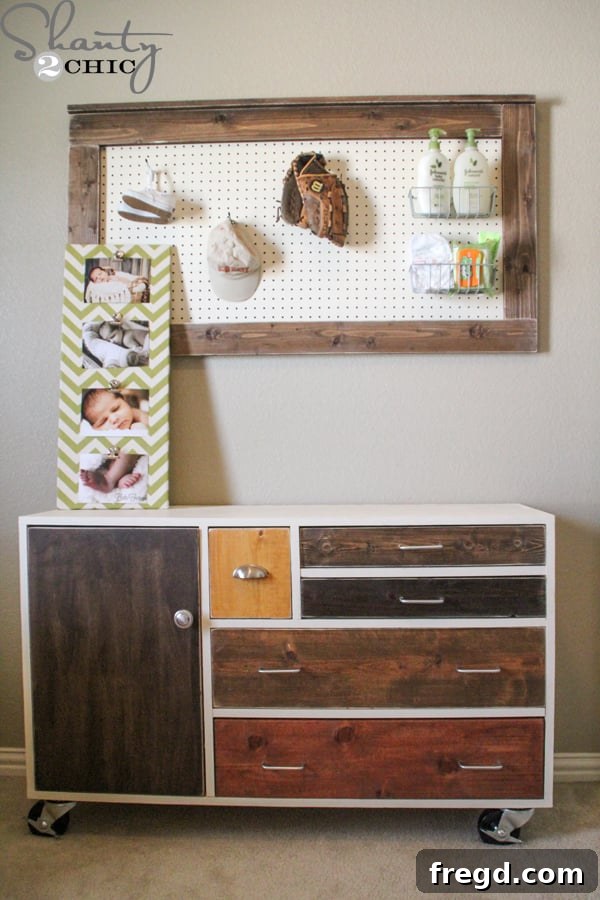
DIY Modern Patchwork Dresser: A West Elm Inspired Nursery Masterpiece on a Budget
There’s nothing quite like the joy of creating something beautiful with your own hands, especially when it’s a heartfelt gift for someone special. This project holds a unique place in my heart, not only because I’m absolutely smitten with the finished piece but also because it was lovingly crafted as a nursery gift for my dearest friend. The inspiration for this modern patchwork dresser struck me and Whit during a visit to a popular furniture store, where we stumbled upon a stunning dresser that seemed absolutely perfect for my friend Lauri’s new nursery. However, with a hefty price tag of $1,200, it was well beyond my budget. That’s when I decided to turn to our incredibly talented friend, Ana White, for some brilliant plans to bring this vision to life ourselves, proving that exquisite design doesn’t have to break the bank.
Choosing the Right Materials: Beauty Meets Safety with Purebond Plywood
When embarking on a DIY furniture project, especially one destined for a baby’s nursery, material selection is paramount. For this dresser, I chose to build with Purebond Plywood in Birch, and for excellent reasons. Beyond its inherent beauty and smooth finish, Purebond plywood is a truly superior choice because it is formaldehyde-free. This commitment to healthier materials ensures that the air I breathe while building is safe, and more critically, it guarantees a safer, healthier environment within the baby’s nursery. This is a peace of mind that no mass-produced furniture can truly offer. If you’re keen to learn more about the benefits and the Purebond Pledge, I highly recommend checking out this informative video. The total cost for this stunning and safe dresser, including the materials and hardware, came in at a remarkable $250, with $50 of that dedicated to the sturdy, locking casters. This is a staggering saving compared to its retail counterpart!
Essential Tools for a Seamless Build
Before diving into the construction, having the right tools makes all the difference, transforming a complex project into an enjoyable experience. For this build, a few key tools were indispensable:
- Kreg Jig: An absolute game-changer for creating strong, concealed pocket-hole joints quickly and efficiently.
- Cordless Drill: Essential for driving screws and assembling components with ease and precision.
- Kreg Jig Right-Angle Clamp: Invaluable for holding pieces perfectly square while fastening, especially when constructing drawer boxes and dividers.
- Kreg Jig Rip Cut: A fantastic, budget-friendly alternative to a table saw for making accurate, straight cuts on larger sheet goods like plywood. Paired with a cordless circular saw, it offers incredible versatility without requiring a large workshop space.
- Circular Saw: Used in conjunction with the Rip Cut for precise panel cuts.
- Iron: For applying edge banding seamlessly.
- Edge Banding Trimmer/Scoring Tool: For a clean, professional finish on plywood edges.
- Corner Cat (or sanding block): For achieving that perfectly distressed, rustic-chic look.
For those looking to get started with pocket-hole joinery, I highly recommend the Kreg Jig. It truly simplifies the process and opens up a world of DIY possibilities.
The Building Process: From Plywood Sheets to a Sturdy Frame
With our plans from Ana White in hand (which you can access by clicking HERE for free!), and our materials ready, it was time to bring this dresser to life. Precision in cutting and assembly is key for a professional-looking finish.
Constructing the Main Frame and Internal Dividers
The foundation of any strong piece of furniture is its frame. Using my Kreg Jig and cordless drill, I meticulously assembled the outer frame of the cabinet. Pocket-hole joinery creates incredibly strong connections that are also concealed, resulting in a clean aesthetic.
Once the main frame was solid, the next step involved installing the internal dividers. These dividers not only provide structural integrity but also create the individual compartments for the drawers and cabinet space. Again, the Kreg Jig proved invaluable for securely attaching these boards. Ensuring everything is perfectly square at this stage prevents headaches down the line when fitting drawers and doors.
With the main frame and internal dividers in place, the core structure of the dresser truly began to take shape. It’s always satisfying to see the progress!
Next, I focused on adding the smaller drawer dividers, which further define the individual drawer openings. For this detailed work, the Kreg Jig right-angle clamp became my best friend, holding pieces firmly at a perfect 90-degree angle while I secured them. This tool significantly simplifies the process of creating square drawer boxes.
Mastering Drawer Slides: A Crucial Detail
Drawer slides can often be a source of frustration for DIYers, but with a simple trick, they become much easier to install correctly. The key is careful measurement and sequencing. First, install the interior slides onto the cabinet frame. A handy tip here is to use a scrap piece of wood, cut to the exact thickness of your drawer face, as a spacer. Place this spacer in the drawer face slot and mark where your interior slides should be installed. This ensures that when the drawer face is attached later, it will sit flush with the cabinet frame.
Once the interior slides are securely screwed into place, measure the exact distance from slide to slide. This measurement is critical for determining the precise width needed for your drawer boxes. Accuracy here is paramount for smooth-gliding drawers.
After constructing your drawer box to the exact width you measured, attach the corresponding drawer slides to the sides of the drawer. Make sure that the side of the slide without the wheel mechanism is flush with the front edge of the drawer box. This alignment is crucial for the drawer to operate correctly and close completely.
Cutting the Back Panel with the Kreg Jig Rip Cut
For the back panel of the dresser, accurate, straight cuts are essential. I turned to my trusty Kreg Jig Rip Cut. This ingenious tool, costing less than $40, is a perfect substitute for a table saw, especially for hobbyists or those with limited workshop space. It attaches to your cordless circular saw and allows you to make incredibly straight and precise rip cuts on sheet goods like plywood. It’s user-friendly, doesn’t take up much space, and delivers professional results without the need for a large, expensive machine.
Finishing Touches: Staining, Painting, and Distressing for Character
With the main construction complete, it was time for the really fun part: bringing out the character and beauty of this dresser through thoughtful finishing techniques. This is where the “patchwork” element truly comes to life, mimicking the sophisticated look of its West Elm inspiration.
The Art of Staining: Creating a Modern Patchwork Effect
To achieve the distinctive modern aesthetic of the West Elm dresser, I carefully selected a palette of favorite wood stains for the drawer faces. The goal was to create a subtle yet engaging patchwork effect, where each drawer face showcases a unique tone, contributing to an overall harmonious design. Before applying, it’s always a good idea to test your stains on scrap pieces of the same wood to see how they will truly look.
My chosen stain colors were:
- Dark Walnut
- Kona
- Early American
- Light Walnut
- Summer Oak
Seamless Edge Banding: The Secret to a Solid Wood Look
While the stain was drying on the drawer faces, I turned my attention to the exposed edges of the Purebond Plywood. Edge banding is an incredibly simple yet effective technique that transforms the appearance of plywood, giving it the refined look of solid wood. It’s essentially a thin strip of wood veneer with a heat-activated adhesive on the back. You simply iron it onto the plywood edge, and the heat activates the glue, bonding it securely.
Once applied, you use an edge banding trimmer or a sharp scoring tool to carefully trim away any excess, ensuring a perfectly flush and professional finish. This step is crucial for elevating the overall quality and aesthetic of the piece. For a detailed guide on this technique, watch this helpful Edge Banding Demonstration video.
Painting the Cabinet Frame: A Cozy Contrast
With the drawer faces stained and the edges banded, it was time to paint the main frame of the cabinet. I opted for my favorite latex paint, Behr Cozy Cottage in a satin finish. This soft, inviting color provides a beautiful contrast to the varied wood tones of the drawer faces, enhancing the modern aesthetic while adding a touch of warmth suitable for a nursery.
Demystifying Hinge Installation
Hinges can sometimes intimidate new DIYers, but they are quite straightforward once you break down the process. The trick is to install the shorter side of the hinge first onto the main cabinet frame. Crucially, make sure to position them back far enough to accommodate the full width of the cabinet door, allowing it to close flush without obstruction. Careful measurement here will save you from ill-fitting doors.
Once the cabinet-side of the hinges are installed, attaching the door becomes a simple matter of screwing the other side of the hinges to the door itself, aligning everything carefully. Take your time to ensure the door hangs straight and swings freely.
Final Assembly and Distressing for Character
After the stain had completely dried on the drawer faces, it was time to attach them to the drawer boxes. I used Gorilla Glue Wood Glue for a strong bond, reinforced with 2-inch nails for extra security. For that charming, worn-in look, I distressed the edges of all the drawers and the cabinet door using my Corner Cat. This tool, or even a simple sanding block, allows you to gently sand down the edges and corners, revealing the bare wood underneath and giving the piece a lovely, aged character.
Seeing the various stained faces come together with the painted frame and distressed edges really brought the vision to life. The varied tones of the wood stains created a beautiful, dynamic facade.
Here’s a breakdown of the stain choices for each section, contributing to the “modern patchwork” appeal:
- Big Cabinet Door: Dark Walnut
- Small Top Drawer: Summer Oak
- Top Drawer (under small): Dark Walnut
- Second Drawer: Kona
- Third Drawer: Early American
- Fourth Drawer: Light Walnut
To complete the dresser, I selected some charming hinges for the cabinet door and installed the casters. For a nursery, safety is always a top priority, so I specifically chose locking casters. This feature ensures the dresser stays securely in place, preventing any accidental movement when little ones are around.
The Grand Reveal: A West Elm Inspired Dream Come True
And there it is! The finished modern patchwork dresser, a true labor of love that perfectly captures the high-end aesthetic of its West Elm inspiration, but with the added pride and satisfaction of a DIY creation. I am absolutely thrilled with how it turned out, and I’m convinced I need one for myself now!
This dresser is not just a piece of furniture; it’s a statement of personal style, a testament to what can be achieved with a little ingenuity, and a symbol of friendship. The combination of varied wood stains, the clean lines, and the contrasting painted frame create a piece that is both modern and timeless, perfectly suited for a stylish nursery or any room in the house.
The attention to detail, from the formaldehyde-free Purebond plywood to the distressed edges and locking casters, ensures this piece is not only beautiful but also functional and safe. It’s a prime example of how DIY can offer bespoke solutions at a fraction of the cost of retail, without compromising on quality or style.
I hope this detailed tutorial inspires you to tackle your own furniture projects. There’s immense satisfaction in bringing a vision to life, creating unique pieces that truly reflect your style and meet your specific needs. Keep an eye out soon for tutorials on the accompanying bulletin board and frame – they are equally charming!
If you’re as enamored with this dresser as I am, I would absolutely LOVE for you to share it with your friends and followers on Pinterest!
Thanks so much for stopping by and joining me on this creative journey!
~Ashley