
Unveiling the Rustic Charm: A Step-by-Step Guide to Building Your Own DIY Farmhouse Bench
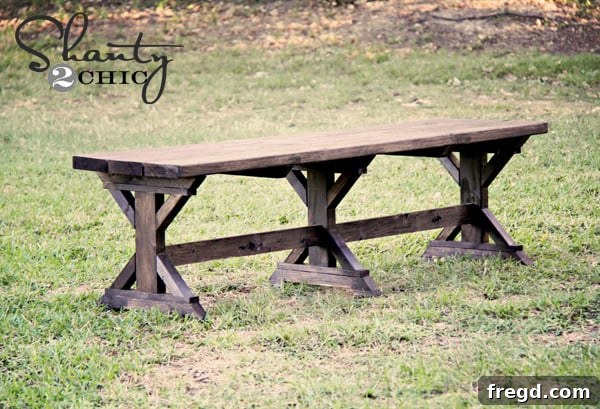
Welcome, fellow DIY enthusiasts! Mondays often get a bad rap, but today is an exceptionally exciting one as I finally get to share the complete details for building this stunning DIY farmhouse bench. After months of anticipation, crafting, and perfecting, these benches are ready to take center stage alongside our beloved Fancy X Farmhouse Table. This project has been a labor of love, a true testament to the beauty of handmade furniture, and I can’t wait for you to embark on your own woodworking journey.
A few months ago, I had the pleasure of collaborating with the incredible Ana White on the design and plans for our Fancy X Farmhouse Table. That table quickly became a sensation, adored for its robust design, timeless appeal, and incredible value. It’s truly a versatile piece – while mine graces our back patio, it would be equally magnificent as an indoor dining centerpiece. The success of that project laid the groundwork for what we’re sharing today: the perfect companion benches that complete the rustic aesthetic.
The Perfect Companion: Why a Farmhouse Bench?
The inspiration for these benches truly sparked when the scorching summer temperatures finally decided to dip below the triple-digit mark. After weeks of avoiding the outdoors, the thought of enjoying our patio again filled me with renewed energy. That’s when I knew it was time to reach out to Ana again. The idea was simple: create matching benches that not only complement the existing table but also enhance its functionality and charm. Benches offer incredible versatility and a cozy, communal dining experience that chairs sometimes can’t capture. They’re space-efficient, can often tuck neatly under a table, and effortlessly convey that sought-after farmhouse feel. Plus, building them ourselves meant we could customize every detail, from length to finish, ensuring a perfect match.
This DIY project is designed to be accessible to builders of various skill levels, offering immense satisfaction upon completion. These benches aren’t just practical seating solutions; they’re statement pieces that embody the warmth and character of farmhouse style. Whether you envision them around a bustling family dining table, as welcoming seating in an entryway, or adding rustic appeal to your garden, these benches are designed to impress. The beauty of DIY lies in the ability to create something truly unique and tailored to your home, and with these benches, you’ll achieve just that.
Partnering with Ana White: Expert Plans for Your DIY Journey
For this project, I once again teamed up with the amazing Ana White, renowned for her brilliant woodworking plans that make complex projects feel incredibly achievable. Her expertise shines through in every detail, providing clear, concise, and easy-to-follow instructions. While I’ll be sharing some valuable tips and insights from my personal build experience here, I highly recommend visiting Ana White’s site for the full, detailed set of plans for this fantastic bench. Her comprehensive guides include cut lists, diagrams, and step-by-step visuals that are indispensable for a successful build.
Ana’s approach to woodworking empowers individuals to create beautiful, functional furniture without needing advanced carpentry skills. Her plans break down each stage into manageable steps, making the entire process feel less daunting and more enjoyable. It’s truly a collaborative effort, combining her masterful planning with my real-world build experience, to ensure you have all the information you need to construct these benches with confidence. Trust me, if you’re looking for a project that yields professional-looking results with straightforward instructions, Ana White’s plans are the gold standard.
Materials & Tools: What You’ll Need to Get Started
Before diving into the build, gathering the right materials and tools is crucial. One of the most appealing aspects of this project is its affordability. We’re talking about achieving custom, high-quality furniture for a fraction of retail prices.
Selecting Your Lumber: Foundation of Your Bench
For a true farmhouse aesthetic, I recommend using common lumber like pine or fir. These woods are readily available, budget-friendly, and take stain beautifully, allowing the natural grain to shine through. The plans will specify exact dimensions, but you’ll primarily be working with pieces like 1x3s for structural elements and larger planks for the seat top. When selecting your lumber, take your time to pick boards that are as straight as possible, free from significant knots, warps, or cracks. This attention to detail at the lumberyard will save you a lot of frustration during the build process and ensure a sturdier, more attractive finished product. Consider the environment where your bench will reside; for outdoor use, pressure-treated lumber might be an option for hidden structural parts, though the finish will be key for protection.
Essential Tools for a Smooth Build
You don’t need a professional workshop to tackle this project, but a few key tools will make the process much smoother and more accurate:
- Miter Saw: Essential for making precise straight and 45-degree cuts, which are fundamental to the “X” bases. Accuracy here is paramount for strong, flush joints.
- Drill/Driver: For pre-drilling holes and driving screws.
- Measuring Tape & Pencil: For accurate measurements and marking cuts.
- Safety Gear: Always wear safety glasses, and consider hearing protection when using power tools.
- Clamps: Invaluable for holding pieces securely while glue dries or while fastening.
- Sander (or Sandpaper): For preparing surfaces for staining and achieving a smooth finish.
Key Fasteners & Adhesives: Strength and Durability
My build relied heavily on two crucial elements for strong, lasting joints:
- Gorilla Wood Glue: Don’t underestimate the power of a good wood glue. I used Gorilla Wood Glue for all the joints on my bases, and it provides an incredibly strong bond, essentially making the wood pieces one solid unit. Apply it generously but neatly, and wipe away any squeeze-out before it dries.
- Finish Nails: Used in conjunction with wood glue, finish nails help secure the pieces together while the glue cures, providing immediate stability. A nail gun makes this process quick and easy, but a hammer and finishing nails will work just as well with a little patience.
- Kreg Jig® Pocket Hole System: This tool is a game-changer for DIY furniture. The Kreg Jig® allows you to create strong, hidden joints with ease. It’s perfect for attaching the 1×3 connectors and the seat planks without visible screws on the exterior. If you don’t own one (yet!), I highly recommend investing in one if you plan on more woodworking projects. It dramatically simplifies joinery and improves the aesthetic of your builds.
- Wood Screws: For the support pieces and any other areas where visible screws are acceptable, or if you opt for countersinking instead of pocket holes for the top planks.
Finishing Materials: Protecting and Beautifying
For the final touch, I used an outdoor semi-transparent stain tinted to espresso, found at Lowe’s. This type of stain offers both color and protection, essential for an outdoor piece. For indoor use, you might choose a different stain color or a clear polyurethane finish for durability. The choice of finish greatly impacts the bench’s longevity and overall look, so consider your desired aesthetic and functional requirements.
Step-by-Step Guide: Building Your Farmhouse Bench
Building these benches is a straightforward process, broken down into manageable steps. Remember, the key is precision in your cuts and patience with your assembly.
1. Crafting the “X” Bases: The Foundation of Style
The heart of this farmhouse bench design lies in its iconic “X” bases. Each bench requires three of these sturdy supports. The beauty of this step is its simplicity: all cuts are either straight or at a 45-degree angle. This means a miter saw will be your best friend for achieving crisp, accurate angles. Follow Ana White’s plans meticulously for the exact dimensions and angles for each piece of the “X.” Once your pieces are cut, assemble them using a generous application of Gorilla Wood Glue on all mating surfaces. Secure the joints with finish nails. Using clamps to hold the pieces tightly while the glue dries will ensure a strong, lasting bond. This initial phase sets the stage for the entire bench, so take your time to ensure each “X” base is square and solid.
2. Connecting the Bases: Forming the Bench Frame
Once your three “X” bases are complete and the glue has set, it’s time to connect them using 1×3 lumber pieces. These connectors will define the overall length and stability of your bench. I chose to make my benches a bit shorter than the table, allowing them to push fully underneath and leave ample space at the ends for additional metal chairs. This customization is easy: simply adjust the length of these connecting pieces to suit your specific needs. For attachment, I relied on my Kreg Jig®. This allowed me to create strong, concealed joints. A crucial tip here is to ensure all your pocket holes are placed on one side of the bench – specifically, the side that will face the table. This ingenious placement means you won’t have to worry about filling pocket holes, keeping the visible sides of your bench clean and smooth.
3. Attaching the Seat Planks: The Bench Top
Now for the most visible part of your bench: the top planks! Just like the connecting pieces, you can easily modify the length of these planks to achieve your desired bench size. For a cohesive and clean look, I again utilized my Kreg Jig® to attach the top planks. After constructing each “X” base, I drilled three pocket holes on the top end of one side of each base. These strategically placed holes allow you to fasten the seat planks securely from underneath, leaving a smooth, unblemished surface on top.
This method provides an incredibly strong and aesthetically pleasing joint. If you don’t own a Kreg Jig® – although I genuinely believe it’s an investment every DIYer should consider – you have an alternative. You can countersink wood screws from the top of the bench directly into the bases. While this will leave visible screw heads, you can fill them with wood putty before applying your finish, making them virtually disappear once stained or painted. The goal is a secure and stable seating surface, regardless of the method you choose.
4. Adding Support & Stability: The Final Structural Touches
The final structural step before moving on to finishing is to add small support pieces to the bottom of the bench. These pieces, though subtle, play a crucial role in enhancing the overall stability and rigidity of your bench, preventing any potential sagging over time and ensuring it can withstand years of use. For this part, I used standard wood screws. Simply measure and cut your support pieces according to the plans, position them strategically on the underside of the bench – usually running between the bases – and secure them firmly with wood screws. This step might seem minor, but it contributes significantly to the bench’s durability and robust feel.
5. Finishing Touches: Staining for Durability and Style
With all the structural elements in place, it’s time for the most transformative step: finishing! This is where your bench truly comes to life. Before applying any stain or paint, thoroughly sand all surfaces of your bench. Start with a coarser grit (like 100-120) to smooth out any imperfections or pencil marks, then move to a finer grit (180-220) for a silky-smooth finish. Proper sanding is key to an even and professional-looking stain application.
For my benches, I opted for the same outdoor semi-transparent stain in an espresso tint that I used on the Fancy X Farmhouse Table. This ensures a perfectly coordinated set and provides excellent protection against the elements, which is vital for outdoor furniture. I found this particular stain at Lowe’s, and the application couldn’t be simpler: just paint it on evenly, following the wood grain, and let it dry according to the manufacturer’s instructions. The semi-transparent nature allows the beautiful wood grain to show through, adding to the rustic charm, while the tint provides a rich, deep color.
If your bench is destined for indoors, you might explore different stain colors – from light oaks to dark walnuts – or even consider painting it for a more contemporary or vibrant look. Always remember to apply a clear protective topcoat (like polyurethane or spar urethane for outdoor use) after staining to seal and further protect the wood, ensuring your masterpiece lasts for years to come. This final step not only beautifies your bench but also significantly extends its lifespan.
The Numbers: An Affordable DIY Project
Now, let’s talk about the incredible value of this project. The total cost for lumber for *each* bench came in at under $35! Yes, you read that right – under $35 per bench! This astounding affordability means that the combined cost for both benches and our Fancy X Farmhouse Table amounted to less than $140. Woohooooo! This truly fits my “shanty” budget perfectly and demonstrates that you don’t need to break the bank to create beautiful, custom furniture for your home. The satisfaction of knowing you built such a functional and stylish piece for so little is truly priceless.
Versatility and Inspiration: Where Will Your Bench Live?
Beyond its primary role as dining seating, the versatility of this DIY farmhouse bench is boundless. Imagine this beautifully crafted bench gracing your entryway, providing a convenient spot to sit while putting on shoes or a charming display area for decorative pillows and baskets. Or perhaps in a mudroom, offering practical seating and a touch of rustic elegance. It could even serve as extra seating in a living room, a long coffee table, or simply a decorative accent under a window. For those with a large garden or porch, it offers a welcoming place to relax and enjoy the outdoors. The timeless design ensures it can seamlessly integrate into various decor styles, from rustic and farmhouse to transitional and even modern, bringing warmth and character wherever it’s placed. Where will your DIY masterpiece find its home?
Your Journey Starts Here: Full Plans & More Inspiration
I sincerely hope you love these benches as much as I do! They are not just pieces of furniture; they are foundations for countless memories – from lively family dinners to quiet mornings with a cup of coffee. The joy of creating something so functional and beautiful with your own hands is truly unparalleled. A huge thank you once again to Ana White for her incredible collaboration and for making these plans so accessible and enjoyable to follow. Can you tell I’m absolutely delighted with the outcome?
Remember, for the ultimate guide, make sure to check out the full set of plans for these easy DIY benches over at Ana-White.com. Her detailed instructions will ensure your project is a success.
And if you haven’t seen it yet, you can also dive into the details of my original Fancy X Farmhouse Table right HERE! Building the table first will give you a perfect understanding of the style and construction that these benches are designed to complement.
Thank you so much for stopping by and sharing in this exciting DIY adventure. We love seeing what you create, so please feel free to share your finished projects with us and the broader DIY community!
Join Our Community for More DIY Inspiration!
A heartfelt thank you to all our wonderful readers who continue to support Shanty2Chic! Your encouragement and engagement inspire us to keep sharing creative and achievable DIY projects. We are so honored to have you as part of our community. Stay tuned for more exciting builds, home decor ideas, and budget-friendly transformations. Don’t forget to connect with us on social media and subscribe to our newsletter for the latest updates and exclusive content!
We appreciate every single one of you!