
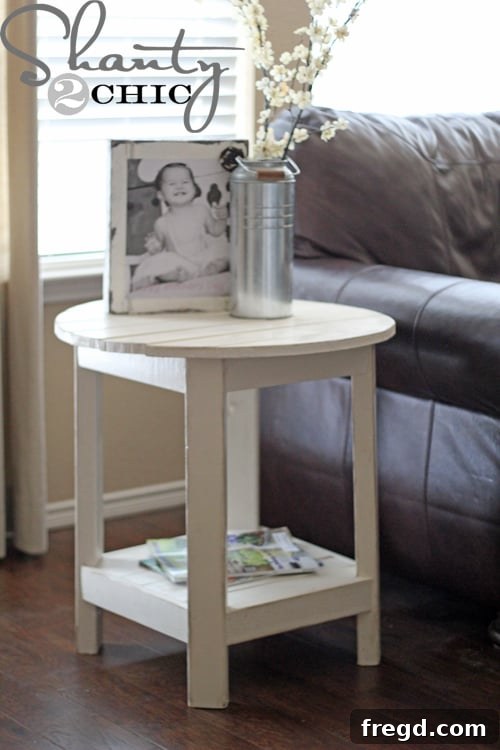
DIY Dream Achieved: Building Pottery Barn Benchwright Side Tables on a Budget with Ana White’s Plans
There are moments in DIY when inspiration strikes, and the results exceed every expectation. This project was one of them! Our incredible friend, Ana White, known for her brilliant and accessible woodworking plans, outdid herself once again by designing ingenious plans for the coveted Pottery Barn Benchwright Side Tables. As soon as I saw them, I knew they would be the perfect, stylish addition to our living room, beautifully complementing the Tryde Coffee Table I had previously built. The allure of Pottery Barn’s classic designs is undeniable, but their price tags often make them unattainable for many. This is where the magic of DIY, powered by clever plans, truly shines – allowing us to bring high-end style into our homes without breaking the bank.
The Allure of the Benchwright Collection: High-End Look, DIY Price
The Pottery Barn Benchwright collection is celebrated for its robust construction, rustic charm, and timeless appeal. Its distinctive industrial-chic aesthetic, often featuring rich wood tones and sturdy hardware, makes it a centerpiece in many interior design schemes. The side tables, with their unique round tops and gracefully angled legs, are particularly eye-catching. However, owning pieces from this collection can be a significant investment. This is precisely why Ana White’s detailed, step-by-step plans are a game-changer. She empowers everyday DIYers to replicate these stunning designs using readily available materials and standard tools, transforming what seems like a daunting project into an achievable weekend build. Thanks to Ana’s visionary plans, I was able to build two of these magnificent side tables for an astonishing $25 each – a fraction of the retail cost!
Gathering Your Supplies: Essential Tools and Materials
Before diving into any woodworking project, a well-organized workspace and the right supplies are crucial. While Ana’s plans provide a comprehensive list, here’s a general overview of what you might need to embark on your own Benchwright side table journey. For materials, common choices include pine boards or plywood, which are affordable and easy to work with. You’ll also need wood glue, screws, and sandpaper in various grits. For the finish, as you’ll see, I opted for Rust-Oleum products, which deliver fantastic results.
Regarding tools, a miter saw or circular saw will be essential for making precise cuts. A drill is indispensable for pre-drilling holes and driving screws. For cutting the distinctive round tabletops, a jigsaw is a common choice, but I discovered a fantastic alternative. For assembly, while not strictly required, a Kreg Jig pocket hole system will elevate the quality and sturdiness of your joints significantly. Don’t forget safety gear: safety glasses, hearing protection, and gloves are paramount for any DIY project.
Bringing the Vision to Life: A Glimpse into the Build Process
The construction process for these tables, while appearing complex due to the round tops and angled legs, is surprisingly manageable with Ana White’s clear instructions. Here are some snapshots and insights from my build:
Crafting the Perfect Round Table Tops
One of the most distinctive features of these side tables is their elegant round tops. This step can seem intimidating, but Ana’s advice made it incredibly simple. I followed her ingenious method: tying a string around a nail, placing the nail at the center of my wood piece, and using the string as a compass to draw a perfect guide circle. This technique is brilliant for achieving symmetrical, smooth curves without specialized equipment. Once the circle was marked, I used my Dremel Trio to cut out the shapes. The Dremel Trio, with its versatility, made quick and accurate work of this task, resulting in beautifully cut tabletops ready for the next phase of the build. If you don’t have a Dremel Trio, a jigsaw would also work wonderfully for this step, just take your time for a smooth edge.
The Kreg Jig Advantage: Building Sturdy and Strong
For connecting the various wooden components of the table base, a Kreg Jig pocket hole system is an absolute game-changer. While you certainly don’t *have* to use it to build these tables, I highly recommend it. The Kreg Jig creates strong, hidden joints quickly and easily, leading to a much sturdier final product. It simplifies assembly, especially when dealing with angled pieces, and provides a professional finish by concealing all fasteners. If you’re serious about woodworking, investing in a Kreg Jig is well worth it; it makes projects like this not just easier, but also ensures they last for years to come.
The Art of the Finish: Achieving That Signature Rustic Look
Once the tables were fully assembled, it was time for the finishing touches – a step that truly transforms raw wood into a piece of art. The key to replicating the Benchwright’s rustic aesthetic lies in a multi-layered finishing process involving paint, distressing, and stain.
A Base of Heirloom White
To begin, I applied a couple of coats of Rust-Oleum Heirloom White spray paint. This soft, off-white shade provides a beautiful, classic foundation, allowing the subsequent distressing and staining to pop. Spray paint is excellent for achieving a smooth, even finish quickly, especially on intricate pieces. Remember to apply several thin coats rather than one thick one to avoid drips and ensure proper drying.
Distressing for Authentic Character
After the Heirloom White paint had thoroughly dried, I moved on to distressing the edges. This step is crucial for giving the tables that aged, well-loved character synonymous with the Benchwright style. Using 80-grit sandpaper, I gently sanded down the corners and edges, revealing hints of the bare wood underneath. The goal isn’t to create uniform scratches but rather to mimic natural wear and tear, giving each table its unique story. This technique adds depth and a tactile quality that mass-produced furniture often lacks.
Adding Depth with Dark Walnut Stain
Finally, to deepen the rustic effect and tie everything together, I followed up with a tiny bit of Rust-Oleum Dark Walnut Stain. Applying this dark stain strategically over the distressed areas and wiping off the excess quickly allows the darker tones to settle into the sanded spots and crevices, enhancing the aged appearance. The contrast between the soft Heirloom White and the rich Dark Walnut creates a beautiful, layered finish that perfectly captures the Pottery Barn aesthetic. This step truly brought out the character of the wood and the distressing, making the tables look like they’ve been cherished for years.
A Personal Triumph: The Finished Look in Our Home
I am absolutely head over heels in love with these unique-looking tables! Their rustic charm, combined with the elegant round tops and sturdy construction, makes them standout pieces in our living room. They don’t just serve a functional purpose; they add a significant layer of warmth and character to the space. What’s even better is how seamlessly they integrate with the existing decor, especially with my Tryde Coffee Table. The cohesive look truly elevates the entire room, giving it a designer feel without the designer price tag. It’s incredibly satisfying to create pieces that not only meet your practical needs but also truly resonate with your personal style.
Overcoming DIY Intimidation: The Rewards of a Challenge
Honestly, I was quite intimidated to build these tables at first. The idea of perfectly cutting round tops and precisely angled legs felt like a significant challenge. However, I am so incredibly glad that I didn’t shy away from it. This project became a fantastic learning experience; I gained new skills, refined existing ones, and most importantly, boosted my confidence in tackling more complex woodworking projects. The satisfaction of overcoming that initial hesitation and seeing the beautiful, functional pieces of furniture I created with my own hands is immense. And to think, I now have two gorgeous, high-quality side tables to show off, all for just $25 each! It’s a testament to the power of clear plans and a willingness to try.
Ready to Create Your Own Benchwright Masterpiece?
If you’re inspired to build your own Pottery Barn-style Benchwright Side Tables and experience the joy of DIY success, then head over to Ana White’s website for the complete, detailed plans. You’ll find everything you need to know to replicate this project with confidence. For the comprehensive Benchwright Side Table plans, simply click HERE! I highly encourage you to give this project a try; the results are truly rewarding.
If you’ve loved this project and found inspiration in these tables, I would be absolutely thrilled if you shared it! Please feel free to pin this post to your favorite DIY or home decor boards below. Your support means the world!
Thanks so much for reading and happy building!
~Ashley