
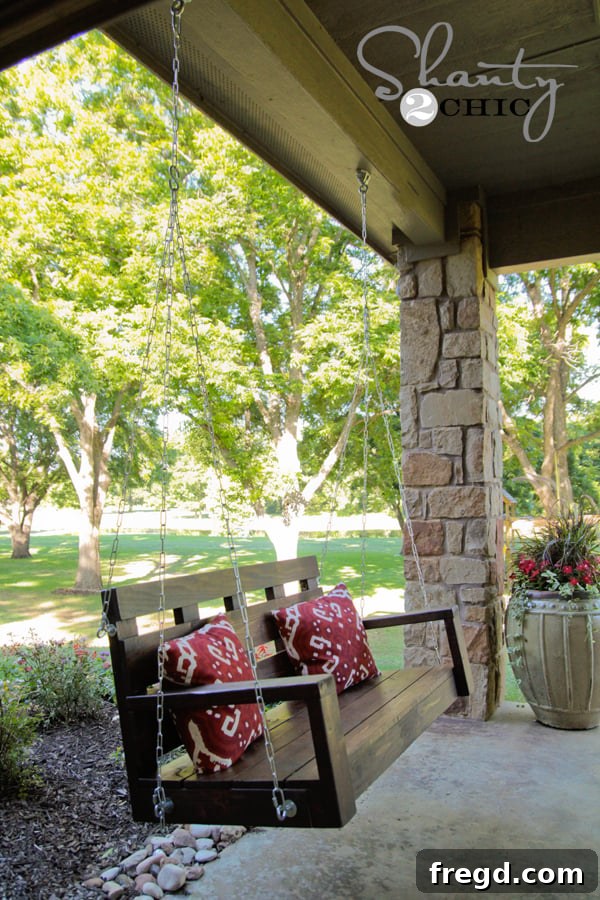
Crafting Your Dream Porch Swing: A DIY Guide for Beginners
Welcome, fellow DIY enthusiasts! I hope your week has been productive and inspiring. Today, I’m absolutely thrilled to share a project that holds a very special place in my heart – a classic porch swing. This build represents more than just a piece of outdoor furniture; it’s about creating lasting memories, much like those I cherished growing up on my grandparents’ porch swing. The thought of my own children experiencing that same simple joy has been a driving force behind this endeavor.
For this exciting project, I had the incredible opportunity to team up with my wonderfully talented friend, Miss Ana White. Together, we designed and brought this beautiful porch swing to life, making sure it’s not only sturdy and stylish but also incredibly approachable for anyone looking to dip their toes into woodworking. This isn’t just a basic build; it’s designed to be an excellent introductory project, especially if you’re new to using a Kreg Jig.
Isn’t she just darling? The charm of a porch swing instantly elevates any outdoor space, inviting relaxation and conversation. Whether you envision quiet mornings with a cup of coffee or lively afternoons with family, a DIY porch swing promises to be a focal point of comfort and joy.
Why Build Your Own Porch Swing?
There’s something incredibly satisfying about creating something with your own hands, especially a piece that will become a cherished part of your home. For me, the desire for a porch swing stemmed from deep-rooted childhood memories. My Meme and Papa had one at their house, a timeless fixture where countless stories were shared, laughter echoed, and quiet moments were savored. I wanted to replicate that nostalgic experience for my own family, providing a similar haven of comfort and tradition.
This particular project is ideal for beginners because it utilizes straightforward techniques and doesn’t require an extensive array of specialized tools. The Kreg Jig, a fantastic tool for creating strong, concealed joints, truly shines here. If you’ve been looking for an accessible entry point into woodworking, this DIY porch swing project is your perfect opportunity to learn new skills and gain confidence.
While I’ll share some essential tips and visual aids here, remember that the full, detailed set of plans for this beginner-friendly porch swing is available on Ana White’s website. Her plans are meticulously crafted, making the building process smooth and enjoyable. Be sure to visit her site for all the precise measurements and cutting lists.
Getting Started: Building the Robust Base
Every sturdy structure begins with a strong foundation. For our DIY porch swing, this means constructing a solid base. This initial step is straightforward, primarily involving pocket hole joinery, which is where your Kreg Jig truly shines. Pocket holes create incredibly strong and durable joints, perfect for furniture that needs to withstand regular use and outdoor elements.
I began by attaching all the shorter wooden pieces to the longer pieces, forming the rectangular frame of the swing’s seat. For these connections, I used 1 1/2″ pocket holes, drilling two into the ends of each small board. These were then secured with robust 2 1/2″ Blue Kote pocket hole screws. Blue Kote screws are particularly good for outdoor projects as they offer enhanced corrosion resistance, ensuring your swing stands the test of time against moisture and weather.
When drilling your pocket holes, consistency is key. Ensure your Kreg Jig is set to the correct depth for your material thickness, and always drill on the hidden side of the joint for a clean finish. Once drilled, carefully align your pieces and drive in the screws. Don’t overtighten, but make sure the joint is snug and secure.
Constructing the Back Support
With the base complete, the next step involves building the back support for the porch swing. This section will provide comfortable seating and contribute significantly to the swing’s overall stability. Similar to the base, this component is assembled using the reliable pocket hole method.
Again, I utilized 1 1/2″ pocket holes and 2 1/2″ pocket hole screws to join the pieces of the back support. The process is identical to how the base was assembled, ensuring uniformity and strength throughout the structure. Pay attention to the angles if your design incorporates a slight recline; Ana White’s plans will specify these details.
Once the back support frame was assembled, it was time to attach it to the swing’s base. For this critical connection, I once again relied on the strength of the Blue Kote 2 1/2″ screws. These were driven through the 2x4s of the base and securely into each brace of the back support. To further reinforce every joint and ensure maximum longevity, I liberally applied Gorilla Wood Glue between all mating surfaces. This combination of mechanical fasteners and strong adhesive creates a bond that is incredibly robust and resistant to movement, crucial for the safety and durability of your new porch swing.
Adding Comfort and Style: The Arm Supports
With the base and back firmly in place, it’s time to add the arm supports, which are essential for both comfort and the overall aesthetic of your porch swing. These supports not only provide a place to rest your arms but also contribute significantly to the structural integrity of the swing.
Before attaching the main arm supports to the swing, I prepared them by drilling two pocket holes at the top of each piece. These strategically placed holes will be used to secure the actual armrest pieces later on. It’s a clever way to conceal fasteners for a cleaner look.
Next, I attached these supports to the main swing structure. Using the same reliable Blue Kote screws, I drove them through the base of the swing and into the bottom of the arm supports. This ensures a strong, vertical connection. It’s vital to ensure these are plumb and level before fully tightening, as they dictate the final position of your armrests.
Here’s another perspective to help visualize the attachment process. You can see how the arm support integrates seamlessly with the base, forming a robust corner for the swing.
For each armrest, I also drilled two pocket holes on the side that would connect to the back support of the swing. Then, using more pocket holes, I attached the front and back pieces of the armrest, creating a complete, sturdy structure. Thanks to the precision of the Kreg Jig, this step becomes incredibly simple and yields professional-looking results. The ability to hide the screws ensures a clean, smooth finish, free from visible fasteners.
This photograph illustrates where the armrest attaches to the back support of the swing, highlighting the secure pocket hole joinery that makes these connections so strong.
Adding the Slats: Seat and Backrest
With the main frame of the porch swing assembled, it’s time for the aesthetically pleasing and functional step of attaching the 1x boards that form the seat and backrest. This is where your swing truly starts to take shape and gain its characteristic comfort.
To secure all the 1x boards onto both the seat and the backrest, I used a combination of Gorilla Wood Glue and my trusty Ryobi 18v Cordless Airstrike Nailer. This tool is an absolute game-changer for projects like this! It’s incredibly easy to use, eliminates the need for an air compressor, and allows for rapid, secure fastening. Plus, it’s surprisingly affordable, making it a fantastic addition to any DIYer’s toolkit. You can typically find it at your local Home Depot.
When attaching the slats, ensure even spacing for a comfortable and visually appealing finish. A few small spacers can help maintain consistent gaps. The wood glue provides long-term adhesion, while the nails (or brads from the Airstrike nailer) hold the boards in place securely while the glue dries. This two-pronged approach ensures a durable and strong surface for years of enjoyment.
Finishing Touches: Staining, Sealing, and Protecting Your Investment
Once the construction is complete, the final step before hanging your beautiful porch swing is to protect and beautify it with a proper finish. This is crucial, especially for outdoor furniture that will be exposed to the elements.
DONE with the build! My very last step before hanging it was to apply the finish. For my swing, I chose the same stain I had previously used on my outdoor dining table. This creates a cohesive look across my outdoor furniture and ensures I love the aesthetic. I opted for Rust-Oleum Dark Walnut, which provides a rich, deep color that highlights the natural beauty of the wood grain.
After the stain had thoroughly dried according to the manufacturer’s instructions, the most critical protective step for outdoor longevity began. Because this swing will face outdoor elements – sun, rain, and humidity – a robust protective topcoat is indispensable. I applied three generous coats of Rust-Oleum Spar Varnish. Spar varnish is specifically designed for outdoor marine use, making it incredibly resilient against UV rays, moisture, and temperature fluctuations. It forms a flexible, durable barrier that prevents the wood from cracking, peeling, or fading.
This particular spar varnish is surprisingly easy to apply and doesn’t emit a strong, overpowering odor, which is a huge bonus. It goes on white, allowing you to easily see where you’ve applied it, but dries to a crystal-clear finish, preserving the beautiful stain beneath. Applying multiple thin coats, allowing adequate drying time between each, will give you the best protection and a beautifully smooth surface.
The Grand Finale: Safely Hanging Your Porch Swing
After the varnish dried and cured, the moment of truth arrived: it was time to hang the porch swing! This final step requires careful attention to detail and, most importantly, a strong emphasis on safety. Before I dive into how I hung my swing and share some tips, I must issue a crucial disclaimer:
I am providing information on how *I* successfully hung *my* porch swing, offering these details as helpful tips and insights. However, it is imperative to understand that every house structure is unique, and attachment points for swings will vary. Structural integrity can differ significantly from one home to another. Consequently, I cannot and will not be held responsible for any injuries or damage that may occur from improper installation or failure to adequately assess your specific structural conditions. Always prioritize safety, consult with a professional if you have any doubts about your ceiling’s capacity, and ensure all hardware meets or exceeds the required weight limits.
Okay, with that essential safety note out of the way, let’s talk about the process! Knowing that my precious children would be swinging in this, I dedicated a significant amount of time to researching the safest and most effective methods for hanging a porch swing. I even had a wonderful helper at the hardware store who guided me toward the appropriate hardware. Here’s a look at the heavy-duty hardware I ultimately used for my porch swing:
Initially, I attached two hanging points on each side of the swing’s base. However, after a test swing, I found it felt a bit “tippy” – not quite as stable as I desired. To rectify this and ensure maximum safety and comfort, I added a third attachment point to the top of the back of the swing. While it might seem like overkill to some, you haven’t met my energetic kids! Their enthusiasm justified the extra reinforcement, giving me complete peace of mind.
Here’s how these robust hanging brackets look from the inside of the swing, demonstrating their secure placement:
And this is how they appear from the outside, showing the functional and sturdy connection points for the chains:
I used heavy-duty chain to connect the swing to the ceiling. The chain was attached to the swing’s brackets via strong S-hooks, then extended upwards to the ceiling mounts. For ceiling attachment, I sought out heavy-duty swing hangers, which are designed to support significant dynamic loads. Alternatively, you can use large eye screws, provided they have an adequately high weight limit and are securely fastened into structural joists, not just drywall or thin ceiling material. Always use a stud finder to locate solid wood framing in your ceiling.
To enhance comfort, we deliberately made the back of the swing hang just slightly lower than the front – approximately 4-6 chain links difference. This subtle adjustment gives the swing a gentle recline, making it incredibly comfortable for extended periods of relaxation. It truly is perfect for lounging!
That’s it! Once everything is securely hung and double-checked for stability, your DIY porch swing is ready for its maiden voyage. Time to grab a cold drink, settle in, and enjoy the fruits of your labor!
Enjoying Your Handmade Haven
Oh, how I adore this porch swing! And it’s not just me; my kiddos are absolutely captivated by it too. It’s truly heartwarming to see them create their own memories, just as I did. This project has been a labor of love, resulting in a piece of furniture that brings immense joy and character to our home.
I would absolutely LOVE for you to share this project and PIN this swing below to inspire others in their DIY journeys! Spread the word about how accessible and rewarding building your own porch swing can be.
Don’t forget to head over to Ana White’s site for the complete set of free plans! Her detailed instructions are an invaluable resource that will guide you through every cut and joint. Thank you so much for stopping by and sharing in my excitement! I’m off to enjoy a leisurely swing in my new handmade haven!
Explore More Outdoor DIY Projects
If you enjoyed building this porch swing, you might be interested in tackling some of my other outdoor projects designed to enhance your living spaces. DIY woodworking is a continuous journey of learning and creation!