
Table of Contents
Free DIY Platform Bed Plans: A Beginner’s Guide to Building Your Own Bed
Are you ready to transform your bedroom with a stylish and incredibly sturdy bed frame that you built yourself? Our free DIY platform bed plans are designed specifically with beginners in mind, requiring only a few basic tools and an affordable budget, typically around $50-$75 for lumber. This project is not just about saving money; it’s about the immense satisfaction of creating a functional piece of furniture with your own hands.
Inspired by high-end designs from catalogs like West Elm, this platform bed boasts a robust and chunky aesthetic without the hefty price tag. We’ve engineered this design to be straightforward, making it an ideal entry point for anyone new to woodworking. While these plans detail a full-size bed, the design is highly adaptable, allowing you to easily adjust measurements for any mattress size, from twin to California king. Get ready to embark on a rewarding woodworking journey and build a beautiful, durable bed that will last for years.
CLICK HERE TO JUMP TO THE FREE Platform Bed Plans
Materials and Tools for Your Platform Bed
Before you begin building your DIY platform bed, gathering all the necessary materials and tools is crucial for a smooth and efficient process. We’ve carefully selected common lumber sizes that are readily available at most hardware stores, keeping both cost-effectiveness and ease of use in mind. This project is designed to be accessible, and the following lists ensure you have everything required to construct a sturdy and beautiful bed frame.
Essential Supplies List
- 8 – 1x3x10 Furring Strips: These inexpensive strips will serve as your mattress slats, providing essential support. Opt for smooth pieces to protect your mattress.
- 1 – 2x8x10 Pine Board or Common Board: This will be used for key structural components, offering good strength and a clean finish.
- 2 – 2x8x8 Framing Boards: These robust boards are fundamental for the main structural integrity of your bed frame.
- 3 – 2x6x8 Framing Boards: Used for additional frame support, contributing to the bed’s overall stability.
- 1 – 2x4x8 Framing Board: This piece is crucial for the central support beam, preventing mattress sag.
- 3 – 2x2x8 Pine Boards or Common Boards: These will form the cleats that hold your mattress slats. (Note: These can be ripped from 2x4s if 2x2s are unavailable in your region, or you can use 2x3s for extra robustness if preferred).
- 2 1/2″ Pocket Hole Screws: These are essential for creating strong, concealed joints in your frame assembly, thanks to the Kreg Jig.
- 1 1/4″ Screws (or Brad Nails): Used for securely attaching the mattress slats. Screws provide maximum hold, while a brad nailer offers quick installation.
- 2 1/2″ Wood Screws: For general wood-to-wood fastening, particularly for attaching cleats and the headboard.
- Wood Glue: An indispensable component for adding significant strength and durability to all your joints. Always apply glue generously for the best bond.
- Wood Stain or Finish of Choice: To protect the wood and achieve your desired aesthetic.
Recommended Tools
- Miter Saw: For making precise and repeatable cuts in your lumber. Safety first when operating!
- Drill: Essential for drilling pilot holes and driving screws.
- Kreg Jig: This tool makes pocket holes, creating strong and invisible joints, perfect for beginners.
- Sander (or Sandpaper): For smoothing all surfaces before finishing, ensuring a professional look and feel.
- Brad Nailer (Optional): Speeds up the process of attaching slats, but 1 1/4″ wood screws work just as well.
Having these tools and materials ready will allow you to focus on the building process, making for a more enjoyable and successful project. Remember to always prioritize safety when working with power tools.
How to Build Your DIY Platform Bed Frame
Building your own platform bed frame is a rewarding project that comes together faster than you might expect. Follow these step-by-step instructions carefully to construct a durable and stylish bed that will be the focal point of your bedroom. Remember to refer to the detailed cut list and diagrams in the printable plans for precise measurements and visual guidance.
Step 1: Assemble the Bed Frame Base
Begin by cutting all your lumber according to the precise measurements provided in the free printable plans. Accuracy in this stage will ensure your bed frame assembles correctly and is perfectly square. If you’re new to using a miter saw, consider watching a tutorial on how to use a miter saw to ensure safe and accurate cuts.
Once your pieces are cut, it’s time to drill pocket holes. Using your Kreg Jig, set it for 1 1/2″ thick boards and drill pocket holes on the ends of your shorter frame pieces, as indicated in the plans. Pocket holes are fantastic for creating strong, hidden joints that give your finished product a clean, professional look. If you need a refresher, check out our How to Use a Kreg Jig Video HERE.
Next, assemble the top frame. Apply a generous amount of wood glue to each joint before securing with 2 1/2″ pocket hole screws. Wood glue is your best friend here, adding incredible strength and longevity to your connections. Ensure your frame is square before the glue sets.
Repeat the process for the bottom frame, ensuring that the pocket holes are positioned correctly so they can be hidden or easily filled later. This meticulous attention to detail at this stage will pay off in the final product.
Now, flip the top frame over so the pocket holes are facing up. Carefully align and attach the bottom frame to the side rails of the top frame using 2 1/2″ wood screws and wood glue. This creates the sturdy, chunky profile of your platform bed base.
Step 2: Attach the Bed Frame Supports
Flip the assembled frame back over. This is likely the heaviest part of the build, so don’t hesitate to ask for help! Now, attach the center support (made from the 2×4 lumber) between the headboard and footboard sections of your frame using 2 1/2″ pocket hole screws. This central beam is crucial for preventing your mattress from sagging over time, distributing weight evenly across the bed.
Finally, attach the cleats to the inside of the side rails. These 2×2 (or 2×3, if preferred for extra strength) cleats will support your mattress slats. Secure them with 2 1/2″ wood screws, ensuring they are positioned 3/4″ lower than the top of the top frame, allowing the slats to sit flush. For an easier process, consider using Spax self-tapping screws, which often eliminate the need for pre-drilling. If using regular wood screws, always pre-drill pilot holes to prevent wood splitting.
Step 3: Sanding and Finishing the Wood
With the frame assembled, it’s time to prepare it for its final appearance. Thoroughly sand the entire platform bed frame. Start with a coarser grit sandpaper (e.g., 120-grit) to remove any imperfections, rough edges, or glue squeeze-out, then follow up with a finer grit (e.g., 220-grit) for a silky-smooth finish. Proper sanding is key for optimal stain absorption and a professional look.
After sanding, wipe down the wood to remove all dust. Then, apply your chosen stain or finish. For a classic, rich look, we recommend one coat of Rust-Oleum Dark Walnut Stain (also available as Varathane Dark Walnut at Home Depot). Apply the stain evenly with a brush or rag, allowing it to penetrate the wood, then wipe off any excess. Always follow the manufacturer’s instructions for drying times and additional coats if desired.
Step 4: Install the Mattress Slats
Once your bed frame’s finish is completely dry, it’s time to install the mattress slats. These 1×3 furring strips provide critical support for your mattress, eliminating the need for a box spring and promoting airflow, which helps extend mattress life. Lay the slats across the bed, resting them on the cleats and the center support.
Space the slats out evenly across the entire length of the bed. You can use a spacer block (a scrap piece of wood) to ensure consistent gaps. Secure each slat to both the side cleats and the center support using either 1 1/4″ brad nails (if you have a brad nailer) or 1 1/4″ wood screws. Ensure the furring strips are smooth to prevent any damage or tears to your mattress. This step completes the structural integrity of your platform bed.
Step 5: Attach the DIY Headboard (Optional)
If you’ve built a headboard separately (like our Planked Headboard), now is the time to attach it. Position your headboard against the platform bed frame. From the backside of the headboard legs, drill 2 1/2″ Spax screws through the legs and into both the bottom and top frames of the platform bed. This method ensures a very secure and stable connection between your headboard and bed frame.
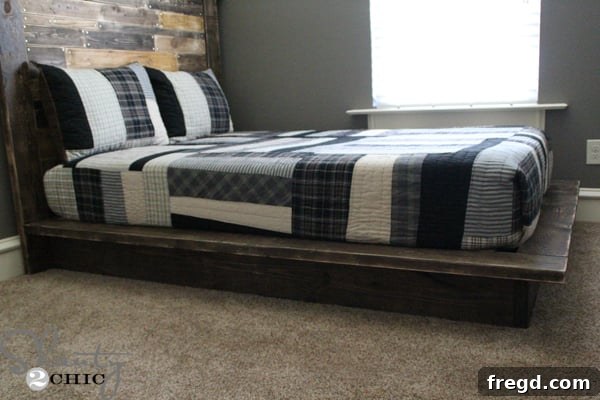
We absolutely adore this DIY platform bed! It perfectly embodies a blend of rustic charm and modern farmhouse aesthetic, and its incredible sturdiness ensures years of reliable use. There’s truly nothing quite like the pride of building something beautiful and functional with your own hands. My son loves his new bed, and hearing him proudly tell his friends that “Mom built my bed” is truly the best compliment a DIYer can receive.
If you’re as obsessed with the wall color in his room as we are, you can learn more about our wall color choices here. And for those asking about the quilt, it was purchased from Pottery Barn Teen a few years ago and may no longer be available.
Customize Your Platform Bed: Size Modification Options
One of the greatest advantages of building your own furniture is the ability to customize it to perfectly fit your needs. While these plans are designed for a full-size mattress, modifying the dimensions of this DIY platform bed frame to accommodate other mattress sizes is remarkably simple. Here’s how you can adjust the key measurements:
- Twin Size Mattress: To create a twin-size platform bed, subtract approximately 15 inches from the total width of the bed frame’s side rails and corresponding end pieces. You may also need to adjust the number of slats.
- Queen Size Mattress: For a queen-size bed, add about 7 inches to the width and 5 inches to the length of your main frame components (side rails, end rails, and center support). You’ll also need more slats to cover the increased area.
- King Size Mattress: To accommodate a king-size mattress, increase the width by roughly 23 inches and the length by 5 inches. This will require longer side rails and a wider footboard/headboard, plus additional slats.
- California King Size Mattress: For a California king, add approximately 19 inches to the width and 9 inches to the length of the frame. Again, adjust the number and length of your slats accordingly.
When making these modifications, always remember to adjust the corresponding pieces—side rails, headboard/footboard cross pieces, center support, and the length of your slats—to maintain structural integrity and a perfect fit for your chosen mattress. Planning these adjustments on paper beforehand can save you time and material during the build.
DIY Platform Bed FAQs
We receive many questions about building and using DIY platform beds. Here are answers to some of the most common inquiries to help you with your project and ensure you get the most out of your new bed frame.
How much does it cost to build a platform bed?
The cost to build a DIY platform bed can vary depending on several factors, including the specific design, the type of lumber and finishes used, and current lumber prices in your area. This particular platform bed design is highly budget-friendly, typically costing between $50 and $75 for the raw lumber. We prioritize using standard framing lumber, which is generally more affordable than premium hardwoods. To get an exact price for your project, we recommend checking the current lumber prices at your local hardware store using our detailed supply list.
What size mattress fits this DIY bed frame?
This bed frame was originally designed and built to perfectly fit a full-size mattress. However, as detailed in the “Modification Options and Measurements” section, the design is incredibly flexible. You can easily modify the dimensions of the side rails, headboard, footboard, and center support to accommodate any mattress size, from a twin to a California king. Always measure your specific mattress to ensure a custom, snug fit.
Can I build a platform bed without a headboard?
Absolutely! This platform bed design is intentionally separate from our headboard plans, giving you complete flexibility. The bed frame stands strong and looks great on its own, offering a minimalist or modern aesthetic. You can choose to use it without any headboard, or you can mix and match it with a different headboard design that suits your personal style. It’s all about creating the perfect bed for your space.
Is this bed sturdy enough without a box spring?
Yes, this DIY platform bed is incredibly sturdy and is specifically designed to be used without a box spring. The robust construction of the frame, combined with the integrated cleats and mattress slats, provides ample support for any standard mattress. The slats distribute the mattress’s weight evenly, preventing sag and extending the life of your mattress. For mattresses larger than a full-size (Queen, King, California King), we highly recommend installing additional short support blocks underneath the center support beam for enhanced stability and peace of mind. Eliminating the box spring is not only a great way to save money but also allows for a lower-profile, more contemporary bed look.
More DIY Bed Frame Plans You’ll Love
If you’ve enjoyed building this platform bed, or if you’re looking for inspiration for your next bedroom project, explore some of our other popular DIY bed frame plans. There’s a design for every style and skill level!
- DIY Modern Farmhouse Platform Bed
- Free Platform Bed Plan with Headboard
- DIY Twin Platform Bed with Chevron Headboard
- Platform Bed on Wheels
- How to Build a Platform Bed with Storage
Free Printable DIY Platform Bed Plans
Ready to start building your own durable and stylish platform bed? This beginner-friendly design is not only affordable but comes with comprehensive, step-by-step instructions to guide you through every cut and assembly. For your convenience, we’ve compiled all the essential details, including a complete cut list and detailed diagrams, into a downloadable PDF.
Don’t build without it! Make sure to download and print the full set of DIY Platform Bed Plans (PDF) with the complete cut list. This printable guide will be your indispensable companion throughout the building process, ensuring accuracy and making your project a breeze.
Key Instructions Overview (Refer to PDF for full details)
-
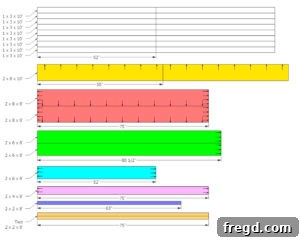
Cut List: Precisely cut all your lumber according to the dimensions provided in the downloadable PDF plans. This diagram shows all the pieces you’ll need.

Follow the cut list diagram for accurate lumber preparation. -
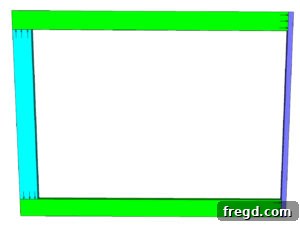
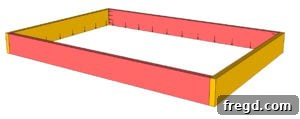
Assemble Top Frame: Begin by assembling the top frame of your bed. Use wood glue and 2 1/2″ pocket hole screws at each connection point for maximum strength. Ensure the frame is square.
The top frame forms the visible edge of your platform bed. -
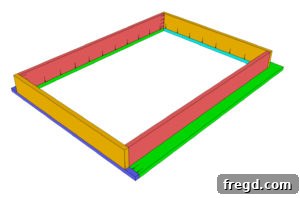
Assemble Lower Frame: Next, construct the lower frame. Pay attention to the orientation of the pocket holes – ensure they face the same direction for a consistent look and easier assembly later. This frame will be hidden, forming the internal structure.
The lower frame adds bulk and stability to the design. -
Combine Frames: Lay the top frame on the floor with its pocket holes facing up. Carefully place the lower frame directly on top, aligning all edges. Secure the two frames together using pocket hole screws, creating a solid and robust base.
Attaching the frames together creates the bed’s sturdy profile. -
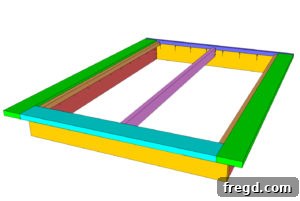
Attach Cleats and Center Support: Install the 2×2 cleats along the inner sides of the bed frame using wood screws. Then, attach the 2×4 center support in the middle, securing it with pocket hole screws on each end. Crucially, all three of these support pieces should be positioned 3/4″ lower than the top edge of the top frame, allowing your mattress slats to sit flush.
Cleats and center support ensure even mattress support. -
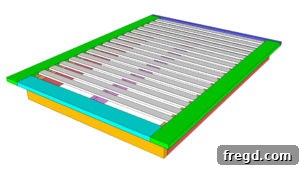
Add Slats and Finish: Finally, place your 1×3 slats across the cleats and center support, spacing them evenly. Secure them with 1 1/4″ screws or brad nails. Once the construction is complete, sand the entire bed frame smooth and apply your chosen finish, such as a rich wood stain. Then, simply enjoy your beautiful new DIY platform bed!
The final construction step before sanding and finishing.
As always, if you decide to make this bed, be sure to share your creation on social media! Use the hashtag #shanty2chic so we can see and share your amazing work too!