
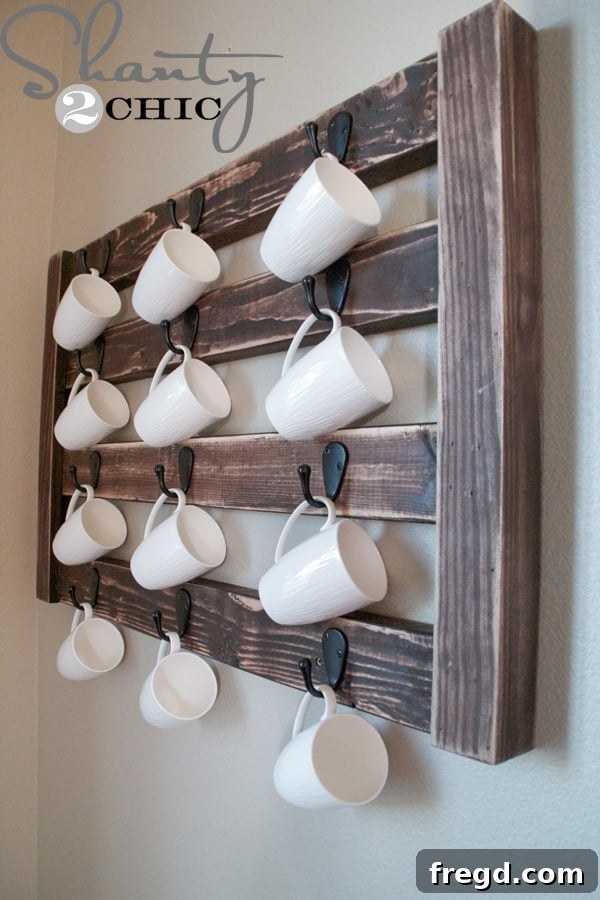
Hey there, fellow coffee lovers and DIY enthusiasts! Are you tired of your beloved coffee mugs cluttering your countertops or hiding away in cabinets? We absolutely adore a good cup of coffee, and what better way to celebrate that passion than by showcasing your favorite mugs in a stylish, custom-built display? Today, we’re thrilled to share how you can craft your very own rustic coffee mug holder – a project that’s not only incredibly functional but also adds a charming, personalized touch to your kitchen, dining area, or dedicated coffee nook. This quick and easy build is perfect for anyone looking to add a touch of handcrafted elegance and organization to their home. Let’s dive in and transform your mug collection into a beautiful display!
Build Your Own Rustic DIY Coffee Mug Display: Easy Step-by-Step Guide
We believe every home deserves functional beauty, and this DIY coffee mug display perfectly embodies that philosophy. Whether you’re a seasoned woodworker with a workshop full of tools or just starting with your very first project, you’ll find these instructions straightforward and incredibly rewarding. Imagine sipping your morning brew, admiring your neatly organized mugs, each with its own story or sentimental value, hanging proudly. This project is a fantastic and accessible way to declutter your space, add a unique piece of wall art, and express your personal style. It’s more than just storage; it’s a statement piece.
Why Build Your Own Coffee Mug Display?
Beyond the simple act of storing mugs, a DIY display offers numerous benefits for your home and lifestyle:
- Effortless Organization: Say goodbye to cluttered cabinets and overflowing shelves! A dedicated wall-mounted display keeps your mugs tidy, easily accessible, and frees up valuable cabinet space for other kitchen essentials.
- Charming Home Decor: This rustic design isn’t just practical; it’s a beautiful decor element that significantly enhances the aesthetic of your kitchen, dining room, or coffee bar area. It adds warmth and character that store-bought options often lack.
- Personalized Touch: Building it yourself allows for complete customization. You can perfectly match the size, finish, and style of hooks to your existing home aesthetic and the specific needs of your mug collection.
- Cost-Effective Solution: Crafting your own display is often significantly more affordable than purchasing a pre-made commercial unit, especially one of this quality and size. Plus, there’s the invaluable satisfaction of creating something with your own hands.
- Showcase Your Collection: For many coffee lovers, mugs are more than just vessels – they’re souvenirs, gifts, or pieces of art. This display allows you to proudly exhibit your favorite, most unique, or sentimental mugs instead of tucking them away.
- Easy to Build: Despite its impressive appearance, this project utilizes common lumber and basic woodworking techniques, making it approachable for most DIYers.
Before we roll up our sleeves and get building, a huge shout-out and heartfelt thank you to our brilliant friend Jamison over at Rogue Engineer! He’s generously provided the detailed, easy-to-follow, and completely FREE plans specifically for this coffee mug display project. These plans are an invaluable resource, offering precise measurements and visual guides that complement our instructions perfectly. We highly recommend heading over to his site to download them – they’re essential for a smooth and accurate build. While you’re there, take some time to explore the incredible array of woodworking projects and beautiful furniture designs that he and his talented wife, Jamie, have meticulously crafted. You’re sure to find even more inspiration for your next DIY adventure!
Gather Your Materials and Tools for Success
Success in any DIY project starts with proper preparation and having all your materials and tools at hand. Here’s a comprehensive list of what you’ll need to create your stunning and durable coffee mug display. Always remember to prioritize safety by wearing appropriate protective gear when working with power tools and materials.
Essential Materials:
- Lumber:
- 2x4s: These form the robust main frame and vertical supports of your display.
- 1x3s: Used for the horizontal elements of the “L” shaped pieces, providing a ledge for the mugs.
- 1x2s: These pieces complete the “L” shaped sections, adding depth and structural integrity.
(Please refer to Jamison’s free plans for the exact measurements and quantities of each lumber size required. Common pine or fir lumber is an excellent choice for this project, offering a great balance of affordability, ease of workability, and a rustic aesthetic when stained.)
- Wood Glue: A high-quality wood glue (like Titebond III) is crucial for creating strong, lasting joints that reinforce the mechanical fasteners.
- Brad Nails: Approximately 1 1/4″ brad nails are ideal for quickly and cleanly securing the lighter “L” pieces and initial framing connections. They offer good holding power without large visible nail heads.
- Wood Stain: We achieved our signature rustic look using Varathane Carrington stain. However, you can choose any color or brand that complements your home decor. A clear coat of polyurethane or a similar sealant is also recommended for durability.
- Mug Hooks: Select decorative hooks that are robust enough to securely hold the weight of your mugs. Consider the style and finish (e.g., black, bronze, chrome) to match your desired look.
- Wood Screws: 3″ long wood screws are necessary for securely mounting the finished display to the wall studs, ensuring it can safely bear the weight of a full mug collection.
Required Tools:
- Miter Saw or Circular Saw: Essential for making precise, straight, and accurate cuts in your lumber. A miter saw offers excellent precision for repetitive cuts.
- Brad Nailer (and air compressor if pneumatic): Speeds up the assembly process significantly and creates neat, almost invisible connections. A cordless electric brad nailer is also a great option.
- Tape Measure and Pencil: For meticulous measuring and marking of all your wood pieces. “Measure twice, cut once!”
- Safety Glasses and Hearing Protection: Absolutely critical for personal safety when operating any power tools. Always wear them!
- Orbital Sander (or sanding block with sandpaper): For smoothing wood surfaces, removing rough edges, and preparing the wood for staining. It’s also used for the optional distressing step.
- Stain Applicator: A brush, foam applicator, or clean rag for applying wood stain evenly.
- Clean Rags: Several clean rags for wiping off excess stain and for general cleanup.
- Drill/Driver: Used for pre-drilling pilot holes (highly recommended to prevent wood splitting) and for driving the mounting screws into the wall studs.
- Stud Finder: A non-negotiable tool for accurately locating wall studs, ensuring a safe and secure installation of your display.
- Level: Crucial for ensuring your display hangs perfectly straight on the wall, both visually appealing and structurally sound.
- Clamps (optional but recommended): Can be very helpful for holding pieces together while glue dries or while you’re driving nails, ensuring precise alignment.
Step-by-Step Construction Guide for Your Mug Display
Now that you have all your materials and tools ready, let’s get building! Remember to consistently refer to Jamison’s plans for specific dimensions and detailed diagrams. These steps provide a comprehensive, easy-to-follow overview of the construction process, designed to guide you to a perfect finish.
Step 1: Make All Your Cuts with Precision
Begin your project by carefully measuring and cutting all your lumber pieces according to the exact specifications provided in the free plans. This includes your 2x4s for the frame, and the 1x3s and 1x2s for the “L” shaped horizontal supports. Precision is absolutely paramount in this initial stage; accurate cuts will ensure that your display comes together squarely, securely, and without unsightly gaps. Use a miter saw or circular saw for clean, straight cuts, and always double-check your measurements before making any cut to avoid waste. Once all pieces are cut, a quick sanding to remove any burrs or splinters will prepare them perfectly for assembly.
Step 2: Construct the “L” Shaped Pieces
Next, you’ll assemble the two identical “L” shaped components that will serve as the primary horizontal supports for your mugs. To achieve this, take a 1×2 board and a 1×3 board. Apply a generous, even bead of high-quality wood glue along the long edge of one of the boards where it will meet the other. Carefully align the two boards at a 90-degree angle to form the “L” shape. Secure them together using 1 1/4″ brad nails, ensuring they penetrate both pieces of wood. The wood glue provides significant, long-lasting strength to the joint once dried, while the brad nails effectively hold the pieces firmly in place during the crucial drying process. Take your time to ensure these “L” pieces are perfectly square and robust, as they will bear the weight of your entire mug collection.
Upon completion of this step, you should now have two identical, strong, and perfectly square “L” shaped assemblies. These will form the shelves and hanging points for your coffee mugs.
Step 3: Attach the End 2×4 Supports to the L-Pieces
Now, take one of your cut 2×4 pieces, which will serve as a strong vertical end support for the entire display. Position it at one end of both “L” pieces, ensuring flush alignment. Apply wood glue generously to all contact surfaces where the 2×4 meets the “L” pieces. Then, firmly secure the 2×4 in place using your brad nailer. For maximum stability and a truly robust hold, drive nails not only through the top surface of the “L” (into the end grain of the 2×4) but also from the sides where the 1×2 or 1×3 meets the wider face of the 2×4. This multi-directional nailing technique, combined with the wood glue, creates an incredibly robust connection that will stand the test of time and support significant weight.
As emphasized, ensure you drive brad nails through the top surface of the “L” pieces directly into the top edge (end grain) of the 2×4. This reinforces the bond significantly and helps prevent any potential twisting or weakening of the joint over time, especially when loaded with mugs.
Crucially, also add nails from the sides of the 1×2 and 1×3 components of the “L” pieces into the face of the 2×4. This provides a complete and incredibly sturdy connection from multiple angles, essential for the overall structural integrity and longevity of your coffee mug display.
Step 4: Complete the Frame by Attaching the Other End 2×4
Repeat the exact same process from Step 3 to attach the second 2×4 support to the opposite end of your “L” pieces. Before permanently fastening, carefully ensure that both end 2x4s are perfectly parallel to each other and that the entire structure remains square. Use a large carpenter’s square or a tape measure to check diagonal measurements to confirm squareness. This step forms the basic rectangular frame of your display. Take your time to align everything perfectly before driving the nails and allowing the glue to set, as this will significantly impact the final appearance and stability of your finished piece.
Step 5: Install the Middle 2×4 Supports
Finally, position and attach any intermediate or middle 2×4 supports as indicated in Jamison’s plans. These intermediate supports are crucial; they provide additional rigidity to the overall display structure and create distinct, organized sections for hanging your mugs. Use the same wood glue and brad nailing technique you meticulously employed for the end pieces. Once all the 2x4s are securely in place, the core construction of your coffee mug display is proudly complete! Take a moment to admire your handiwork, ensure all joints are tight and secure, and marvel at the solid framework you’ve built.
Finishing Touches: Staining and Distressing for Rustic Charm
With the main structure beautifully built, it’s now time to bring out its inherent rustic charm and protect the wood with a high-quality finish.
Step 6: Apply Your Chosen Wood Stain
Before staining, ensure the entire wooden piece is thoroughly sanded smooth. Pay particular attention to removing any pencil marks, excess glue squeeze-out, or rough spots that could affect the stain’s absorption and final appearance. We achieved our desired warm, inviting tone using one coat of Varathane Carrington stain, which perfectly complements a rustic or farmhouse aesthetic. Apply the stain evenly with a brush, foam applicator, or clean rag, working in the direction of the wood grain. After a few minutes, wipe off any excess stain to prevent blotching and achieve a consistent finish. Allow the stain to penetrate and dry completely according to the manufacturer’s instructions, which typically takes several hours. You can apply multiple coats if you desire a deeper, richer color, but for a natural, rustic look, one coat often suffices. Once dry, consider adding a clear protective topcoat (like polyurethane) for enhanced durability and longevity.
Step 7: Optional Distressing for a Vintage Look
Once your stain (and any optional topcoat) has fully dried and cured, you have the opportunity to add an extra layer of character by lightly distressing the wood. Using an orbital sander with fine-grit sandpaper (or even a sanding block), gently rub over edges, corners, and even flat surfaces to subtly remove some of the stain and reveal the lighter wood underneath. This technique masterfully mimics natural wear and tear that occurs over decades, giving your display an authentic, aged, and charmingly rustic appearance that truly stands out. If your preference leans towards a cleaner, more contemporary or modern look, you can certainly skip this step entirely and proceed directly to adding the hooks.
Step 8: Install the Mug Hooks
The final decorative and functional step before mounting is to meticulously add your chosen mug hooks. Carefully measure and mark the desired spacing for your hooks along the bottom edges of your “L” shaped supports. Ensure the spacing is consistent and generous enough for your mugs to hang freely without bumping into each other or making contact with the wall. For a clean, professional finish and to prevent any potential wood splitting, it’s highly recommended to pre-drill small pilot holes before screwing in each hook. Once all the hooks are securely in place and tightened, your beautiful, handcrafted coffee mug display is officially complete and ready to find its home on your wall!
Mounting Your Display Securely to the Wall
Proper and secure installation is paramount to ensure your display can safely hold your entire collection of cherished mugs for years to come.
Step 9: Attach to the Wall Studs
To securely attach your newly crafted display to the wall, you’ll need a reliable stud finder, a spirit level, and your 3″ wood screws. First, use your stud finder to accurately locate the vertical wooden studs within your wall where you plan to hang the display. It’s critical to mount into studs, not just drywall, for maximum weight bearing capacity. Mark these locations clearly with a pencil. Next, carefully hold the display against the wall at your desired height. Use your level to ensure it’s perfectly straight both horizontally and vertically. Once aligned, pre-drill pilot holes through the 2×4 frame of your display and into the marked wall studs. Finally, drive your 3″ screws directly from the front of your display, through these pilot holes, and firmly into the wall studs. Aim for at least two studs for optimal stability and safety, especially if you have a larger display or anticipate hanging heavier mugs. This method ensures your display is anchored firmly and safely to your wall, ready to proudly bear the weight of all your favorite coffee cups.
That’s it! Easy enough, right? You’ve just successfully created a stunning, personalized, and highly functional piece of rustic decor for your home. Now, fill it with your favorite mugs, step back, and enjoy the organized beauty and handcrafted charm you’ve brought to your space!
Customization and Personalization Tips for Your Unique Display
The truly wonderful aspect of this DIY Coffee Mug Display is its incredible versatility and boundless customizability! You are by no means limited to the exact dimensions, lumber choices, or finish we used. Here are a few inspiring ideas to make this project uniquely yours and perfectly suited to your home and personal taste:
- Size it Up or Down to Fit Your Space: Depending on the volume of your mug collection and the available wall space in your kitchen or coffee bar area, you can effortlessly build this display larger or smaller. Simply adjust the lengths of your 2x4s and “L” shaped pieces proportionally according to your specific needs.
- Experiment with Diverse Finishes: While we absolutely loved the warm, rustic stain, consider myriad other options. You could paint your display a vibrant color to match existing kitchen accents, or opt for a sleek, minimalist white or classic black for a more contemporary feel. For an even more antique or shabby chic look, try a distressed paint finish over a darker base coat.
- Choose Different Hooks to Match Your Style: Explore the vast array of hook styles available! From sleek, modern chrome hooks to charming vintage-inspired brass, rustic wrought iron, or simple farmhouse-style pegs, the type of hooks you select can dramatically alter the overall aesthetic of your display.
- Add a Functional Top Shelf: For enhanced functionality and display potential, consider adding a thin top shelf (perhaps a 1×4 or 1×6 board) to the very top of your display. This extra surface can be used to showcase small decorative items, a vibrant succulent, a jar of artisanal coffee beans, or even small recipe cards.
- Personalize with Stencils or Labels: Infuse more personality by adding stenciled words or phrases like “Coffee Bar,” “Mug Life,” “Brew & Enjoy,” or your family’s initial. If you have themed mug collections, you could even label different sections.
- Consider Different Wood Species: While pine is affordable and easy to work with, exploring other wood types like oak, maple, or even reclaimed barn wood can offer different grains, textures, and inherent character to your display.
Concluding Thoughts and Your Free Plans!
We truly hope you’ve enjoyed this detailed guide on building your very own rustic coffee mug display. This project is far more than just a functional storage solution; it’s a fantastic way to inject personalized character, charm, and impeccable organization into your home. The entire process is straightforward and immensely satisfying, culminating in a beautiful, durable piece you’ll be proud to show off to family and friends for years to come. It’s a rewarding undertaking that enhances your daily coffee ritual and brings a handmade touch to your living space.
A massive, heartfelt thank you once again to Jamison at Rogue Engineer for his incredible generosity in providing the completely FREE printable plans! These plans are an invaluable resource for precise measurements, detailed diagrams, and ensuring your build goes as smoothly and successfully as possible. Don’t forget to download them directly HERE to get started!
We always appreciate you stopping by and joining us on our DIY adventures. Happy building, and may your coffee station always be beautifully organized and inspiring!
~Ashley